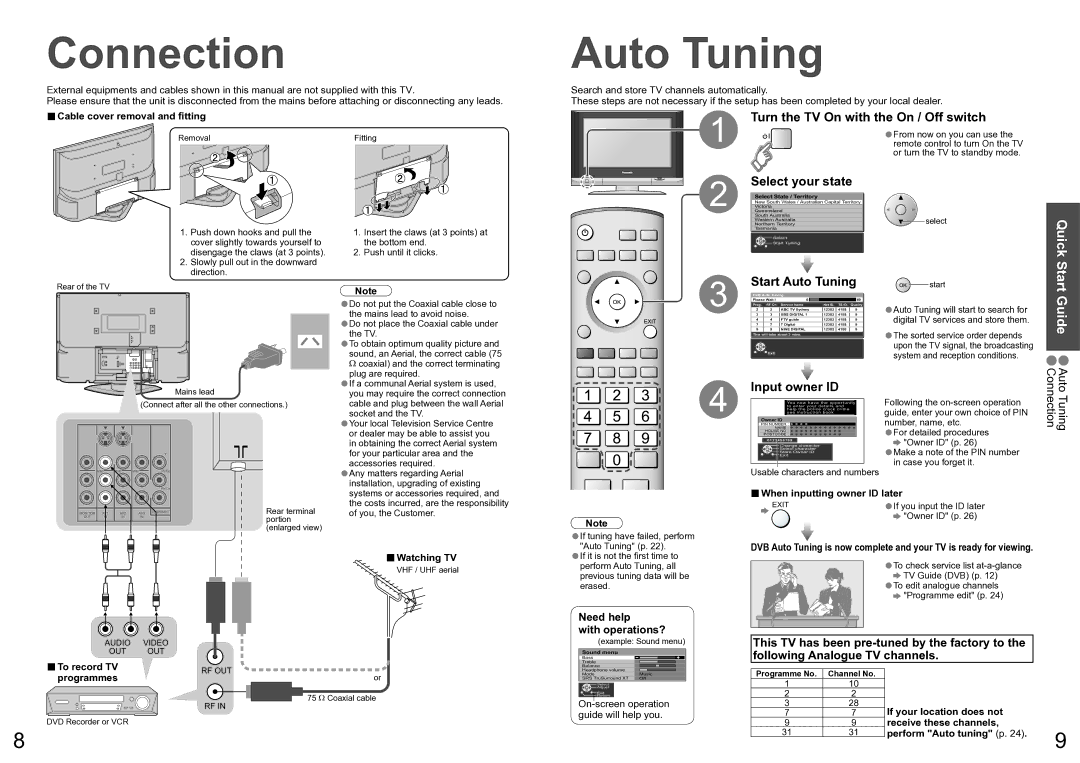
Connection
External equipments and cables shown in this manual are not supplied with this TV.
Please ensure that the unit is disconnected from the mains before attaching or disconnecting any leads.
■Cable cover removal and fitting
Removal | Fitting |
1. | Push down hooks and pull the | 1. | Insert the claws (at 3 points) at |
| cover slightly towards yourself to |
| the bottom end. |
| disengage the claws (at 3 points). | 2. | Push until it clicks. |
2. | Slowly pull out in the downward |
|
|
| direction. |
|
|
Auto Tuning
Search and store TV channels automatically.
These steps are not necessary if the setup has been completed by your local dealer.
1 | Turn the TV On with the On / Off switch | ||||
|
| From now on you can use the | |||
|
| •remote control to turn On the TV | |||
|
|
| or turn the TV to standby mode. | ||
2 | Select your state |
|
|
| |
|
|
|
|
| |
| Select State / Territory |
|
|
| |
| New South Wales / Australian Capital Territory |
|
|
| |
| Victoria |
|
|
| |
| Queensland |
|
|
| |
| South Australia |
|
| select | |
|
| Western Australia |
|
| |
|
| Northern Territory |
|
| |
|
| Tasmania |
|
|
|
Quick Start
Rear of the TV
Note
•Do not put the Coaxial cable close to the mains lead to avoid noise.
•Do not place the Coaxial cable under
•the TV.
To obtain optimum quality picture and sound, an Aerial, the correct cable (75 Ω coaxial) and the correct terminating plug are required.
Guide •
Mains lead
(Connect after all the other connections.)
Y
MONO | MONO | MONO | PB/CB |
|
|
| PR/CR |
MONITOR | AV1 | AV2 | AV3 COMPONENT | Rear terminal |
OUT | IN | IN | IN | portion |
| ||||
|
|
|
| (enlarged view) |
•If a communal Aerial system is used, you may require the correct connection cable and plug between the wall Aerial socket and the TV.
•Your local Television Service Centre or dealer may be able to assist you in obtaining the correct Aerial system for your particular area and the accessories required.
•Any matters regarding Aerial installation, upgrading of existing systems or accessories required, and the costs incurred, are the responsibility of you, the Customer.
Start Auto Tuning
start
3 | DVB Auto Tuning |
|
|
|
|
| ||
Please Wait ! | 6 |
|
|
|
| 69 | ||
Prog. | RF Ch | Service Name |
| Net ID. | TS ID. | Quality | ||
2 | 2 | ABC TV Sydney | 12302 | 4158 | 9 | |||
3 | 3 | SBS DIGITAL 1 | 12302 | 4158 | 9 | |||
| 4 | 4 | FTV guide | 12302 | 4158 | 9 | ||
| 7 | 7 | 7 Digital | 12302 | 4158 | 9 | ||
| 9 | 9 | NINE DIGITAL | 12302 | 4158 | 9 | ||
•Auto Tuning will start to search for digital TV services and store them.
This will take about 3 mins.
 Exit
Exit
•The sorted service order depends upon the TV signal, the broadcasting system and reception conditions.
Note
•If tuning have failed, perform |
Input owner ID
4 |
|
|
|
|
|
|
|
|
|
| Following the | ||
|
|
|
|
| to enter your details and |
|
| ||||||
|
| Owner ID | You now have the opportunity |
|
| guide, enter your own choice of PIN | |||||||
|
| see instruction book |
|
| |||||||||
|
|
|
|
|
| help the police crack crime |
|
|
|
| |||
|
|
|
|
|
|
|
|
|
| number, name, etc. | |||
|
|
| PIN NUMBER : | ∗ ∗ ∗ ∗ |
|
| |||||||
|
|
|
| NAME : | ∗ ∗ ∗ ∗ ∗ ∗ ∗ ∗ ∗ ∗ ∗ ∗ ∗ ∗ |
|
| • | For detailed procedures | ||||
|
|
|
| POSTCODE : | ∗ ∗ ∗ ∗ ∗ ∗ ∗ ∗ ∗ ∗ ∗ |
|
| ||||||
|
|
|
| HOUSE NO : | ∗ ∗ ∗ ∗ ∗ ∗ ∗ ∗ ∗ ∗ ∗ |
|
|
| |||||
|
|
|
|
|
|
|
|
|
|
|
| "Owner ID" (p. 26) | |
|
|
|
|
|
|
|
| ||||||
|
|
|
|
| Change | character |
| ||||||
|
|
| 0123456789 |
|
|
|
|
|
| ||||
|
|
|
|
| Exit |
|
|
|
|
|
| Make a note of the PIN number | |
|
|
|
|
| Select character |
| •in case you forget it. | ||||||
|
|
|
|
| Store Owner ID |
| |||||||
|
|
|
|
|
|
|
|
|
|
|
| ||
| Usable | characters and numbers |
|
| |||||||||
| ■When inputting owner ID later | ||||||||||||
|
|
|
| EXIT |
|
|
|
|
| • | If you input the ID later | ||
|
|
|
|
|
|
|
|
|
|
|
| "Owner ID" (p. 26) | |
|
|
|
|
|
|
|
|
|
|
|
|
|
|
|
|
|
|
|
|
|
|
|
|
|
|
|
|
|
|
|
|
|
|
|
|
|
|
|
|
|
|
|
|
|
|
|
|
|
|
|
|
|
|
|
|
|
|
|
|
|
|
|
|
|
|
|
|
|
|
|
|
|
|
|
|
|
|
|
|
|
|
|
|
|
|
|
|
|
|
|
|
|
|
|
|
|
|
|
|
|
|
|
|
|
|
|
|
|
|
|
|
|
|
|
|
|
|
|
|
|
|
|
|
|
|
|
|
|
|
|
|
|
|
|
|
|
|
|
|
|
|
|
|
|
|
|
|
|
|
|
|
|
|
|
|
|
|
|
|
|
|
|
|
|
|
|
|
Auto Tuning Connection
■Watching TV
VHF / UHF aerial
AUDIO VIDEO
OUT OUT
■To record TV | RF OUT |
programmes | or |
| 75 Ω Coaxial cable |
| RF IN |
DVD Recorder or VCR |
|
8
"Auto Tuning" (p. 22). |
If it is not the first time to |
•perform Auto Tuning, all |
previous tuning data will be |
erased. |
Need help
with operations?
(example: Sound menu)
Sound menu
Bass
Treble |
|
Balance |
|
Headphone volume |
|
Mode | Music |
SRS TruSurround XT | Off |
Select
Adjust
![]() Exit
Exit
Return
DVB Auto Tuning is now complete and your TV is ready for viewing.
•To check service list at-a-glance
 TV Guide (DVB) (p. 12)
•To edit analogue channels ![]() "Programme edit" (p. 24)
"Programme edit" (p. 24)
This TV has been
Programme No. | Channel No. |
|
1 | 10 |
|
2 | 2 |
|
3 | 28 | If your location does not |
7 | 7 | |
9 | 9 | receive these channels, |
31 | 31 | perform "Auto tuning" (p. 24). |
9