INSTALLATION
SunLite® LTC Lamp Housing Installation
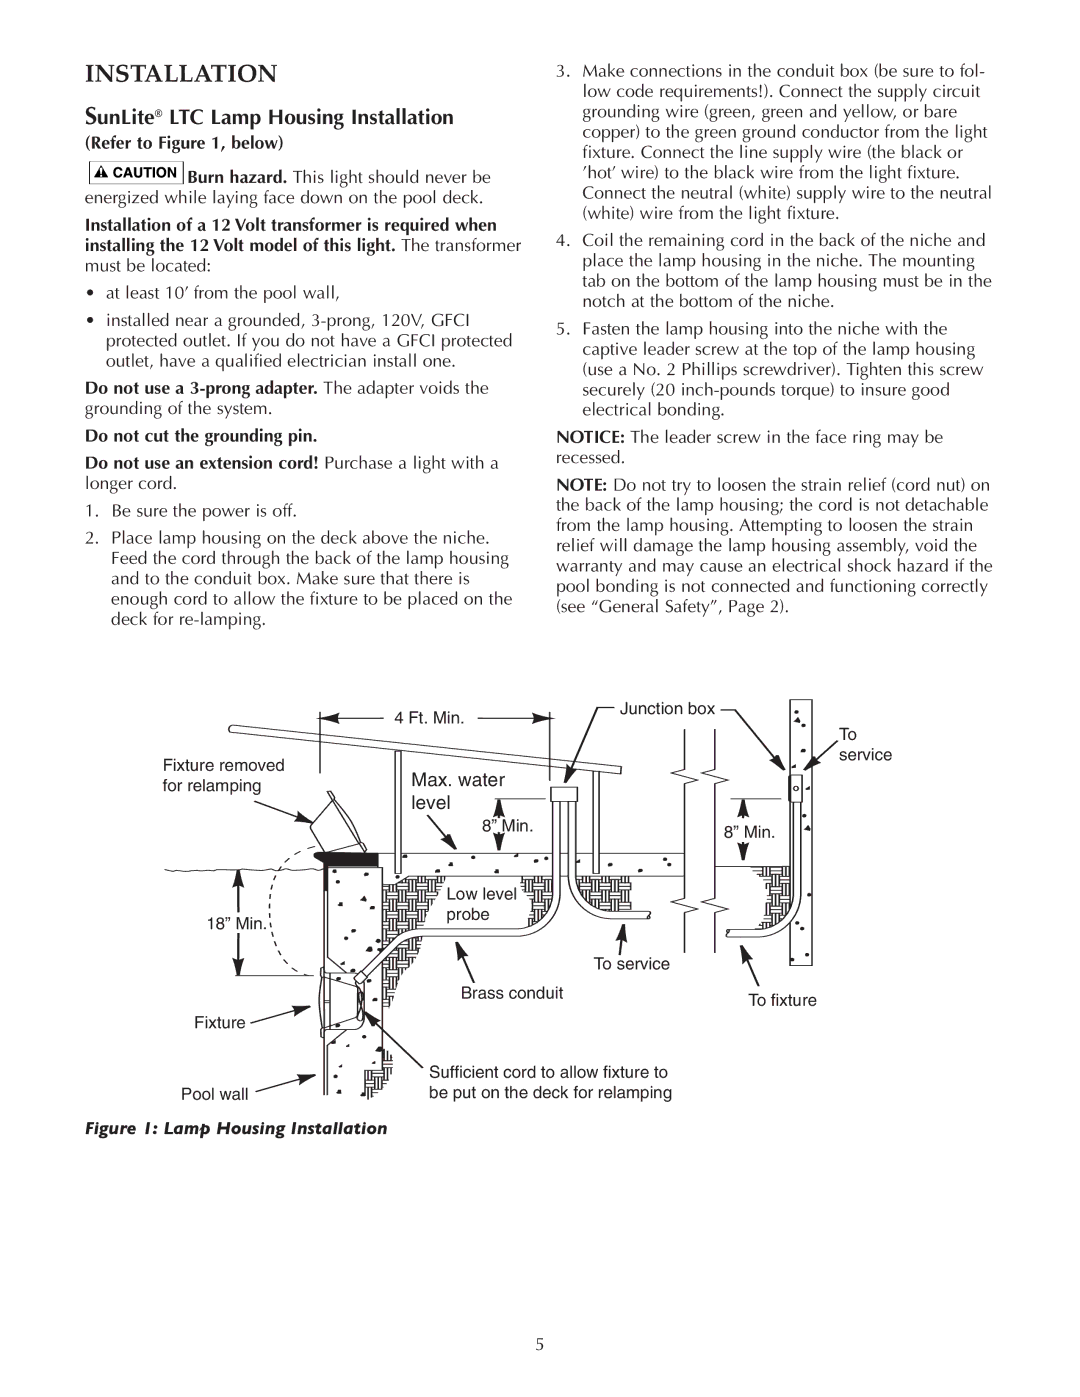
(Refer to Figure 1, below)
![]()
![]()
![]()
![]()
![]()
![]()
![]() Burn hazard. This light should never be energized while laying face down on the pool deck.
Burn hazard. This light should never be energized while laying face down on the pool deck.
Installation of a 12 Volt transformer is required when installing the 12 Volt model of this light. The transformer must be located:
•at least 10’ from the pool wall,
•installed near a grounded,
Do not use a
Do not cut the grounding pin.
Do not use an extension cord! Purchase a light with a longer cord.
1.Be sure the power is off.
2.Place lamp housing on the deck above the niche. Feed the cord through the back of the lamp housing and to the conduit box. Make sure that there is enough cord to allow the fixture to be placed on the deck for
3.Make connections in the conduit box (be sure to fol- low code requirements!). Connect the supply circuit grounding wire (green, green and yellow, or bare copper) to the green ground conductor from the light fixture. Connect the line supply wire (the black or ’hot’ wire) to the black wire from the light fixture. Connect the neutral (white) supply wire to the neutral (white) wire from the light fixture.
4.Coil the remaining cord in the back of the niche and place the lamp housing in the niche. The mounting tab on the bottom of the lamp housing must be in the notch at the bottom of the niche.
5.Fasten the lamp housing into the niche with the captive leader screw at the top of the lamp housing (use a No. 2 Phillips screwdriver). Tighten this screw securely (20
NOTICE: The leader screw in the face ring may be recessed.
NOTE: Do not try to loosen the strain relief (cord nut) on the back of the lamp housing; the cord is not detachable from the lamp housing. Attempting to loosen the strain relief will damage the lamp housing assembly, void the warranty and may cause an electrical shock hazard if the pool bonding is not connected and functioning correctly (see “General Safety”, Page 2).
Fixture removed for relamping
18” Min.
4 Ft. Min.
Max. water  level
level 

8” Min.
![]()
![]()
![]()
![]() Low level
Low level![]()
![]()
![]()
![]()
![]()
![]()
![]()
![]()
![]()
![]()
![]()
![]()
![]()
![]()
![]()
![]()
![]() probe
probe ![]()
![]()
![]()
Junction box |
To |
service |
8” Min. |
To service |
Fixture ![]()
Pool wall
Figure 1: Lamp Housing Installation
Brass conduit | To fixture |
|
Sufficient cord to allow fixture to be put on the deck for relamping
5