Thank you for choosing the PetSafe® brand. You and your pet deserve a companionship that includes memorable moments and a shared understanding together. Our products and training tools promote a lifestyle of protection, teaching, and
PRODUCT WARRANTY
To get the most protection out of your warranty, please register your product within 30 days at www.petsafe.net. By registering and keeping your receipt, you will enjoy the product’s full warranty and should you ever need to call the Customer Care Center, we will be able to help you faster. Most importantly, PetSafe® will never give or sell your valuable information to anyone. Complete warranty information is available online at www.petsafe.net.
Installation Instructions | |||
|
|
| NOTICE |
| If painting the pet door, it is recommended to paint it prior to installation. | ||
|
| For best results, use a primer for plastics before applying paint. | |
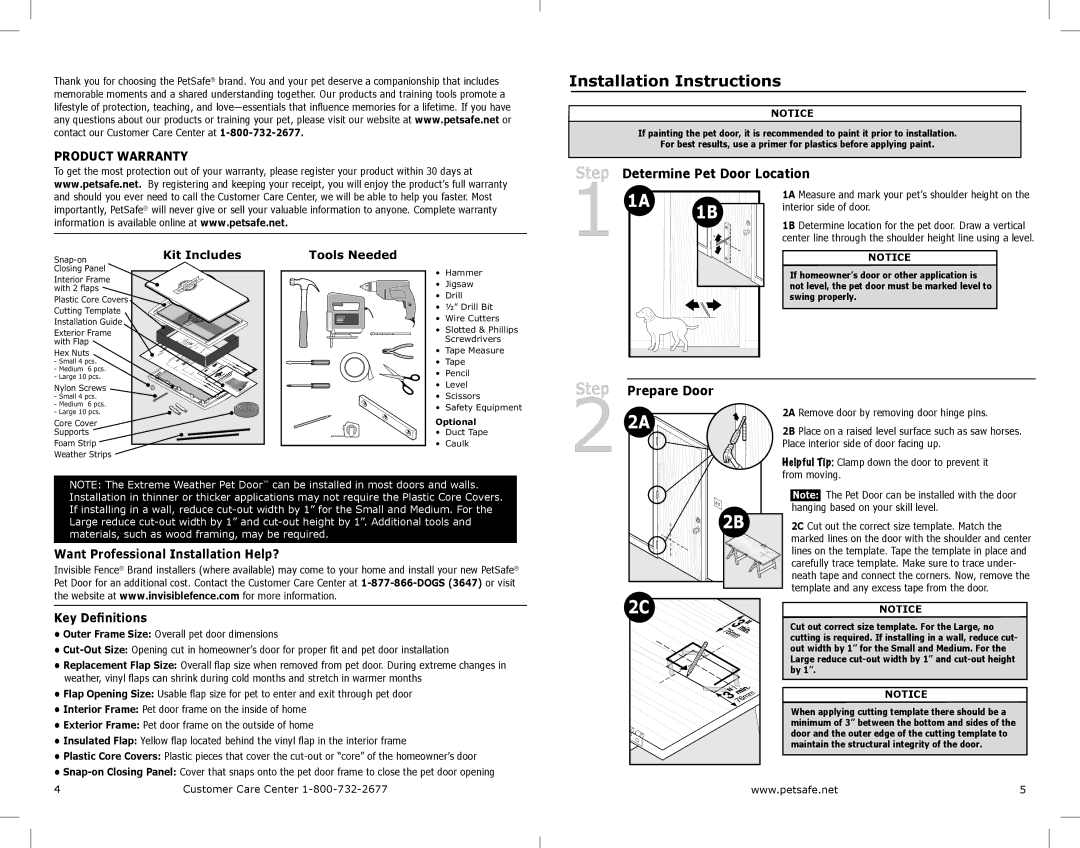
Step Determine Pet Door Location | |||
1 | 1A | 1B | 1A Measure and mark your pet’s shoulder height on the |
interior side of door. | |||
| 1B Determine location for the pet door. Draw a vertical | ||
|
| ||
|
| center line through the shoulder height line using a level. | |
Interior Frame with 2 flaps
Plastic Core Covers Cutting Template Installation Guide
Exterior Frame with Flap
Hex Nuts
- Small 4 pcs. |
- Medium 6 pcs. |
- Large 10 pcs. |
Kit Includes
Tools Needed
• Hammer
• Jigsaw
• Drill
• ½” Drill Bit
• Wire Cutters
• Slotted & Phillips
Screwdrivers
• Tape Measure
• Tape
• Pencil
NOTICE |
If homeowner’s door or other application is |
not level, the pet door must be marked level to |
swing properly. |
Nylon Screws
-Small 4 pcs.
-Medium 6 pcs.
-Large 10 pcs.
Core Cover
Supports
Foam Strip
Weather Strips
• Level
• Scissors
• Safety Equipment
Optional
• Duct Tape
• Caulk
Step
2 Prepare Door
2A
2A Remove door by removing door hinge pins.
2B Place on a raised level surface such as saw horses. Place interior side of door facing up.
Helpful Tip: Clamp down the door to prevent it from moving.
NOTE: The Extreme Weather Pet Door™ can be installed in most doors and walls. Installation in thinner or thicker applications may not require the Plastic Core Covers. If installing in a wall, reduce
Want Professional Installation Help?
Invisible Fence® Brand installers (where available) may come to your home and install your new PetSafe® Pet Door for an additional cost. Contact the Customer Care Center at
2B
Note: The Pet Door can be installed with the door hanging based on your skill level.
2C Cut out the correct size template. Match the marked lines on the door with the shoulder and center lines on the template. Tape the template in place and carefully trace template. Make sure to trace under- neath tape and connect the corners. Now, remove the template and any excess tape from the door.
Key Definitions
•Outer Frame Size: Overall pet door dimensions
•
•Replacement Flap Size: Overall flap size when removed from pet door. During extreme changes in weather, vinyl flaps can shrink during cold months and stretch in warmer months
•Flap Opening Size: Usable flap size for pet to enter and exit through pet door
•Interior Frame: Pet door frame on the inside of home
•Exterior Frame: Pet door frame on the outside of home
•Insulated Flap: Yellow flap located behind the vinyl flap in the interior frame
•Plastic Core Covers: Plastic pieces that cover the
•
4 | Customer Care Center |
2C | NOTICE |
Cut out correct size template. For the Large, no cutting is required. If installing in a wall, reduce cut- out width by 1” for the Small and Medium. For the Large reduce
NOTICE
When applying cutting template there should be a minimum of 3” between the bottom and sides of the door and the outer edge of the cutting template to maintain the structural integrity of the door.
www.petsafe.net | 5 |