Manuals
/
Petsafe
/
Household Appliance
/
Pet Fence
Petsafe
RFA-200
manual
Position the Boundary Wire, To Twist the Boundary Wire 3A, Step, Twists/ft
Models:
RFA-200
1
7
64
64
Download
64 pages
4.39 Kb
4
5
6
7
8
9
10
11
Troubleshooting
Install
Le signal n’est pas constant
Indicator Light
Boundary Wire - 500 ft
Warranty
Resolución de problemas
Sample 5 2H Lake Access
Setup
range, adjust the Boundary
Page 7
Image 7
Page 6
Page 8
Page 7
Image 7
Page 6
Page 8
Contents
Please read this entire guide before beginning
PetSafe Stubborn Dog In-Ground Radio Fence
Operating Guide
Table of Contents
Training Guide
Battery
Fence Transmitter Power Adapter
Boundary Wire - 500 ft
Wire Nuts
Receiver Collar
How the System Works
Key Definitions
Fence Transmitter
Step
Operating Guide
Step Locate the Fence Transmitter
Lay Out the System
Sample 5 2H Lake Access
Sample Layouts
Double Loop
Sample 2 2E Perimeter Loop Using Existing Fence Single Loop
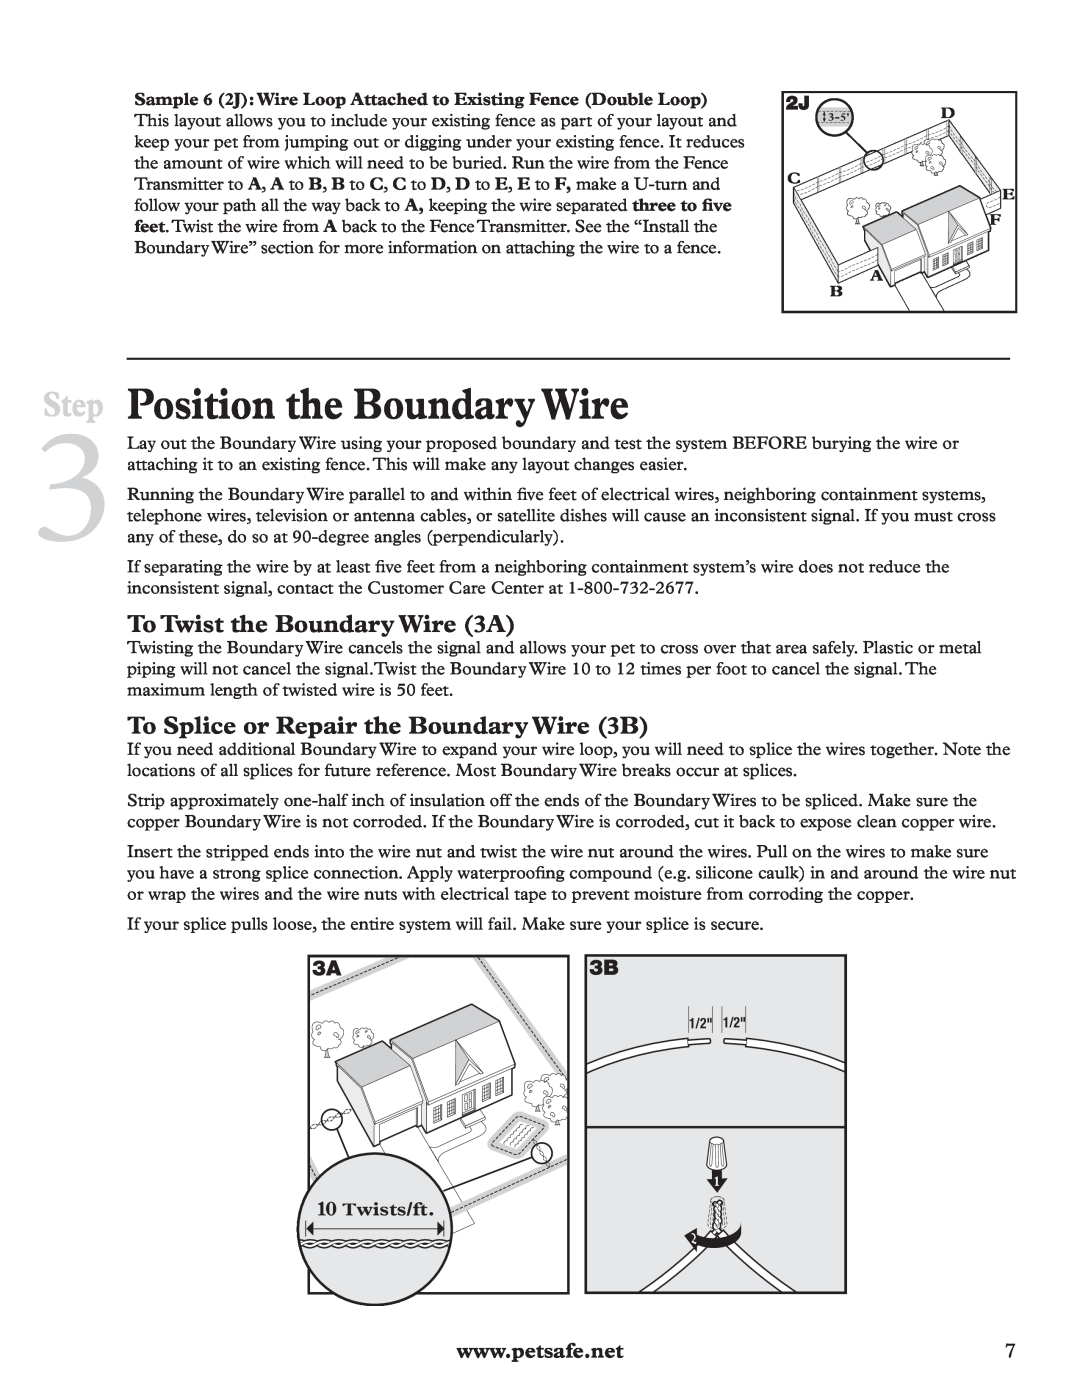
Sample 6 2J Wire Loop Attached to Existing Fence Double Loop
Position the Boundary Wire
To Twist the Boundary Wire 3A
To Splice or Repair the Boundary Wire 3B
To Insert and Remove the Battery
Connect the Wires to the Fence Transmitter
Additional Boundary Wire
Boundary Wire 4A
Correction Level
Function and Response Table
To Set the Correction Level
Indicator Light
Zones, make sure the Receiver Collar battery is
Set the Boundary Width and Test the Receiver Collar
Amount of Wire
Setting
To Bury the Boundary Wire
Install the Boundary Wire
To Attach the Boundary Wire to an Existing Fence
Step
Place the Boundary Flags
Fit the Receiver Collar
To Cross Hard Surfaces driveways, sidewalks, etc
9B 9C
To Re-Thread the Collar
If the condition persists beyond 48 hours, see your veterinarian
Day 1 - Boundary Flag Awareness
Phase
Training Guide
Be Patient With Your Pet
Days 2 thru 4 - Continue Boundary Flag Awareness
Days 5 thru 8 - Distraction Phase
Congratulations!You have now successfully completed the
Days 9 thru 14 - Unleashed Supervision
Days 15 thru 30 - Pet Monitoring
Taking Your Pet Out of the Pet Area
Component
Accessories
Part Number
The Power and Loop Indicator Lights
Troubleshooting
top of the Boundary Wire to activate
I have an inconsistent signal
Short Loop Test
Additional Information
2. Proper Use
To Locate a Break in the Boundary Wire
Terms of Use and Limitation of Liability
1. Terms of Use
Product Warranty
Manuel de dressage
Table des matières
Français
Manuel d’utilisation
Contacteurs longs
Autres éléments pouvant s’avérer nécessaires
Émetteur de clôture
contacteurs courts
Collier récepteur
Fonctionnement du système
Définitions
Émetteur de clôture
Étape
Étape Emplacement de l’émetteur de clôture
Manuel d’utilisation
Schéma du système
Exemple 3 2F Cour avant ou arrière seulement boucle double
Exemples de schémas
Boucle double
Exemple 1 Périmètre en boucle boucle simple
Exemple 6 2J Boucle attachée à une clôture existante boucle double
Pose du fil périphérique
Pour torsader le fil périphérique 3A
Pour raccorder ou réparer le fil périphérique 3B
Fil périphérique supplémentaire
Étape Raccordement des fils à l’émetteur
de clôture
Préparation du collier récepteur
Niveau de
Tableau des fonctions et réponses
Réglage du niveau de correction
Réponse du
Réglage
Définition de la largeur du périmètre et essai du collier récepteur
d’abord que la pile est correctement installée et
Quantité de fil
Enfouissement du fil périphérique
Installer le fil périphérique
Attacher le fil périphérique à une clôture existante
Entrée ou trottoir en béton
Étape Installation des fanions de délimitation
Ajustement du collier récepteur
Pour traverser des surfaces dures entrées, trottoirs, etc
Renfiler le collier
Objectif
Manuel de dressage
Soyez patient avec votre animal
Jour 1 - Familiarisation avec les fanions de délimitation
Jours 2 à 4 - Familiarisation avec les fanions de délimitation suite
Jours 5 à 8 - Phase de distraction
Félicitations ! Vous avez maintenant terminé avec succès
Jours 9 à 14 - Supervision sans laisse
Jours 15 à 30 - Observation de l’animal
Sortir votre animal de la zone autorisée
Composants
Accessoires
Numéro du composant
Le collier récepteur n’émet pas de bips
Dépannage
Le signal n’est pas constant
et l’émetteur de clôture émet l’alarme
Test en boucle courte
Renseignements complémentaires
2. Utilisation
Repérage des ruptures de fil
Conditions d’utilisation et limite de responsabilité
1. Conditions d’utilisation
Garantie du produit
Mise en garde
Augmenter la distance entre l’équipement et le récepteur
Guía de entrenamiento
Tabla de contenidos
Español
Guía de uso
Tuercas para cables
Otras herramientas que puede necesitar
Transmisor de cerca
Cable delimitador 500 pies
Collar receptor
Cómo funciona el sistema
Definiciones importantes
Transmisor de cerca
Paso
Guía de uso
Sitúe el transmisor de cerca
Prepare el sistema
Muestra 5 2H Acceso a
Muestras de diseños
Circuito doble
Muestra 1 Circuito perimetral un circuito
10 vueltas
Coloque el cable delimitador
Para torcer el cable delimitador 3A
Para unir o reparar el cable delimitador 3B
4 Cable delimitador 4A
Paso Conecte los cables al transmisor de cerca
Prepare el collar receptor
Cable delimitador adicional
Nivel de
Tabla de funciones y respuestas
Para establecer el nivel de corrección
Respuesta de la
Nota El collar receptor es
Establezca la amplitud de límites y pruebe el collar receptor
Cantidad de cable
Ajuste
Para enterrar el cable delimitador
Instale el cable delimitador
Para fijar el cable delimitador a una cerca existente
Nota Si no puede oír el tono, consulte las
Paso Coloque las banderas delimitadoras
Ajuste el collar receptor
Para cruzar superficies duras cocheras, banquetas, etc
Para trenzar el collar
Fase
Guía de entrenamiento
Tenga paciencia con su mascota
Día 1 conciencia de las banderas delimitadoras
Días 2 a 4 conciencia de las banderas delimitadoras continuación
Días 5 a 8 etapa de distracción
¡Felicitaciones! Ahora ha completado con éxito el
Días 9 a 14 supervisión sin correa
Días 15 a 30 observación de la mascota
Saque a la mascota de su área
Componente
Accesorios
Número de pieza
o correcciones
Resolución de problemas
apagada y la alarma de circuito del
El collar receptor no emite tonos
Prueba de circuito corto
Información adicional
2. Uso adecuado
Para encontrar una separación en el cable delimitador
Términos de uso y limitación de responsabilidad
1. Términos de uso
Garantía del producto
Precaución
Reoriente o reubique la antena receptora
Page
Page
Drill Here Percez ici Perfore aqu
Mounting Template Gabarit de montage Plantilla de instalación
Layout Grid/Grille de schéma/Cuadrícula de diseño
3.000 7.62 cm
Top
Page
Image
Contents