1. Connecting the TV-Video Combi

Important for the United Kingdom

This apparatus is fitted with an approved 5 Amp plug. To change a fuse in this type of plug proceed as fol- lows:

1.Remove fuse cover and fuse.

2.Fix new fuse which should be a BS1362 5A,ASTA or BSI approved type.

3.Refit the fuse cover.

If the fitted plug is not suitable for your socket outlets, it should be cut off and an appropriate plug fitted in its place.

If the mains plug contains a fuse, this should have a value of 5A. If a plug without a fuse is used, the fuse at the distribution board should not be greater than 5A.

The severed plug must be destroyed to avoid a possible shock hazard should it be inserted into a 13A socket elsewhere.

How to connect a plug:

The wires in the mains lead are coloured in accordance with the following code:

BLUE- 'NEUTRAL' ('N')

BROWN- 'LIVE' ('L')

4.The BLUE wire must be connected to the ter- minal which is marked with the letter 'N' or coloured BLACK.

5.The BROWN wire must be connected to the terminal which is marked with the letter 'L' or coloured RED.

6.Do not connect either wires to the earth ter- minal in the plug which is marked with the letter 'E' or by the safety earth symbol or coloured green or green-and-yellow.

Before replacing the plug cover, make certain that the cord grip is clamped over the sheath of the lead-not imply over the two wires.

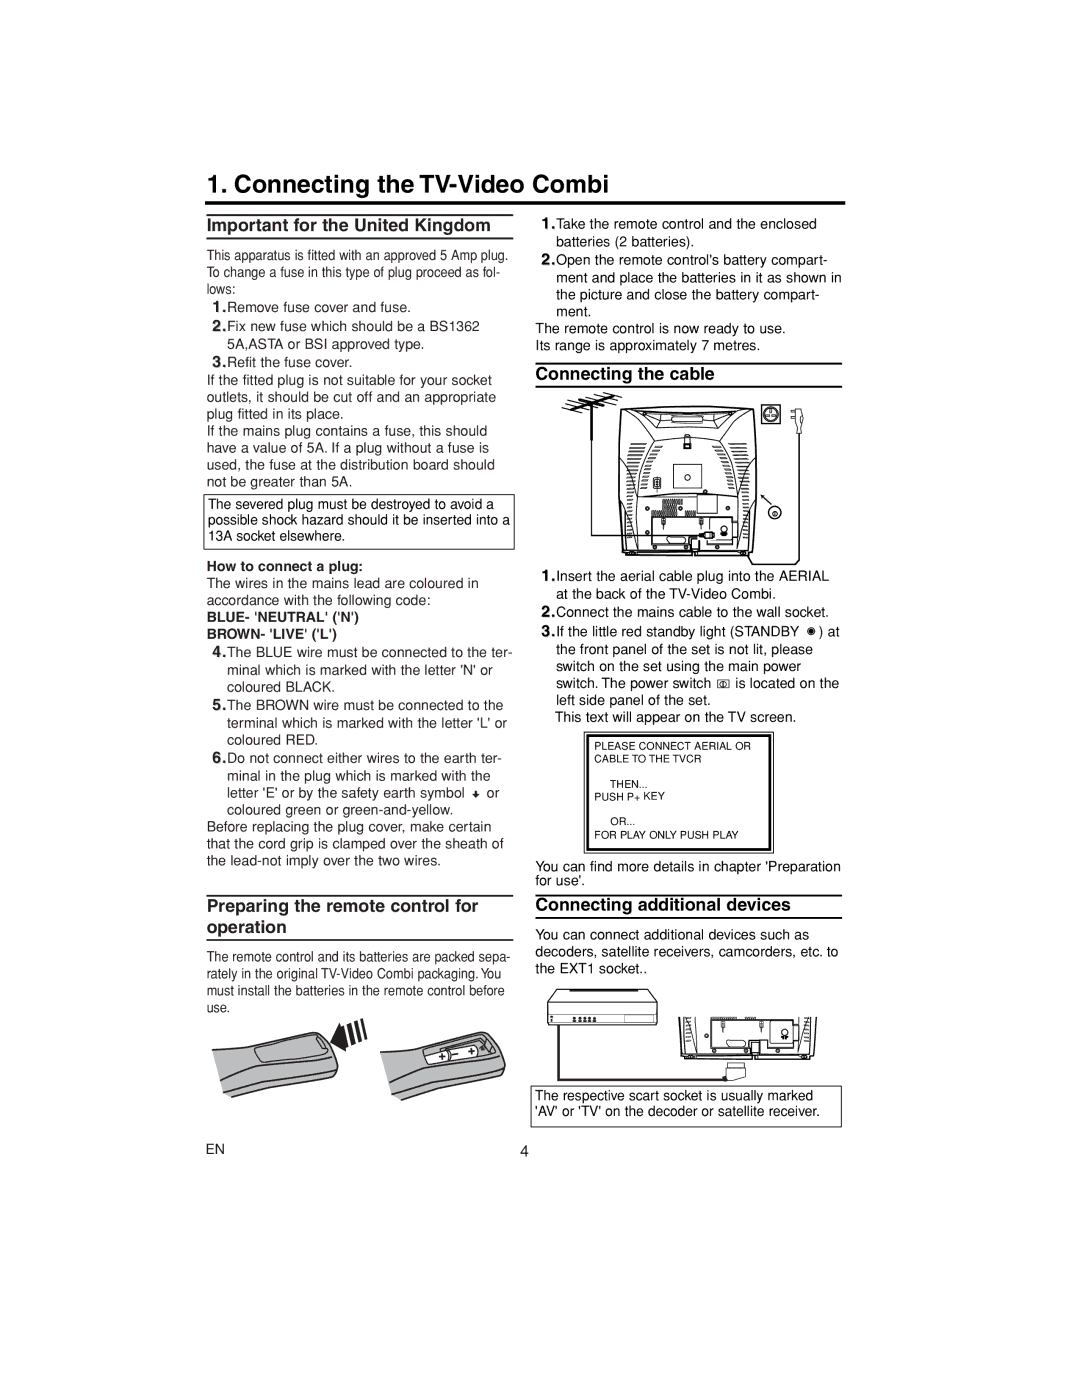
1.Take the remote control and the enclosed batteries (2 batteries).

2.Open the remote control's battery compart- ment and place the batteries in it as shown in the picture and close the battery compart- ment.

The remote control is now ready to use. Its range is approximately 7 metres.

Connecting the cable

1.Insert the aerial cable plug into the AERIAL at the back of the TV-Video Combi.

2.Connect the mains cable to the wall socket.

3.If the little red standby light (STANDBY ) at the front panel of the set is not lit, please switch on the set using the main power switch. The power switch is located on the left side panel of the set.

This text will appear on the TV screen.

PLEASE CONNECT AERIAL OR

CABLE TO THE TVCR

THEN...

PUSH P+ KEY

OR...

FOR PLAY ONLY PUSH PLAY

You can find more details in chapter 'Preparation for use'.

Preparing the remote control for operation

The remote control and its batteries are packed sepa- rately in the original TV-Video Combi packaging. You must install the batteries in the remote control before use.

EN

Connecting additional devices

You can connect additional devices such as decoders, satellite receivers, camcorders, etc. to the EXT1 socket..

The respective scart socket is usually marked 'AV' or 'TV' on the decoder or satellite receiver.

4

Page 4
Image 4
Philips 14PV112/07, 14PV203/07 Connecting the TV-Video Combi, Important for the United Kingdom, Connecting the cable

14PV460/07, 14PV203/07, 14PV111/07, 14PV415/07, 14PV112/07 specifications

The Philips 14PV112/07, 14PV415/07, 14PV111/07, 14PV203/07, and 14PV460/07 are part of Philips' innovative range of compact televisions that cater to diverse viewing preferences. Designed with a blend of functionality and user-friendly features, these models deliver quality performance while maintaining a compact footprint, ideal for small living spaces or secondary rooms.

The Philips 14PV112/07 is known for its clear picture quality and is equipped with a 14-inch screen. This model excels in delivering vibrant colors and sharp images, making it ideal for casual viewing. It incorporates the innovative EasyLink feature, allowing seamless connectivity with compatible devices.

The Philips 14PV415/07 features a similar screen size but elevates the user experience with enhanced sound quality. It comes with built-in stereo speakers that deliver clean and powerful audio, ensuring an immersive experience for viewers. Additionally, it supports multiple input options, making it versatile for connecting different devices such as gaming consoles and DVD players.

The Philips 14PV111/07 stands out with its sleek design and energy-efficient operation. This model is equipped with a unique power-saving feature, reducing energy consumption without compromising performance. It also includes an easy-to-navigate on-screen menu, allowing users to customize their settings effortlessly.

The 14PV203/07 model is recognized for its advanced picture enhancement technology, which optimally adjusts the display settings based on the content being played. This results in an overall improved viewing experience, with clearer images and enhanced contrast ratios. Its compact design makes it an excellent choice for kitchens or bedrooms.

Lastly, the Philips 14PV460/07 is a powerful model that combines a 14-inch display with features like a digital tuner for superior reception of local channels. This model emphasizes connectivity, with multiple HDMI and USB ports that facilitate various multimedia options. The sleek appearance and modern aesthetics of this model make it a stylish addition to any room.

Overall, these Philips television models are designed to accommodate a variety of needs while providing reliable performance, exceptional picture quality, and enhanced sound. Whether for entertainment or everyday viewing, these TVs offer stylish solutions tailored to today’s diverse media consumption trends.