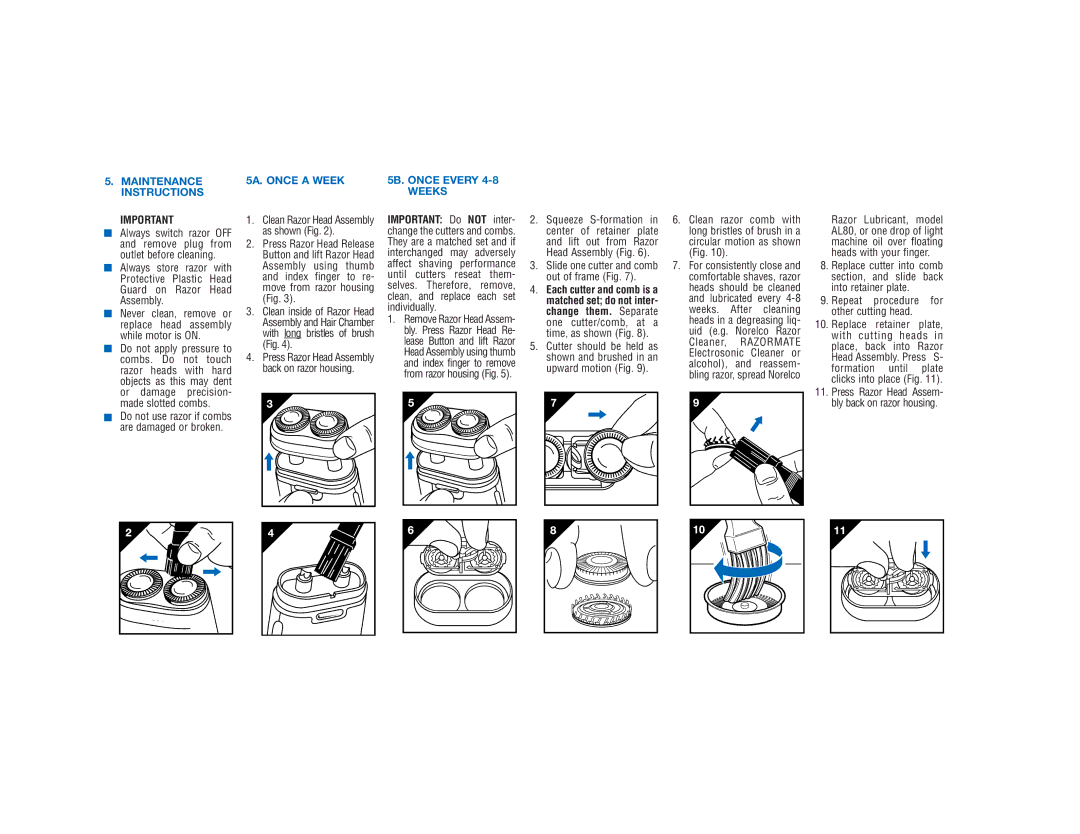
5.MAINTENANCE INSTRUCTIONS
IMPORTANT
■Always switch razor OFF and remove plug from outlet before cleaning.
■Always store razor with Protective Plastic Head Guard on Razor Head Assembly.
■Never clean, remove or replace head assembly while motor is ON.
■Do not apply pressure to combs. Do not touch razor heads with hard objects as this may dent or damage precision- made slotted combs.
■Do not use razor if combs are damaged or broken.
5A. ONCE A WEEK
1.Clean Razor Head Assembly as shown (Fig. 2).
2.Press Razor Head Release Button and lift Razor Head Assembly using thumb and index finger to re- move from razor housing (Fig. 3).
3.Clean inside of Razor Head Assembly and Hair Chamber with long bristles of brush (Fig. 4).
4.Press Razor Head Assembly back on razor housing.
5B. ONCE EVERY 4-8
WEEKS
IMPORTANT: Do NOT inter- change the cutters and combs. They are a matched set and if interchanged may adversely affect shaving performance until cutters reseat them- selves. Therefore, remove, clean, and replace each set individually.
1.Remove Razor Head Assem- bly. Press Razor Head Re- lease Button and lift Razor Head Assembly using thumb and index finger to remove from razor housing (Fig. 5).
2.Squeeze
3.Slide one cutter and comb out of frame (Fig. 7).
4.Each cutter and comb is a matched set; do not inter- change them. Separate one cutter/comb, at a time, as shown (Fig. 8).
5.Cutter should be held as shown and brushed in an upward motion (Fig. 9).
6.Clean razor comb with long bristles of brush in a circular motion as shown (Fig. 10).
7.For consistently close and comfortable shaves, razor heads should be cleaned and lubricated every
Razor Lubricant, model AL80, or one drop of light machine oil over floating heads with your finger.
8.Replace cutter into comb section, and slide back into retainer plate.
9.Repeat procedure for other cutting head.
10.Replace retainer plate, with cutting heads in place, back into Razor Head Assembly. Press S- formation until plate clicks into place (Fig. 11).
11.Press Razor Head Assem- bly back on razor housing.