XP AZ 3038/00 6x3 1/3
English | CONTROLS |
POWER SUPPLY
GENERAL OPERATION | DIGITAL TUNER |
Français COMMANDES
ALIMENTATION
ALIMENTATION | DIGITAL TUNER |
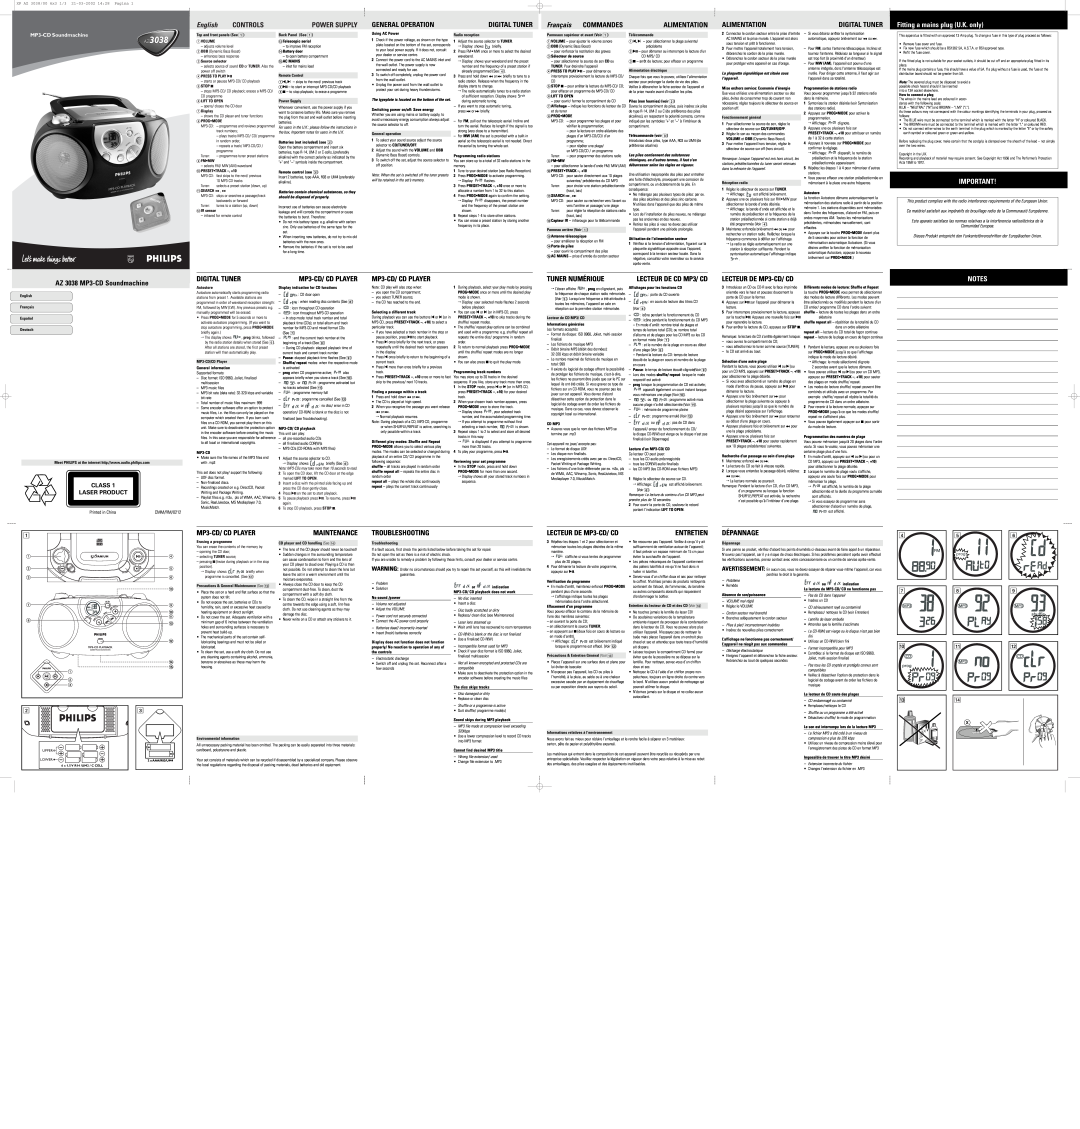
Fitting a mains plug (U.K. only)
Top and front panels (See 1) | ||
AZAZ30383038 | 1VOLUME |
|
| – adjusts volume level | |
| 2DBB (Dynamic Bass Boost) | |
| – enhances bass response | |
| 3Source selector | |
| – selects source of sound CD or TUNER. Also the | |
| power off switch | |
| 4PRESS TO PLAY 2; | |
| – starts or pauses | |
| 5STOP 9 |
|
| – stops | |
| CD programme | |
| 6LIFT TO OPEN | |
| – opens/ closes the CD door | |
| 7Display |
|
| – shows the CD player and tuner functions | |
| 8PROG•MODE | |
| ||
|
| track numbers; |
|
| – plays tracks |
|
| in random order; |
|
| – repeats a track/ |
|
| programme |
| Tuner: | – programmes tuner preset stations |
| 9FM•MW |
|
| – selects FM/ MW (AM) waveband | |
| 0PRESET•TRACK | |
| ||
|
| 10 |
| Tuner: | selects a preset station (down, up) |
| !SEARCH ∞ , § | |
| ||
|
| backwards or forward |
| Tuner: | tunes to a station (up, down) |
| @IR sensor |
|
| – infrared for remote control | |
Back Panel (See 1)
#Telescopic aerial
–to improve FM reception $Battery door
–to open battery compartment
%AC MAINS
–inlet for mains lead
Remote Control
1¡, ™ – skips to the next/ previous track
22; – to start or interrupt
Power Supply
Whenever convenient, use the power supply if you want to conserve battery life. Make sure you remove the plug from the set and wall outlet before inserting batteries.
For users in the U.K.: please follow the instructions in the box, Important notes for users in the U.K.
Batteries (not included) (see 2)
Open the battery compartment and insert six batteries, type
Remote control (see 3)
Insert 2 batteries, type AAA, R03 or UM4 (preferably alkaline).
Batteries contain chemical substances, so they should be disposed of properly.
Incorrect use of batteries can cause electrolyte leakage and will corrode the compartment or cause the batteries to burst. Therefore:
•Do not mix battery types: e.g. alkaline with carbon zinc. Only use batteries of the same type for the set.
•When inserting new batteries, do not try to mix old batteries with the new ones.
•Remove the batteries if the set is not to be used for a long time.
Using AC Power
1Check if the power voltage, as shown on the type plate located on the bottom of the set, corresponds to your local power supply. If it does not, consult your dealer or service centre.
2Connect the power cord to the AC MAINS inlet and the wall outlet. The power supply is now connected and ready for use.
3To switch off completely, unplug the power cord from the wall outlet.
•Unplug the power cord from the wall outlet to protect your set during heavy thunderstorms.
The typeplate is located on the bottom of the set.
Switching power on/off: Save energy
Whether you are using mains or battery supply, to avoid unnecessary energy consumption always adjust the source selector to off.
General operation
1To select your sound source adjust the source selector to CD/TUNER/OFF.
2Adjust the sound with the VOLUME and DBB (Dynamic Bass Boost) controls.
3To switch off the set, adjust the source selector to off position.
Note: When the set is switched off the tuner presets will be retained in the set’s memory.
Radio reception
1Adjust the source selector to TUNER.
™Display: shows ![]()
![]()
![]() briefly.
briefly.
2Press FM•MW once or more to select the desired waveband.
™Display: shows your waveband and the preset number and the frequency of a preset station if already programmed (See 4).
3Press and hold down ∞ or § briefly to tune to a radio station. Release when the frequency in the display starts to change.
™The radio automatically tunes to a radio station of sufficient reception. Display shows ![]()
![]()
![]()
![]() during automatic tuning.
during automatic tuning.
–If you want to stop automatic tuning, press ∞ or § briefly.
–For FM, pull out the telescopic aerial. Incline and turn the aerial. Reduce its length if the signal is too strong (very close to a transmitter).
–For MW (AM) the set is provided with a
Programming radio stations
You can store up to a total of 32 radio stations in the memory.
1Tune to your desired station (see Radio Reception).
2Press PROG•MODE to activate programming.
™Display: ![]()
![]()
![]()
![]() flashes.
flashes.
3Press PRESET•TRACK
4Press PROG•MODE again to confirm the setting.
™Display: ![]()
![]()
![]()
![]()
![]() disappears, the preset number and the frequency of the preset station are shown.
disappears, the preset number and the frequency of the preset station are shown.
5Repeat steps
•You can erase a preset station by storing another frequency in its place.
Panneaux supérieur et avant (Voir 1)
1VOLUME – pour ajuster le volume sonore
2DBB (Dynamic Bass Boost)
–pour renforcer la restitution des graves
3Sélecteur de source
–pour sélectionner la source de son CD ou TUNER. Pour éteindre l'appareil
4PRESS TO PLAY 2; – pour démarrer ou interrompre provisoirement la lecture du
CD
5STOP 9 – pour arrêter la lecture du
6LIFT TO OPEN
– pour ouvrir/ fermer le compartiment de CD
7Affichage – indique les fonctions du lecteur de CD et du tuner
8PROG•MODE
–pour la lecture en ordre aléatoire des plages d’un
–pour répéter une plage/
| un |
Tuner: | – pour programmer des stations radio |
9FM•MW
–pour sélectionner la bande d'onde FM/ MW (AM)
0PRESET•TRACK
Tuner: | pour choisir une station présélectionnée |
| (haut, bas) |
!SEARCH ∞ , §
Tuner: | pour régler la réception de stations radio |
| (haut, bas) |
@Capteur IR – infrarouge pour la télécommande
Panneau arrière (Voir 1)
#Antenne télescopique
–pour améliorer la réception en FM $Porte de piles
–pour ouvrir le compartiment des piles
%AC MAINS – prise d'entrée du cordon secteur
Télécommande
1¡, ™ – pour sélectionner la plage suivante/ précédente
22; – pour démarrer ou interrompre la lecture d’un CD MP3/ CD
39 – arrêt de lecture; pour effacer un programme
Alimentation électrique
Chaque fois que vous le pouvez, utilisez l'alimentation secteur pour prolonger la durée de vie des piles. Veillez à débrancher la fiche secteur de l’appareil et de la prise murale avant d'installer les piles.
Piles (non fournies) (voir 2)
Ouvrez le compartiment de piles, puis insérez six piles de type
Télécommande (voir 3)
Introduisez deux piles, type AAA, R03 ou UM4 (de préférence alcaline).
Les piles contiennent des substances chimiques, en d'autres termes, il faut s'en débarrasser selon les règles en vigueur.
Une utilisation inappropriée des piles peut entraîner une fuite d'électrolyte, provoquant une corrosion du compartiment, ou un éclatement de la pile. En conséquence:
•Ne mélangez pas plusieurs types de piles: par ex. des piles alcalines et des piles
•Lors de l'installation de piles neuves, ne mélangez pas les anciennes et des neuves.
•Retirez les piles si vous ne devez pas utiliser l'appareil pendant une période prolongée.
Utilisation de l'alimentation secteur
1Vérifiez si la tension d'alimentation, figurant sur la plaquette signalétique apposée sous l'appareil, correspond à la tension secteur locale. Dans la négative, consultez votre revendeur ou le service
2Connectez le cordon secteur entre la prise d'entrée AC MAINS et la prise murale. L'appareil est alors sous tension et prêt à fonctionner.
3Pour mettre l'appareil totalement hors tension, débranchez le cordon de la prise murale.
•Débranchez le cordon secteur de la prise murale pour protéger votre appareil en cas d'orage.
La plaquette signalétique est située sous l'appareil.
Mise en/hors service: Economie d’énergie
Que vous utilisiez une alimentation secteur ou des piles, évitez de consommer trop de courant non nécessaire; réglez toujours le sélecteur de source en position off.
Fonctionnement général
1Pour sélectionner la source de son, réglez le sélecteur de source sur CD/TUNER/OFF.
2Réglez le son au moyen des commandes VOLUME et DBB (Dynamic Bass Boost).
3Pour mettre l’appareil hors tension, réglez le sélecteur de source sur off (hors circuit).
Remarque: Lorsque l’appareil est mis hors circuit, les stations présélectionnées du tuner seront retenues dans la mémoire de l'appareil.
Réception radio
1Réglez le sélecteur de source sur TUNER.
™Affichage: ![]()
![]()
![]() est affiché brièvement.
est affiché brièvement.
2Appuyez une ou plusieurs fois sur FM•MW pour sélectionner la bande d’onde désirée.
™Affichage: la bande d’onde est affichée et le numéro de présélection et la fréquence de la station présélectionnée si cette station a déjà été programmée (Voir 4).
3Maintenez enfoncée brièvement ∞ ou § pour rechercher un station radio. Relâchez lorsque la fréquence commence à défiler sur l'affichage.
™La radio se règle automatiquement sur une station à réception suffisante. Pendant la syntonisation automatique l'affichage indique ![]()
![]()
![]()
![]() .
.
–Si vous désirez arrêter la syntonisation automatique, appuyez brièvement sur ∞ ou §.
–Pour FM, sortez l'antenne télescopique. Inclinez et tournez l'antenne. Réduisez sa longueur si le signal est trop fort (à proximité d'un émetteur).
–Pour MW (AM), l'appareil est pourvu d'une antenne intégrée, donc l'antenne télescopique est inutile. Pour diriger cette antenne, il faut agir sur l'appareil dans sa totalité.
Programmation de stations radio
Vous pouvez programmer jusqu’à 32 stations radio dans la mémoire.
1Syntonisez la station désirée (voir Syntonisation des stations radio).
2Appuyez sur PROG•MODE pour activer la programmation.
™Affichage: ![]()
![]()
![]()
![]() clignote.
clignote.
3Appuyez une ou plusieurs fois sur PRESET•TRACK
4Appuyez à nouveau sur PROG•MODE pour confirmer le réglage.
™Affichage: ![]()
![]()
![]()
![]()
![]() disparaît, le numéro de présélection et la fréquence de la station présélectionnée apparaissent.
disparaît, le numéro de présélection et la fréquence de la station présélectionnée apparaissent.
5Répétez les étapes 1 à 4 pour mémoriser d’autres stations.
•Vous pouvez effacer une station présélectionnée en mémorisant à la place une autre fréquence.
Autostore
La fonction Autostore démarre automatiquement la mémorisation des stations radio à partir de la position mémoire 1. Les stations disponibles sont mémorisées dans l’ordre des fréquences, d’abord en FM, puis en ondes moyennes AM. Toutes les mémorisations précédentes, mémorisées manuellement, sont effacées.
•Appuyez sur la touche PROG•MODE durant plus de 5 secondes pour activer la fonction de mémorisation automatique Autostore. (Si vous désirez arrêter la fonction de mémorisation automatique Autostore, appuyez à nouveau brièvement sur PROG•MODE.)
This apparatus is fitted with an approved 13 Amp plug. To change a fuse in this type of plug proceed as follows:
•Remove fuse cover and fuse.
•Fix new fuse which should be a BS1362 5A, A.S.T.A. or BSI approved type.
•Refit the fuse cover.
If the fitted plug is not suitable for your socket outlets, it should be cut off and an appropriate plug fitted in its place.
If the mains plug contains a fuse, this should have a value of 5A. If a plug without a fuse is used, the fuse at the distribution board should not be greater than 5A.
Note: The severed plug must be disposed to avoid a possible shock hazard should it be inserted
into a 13A socket elsewhere.
How to connect a plug
The wires in the mains lead are coloured in accor- dance with the following code:
BLUE – "NEUTRAL" ("N") and BROWN – "LIVE" ("L").
As these colours may not correspond with the colour markings identifying the terminals in your plug, proceed as follows:
•The BLUE wire must be connected to the terminal which is marked with the letter "N" or coloured BLACK.
•The BROWN wire must be connected to the terminal which is marked with the letter "L" or coloured RED.
•Do not connect either wires to the earth terminal in the plug which is marked by the letter "E" or by the safety earth symbol or coloured green or
Before replacing the plug cover, make certain that the cordgrip is clamped over the sheath of the lead – not simply over the two wires.
Copyright in the U.K.
Recording and playback of material may require consent. See Copyright Act 1956 and The Performer’s Protection Acts 1958 to 1972.
IMPORTANT!
This product complies with the radio interference requirements of the European Union.
Ce matériel satisfait aux impératifs de brouillage radio de la Communauté Européenne.
Este aparato satisface las normas relativas a la interferencia radioeléctrica de la
Comunidad Europea.
Dieses Produkt entspricht den Funkentstörvorschriften der Europäischen Union.
AZ 3038
DIGITAL TUNER
TUNER NUMÉRIQUE | LECTEUR DE CD MP3/ CD |
LECTEUR DE
NOTES
English
Français
Español
Deutsch
Meet PHILIPS at the internet http://www.audio.philips.com
CLASS 1
LASER PRODUCT
Printed in China | CMM/RM/0212 |
Autostore
Autostore automatically starts programming radio stations from preset 1. Available stations are programmed in order of waveband reception strength: FM, followed by MW (LW). Any previous presets e.g. manually programmed will be erased.
•Press PROG•MODE for 5 seconds or more to activate autostore programming. (If you want to stop autostore programming, press PROG•MODE briefly again.)
™The display shows ![]()
![]()
![]()
![]()
![]()
![]() , prog blinks, followed by the radio station details when stored (See 5). After all stations are stored, the first preset station will then automatically play.
, prog blinks, followed by the radio station details when stored (See 5). After all stations are stored, the first preset station will then automatically play.
General information
Supported formats:
–Disc format: ISO 9960, Joliet, finalized multisession
–MP3 music files
–MP3 bit rate (data rate):
–Total number of music files maximum: 999
–Some encoder software offer an option to protect music files, i.e. the files can only be played on the computer which created them. If you burn such files on a
•Make sure the file names of the MP3 files end with .mp3
This set does not play/ support the following:
–UDF disc format.
–
–Recordings created on e.g. DirectCD, Packet Writing and Package Writing.
–Playlist files e.g. m3u, pls of WMA, AAC, Winamp, Sonic, RealJukebox, MS Mediaplayer 7.0, MusicMatch.
Display indication for CD functions
–![]()
![]()
![]()
![]()
![]()
![]()
![]()
![]() : CD door open
: CD door open
–![]()
![]()
![]()
![]()
![]()
![]()
![]()
![]()
![]() : when reading disc contents (See 6)
: when reading disc contents (See 6)
–![]() : icon throughout CD operation
: icon throughout CD operation
–![]() : icon throughout
: icon throughout
–In stop mode: total track number and total playback time (CDs); or total album and track number for
–![]()
![]()
![]()
![]()
![]()
![]()
![]() : and the current track number at the beginning of a track (See 8)
: and the current track number at the beginning of a track (See 8)
–During CD playback: elapsed playback time of current track and current track number
–Pause: elapsed playback time flashes (See 9)
–Shuffle/ repeat modes: when the respective mode is activated
–prog when CD programme active; ![]()
![]()
![]()
![]()
![]() also appears briefly when you store a track (See 0).
also appears briefly when you store a track (See 0).
–![]()
![]()
![]()
![]()
![]()
![]()
![]() or
or ![]()
![]()
![]()
![]()
![]()
![]()
![]()
![]() : programme activated but no tracks selected (See !).
: programme activated but no tracks selected (See !).
–![]()
![]()
![]()
![]() : programme memory full
: programme memory full
–![]()
![]()
![]()
![]()
![]()
![]()
![]() : programme cancelled (See @)
: programme cancelled (See @)
–![]()
![]()
![]()
![]()
![]() or
or ![]()
![]()
![]()
![]()
![]() : no disc/ error in CD operation/
: no disc/ error in CD operation/
This unit can play:
–all
–all finalized audio CDR(W)s
–
1Adjust the source selector to CD.
™Display: shows ![]()
![]()
![]()
![]()
![]()
![]()
![]()
![]()
![]() briefly (See 6).
briefly (See 6).
Note:
2To open the CD door, lift the CD door at the edge marked LIFT TO OPEN.
3Insert a disc with the printed side facing up and press the CD door gently close.
4Press 2; on the set to start playback.
5To pause playback press 2;. To resume, press 2; again.
6To stop CD playback, press STOP 9.
Note: CD play will also stop when:
–you open the CD compartment;
–you select TUNER source;
–the CD has reached to the end.
Selecting a different track
During playback you can use the buttons ¡ or ™ (or in
–If you have selected a track number in the stop or pause position, press 2; to start playback.
•Press ™ once briefly for the next track, or press repeatedly until the desired track number appears in the display.
•Press ¡ once briefly to return to the beginning of a current track.
•Press ¡ more than once briefly for a previous track.
•Press PRESET•TRACK
Finding a passage within a track
1Press and hold down ∞ or §.
• The CD is played at high speed.
2When you recognize the passage you want release ∞ or §.
™Normal playback resumes.
Note: During playback of a CD,
Different play modes: Shuffle and Repeat
PROG•MODE allows you to select various play modes. The modes can be selected or changed during playback of an entire CD/ CD programme in the following sequence:
shuffle – all tracks are played in random order shuffle repeat all – repeats the entire disc in random order
repeat all – plays the whole disc continuously repeat – plays the current track continuously
1During playback, select your play mode by pressing PROG•MODE once or more until the desired play mode is shown.
™Display: your selected mode flashes 2 seconds before playback
•You can use ¡ or ™ (or in
•The shuffle/ repeat play options can be combined and used with a programme: e.g. shuffle/ repeat all repeats the entire disc/ programme in random order.
2To return to normal playback press PROG•MODE until the shuffle/ repeat modes are no longer shown.
• You can also press 9 to quit the play mode.
Programming track numbers
You may store up to 20 tracks in the desired sequence. If you like, store any track more than once.
1In the STOP mode, press ¡ or ™ (or in
2When your chosen track number appears, press PROG•MODE once to store the track.
™Display shows ![]()
![]()
![]()
![]()
![]() , your selected track number, and the accumulated programming time.
, your selected track number, and the accumulated programming time.
™If you attempt to programme without first
selecting a track number, ![]()
![]()
![]()
![]()
![]()
![]()
![]()
![]() is shown.
is shown.
3Repeat steps 1 to 2 to select and store all desired tracks in this way.
™![]()
![]()
![]()
![]() is displayed if you attempt to programme more than 20 tracks.
is displayed if you attempt to programme more than 20 tracks.
4To play your programme, press 2;.
Reviewing your set programme
•In the STOP mode, press and hold down PROG•MODE for more than one second.
™Display shows all your stored track numbers in sequence.
™L’écran affiche ![]()
![]()
![]()
![]()
![]()
![]() , prog en clignotant, puis la fréquence de chaque station radio mémorisée. (Voir 5). Lorsqu’une fréquence a été attribuée à toutes les mémoires, l’appareil se cale en réception sur la première station mémorisée.
, prog en clignotant, puis la fréquence de chaque station radio mémorisée. (Voir 5). Lorsqu’une fréquence a été attribuée à toutes les mémoires, l’appareil se cale en réception sur la première station mémorisée.
Lecteur de CD MP3/ CD
Informations générales
Les formats acceptés:
–Format du disque: ISO 9960, Joliet,
–Les fichiers de musique MP3
–Débit binaire MP3 (débit des données):
–Le nombre maximal de fichiers de musique en total: 999
–Il existe du logiciel de codage offrant la possibilité de protéger les fichiers de musique,
CD MP3
•
Cet appareil ne joue/ accepte pas:
–Le format de disque UDF.
–Les disque non finalisés.
–Les enregistrements créés avec par ex. DirectCD, Packet Writing et Package Writing.
–Les fichiers d’une liste référencée par ex. m3u, pls de WMA, AAC, Winamp, Sonic, RealJukebox, MS Mediaplayer 7.0, MusicMatch.
Affichages pour les fonctions CD
–![]()
![]()
![]()
![]()
![]()
![]()
![]()
![]() : porte du CD ouverte
: porte du CD ouverte
–![]()
![]()
![]()
![]()
![]()
![]()
![]()
![]()
![]() : en cours de lecture des titres CD (Voir 6)
: en cours de lecture des titres CD (Voir 6)
–![]() : icône pendant le fonctionnement du CD
: icône pendant le fonctionnement du CD
–![]() : icône pendant le fonctionnement du CD MP3
: icône pendant le fonctionnement du CD MP3
–En mode d’arrêt: nombre total de plages et temps de lecture total (CD); ou nombre total d’albums et de plages pour les CD MP3 ou les CD en format mixte (Voir 7)
–![]()
![]()
![]()
![]()
![]()
![]()
![]() : et le numéro de la plage en cours au début d’une plage (Voir 8)
: et le numéro de la plage en cours au début d’une plage (Voir 8)
–Pendant la lecture du CD: temps de lecture écoulé de la plage en cours et numéro de la plage en cours
–Pause: le temps de lecture écoulé clignote(Voir 9)
–Lors des modes shuffle/ repeat: lorsque le mode respectif est activé
–prog lorsque la programmation de CD est activée;
![]()
![]()
![]()
![]()
![]() apparaît également un court instant lorsque vous mémorisez une plage (Voir 0).
apparaît également un court instant lorsque vous mémorisez une plage (Voir 0).
–![]()
![]()
![]()
![]()
![]()
![]()
![]() ou
ou ![]()
![]()
![]()
![]()
![]()
![]()
![]()
![]() : programme activé mais aucune plage n'a été sélectionnée (Voir !).
: programme activé mais aucune plage n'a été sélectionnée (Voir !).
–![]()
![]()
![]()
![]() : mémoire de programme pleine
: mémoire de programme pleine
–![]()
![]()
![]()
![]()
![]()
![]()
![]() : programme annulé (Voir @)
: programme annulé (Voir @)
–![]()
![]()
![]()
![]()
![]() ou
ou ![]()
![]()
![]()
![]()
![]() : pas de CD dans
: pas de CD dans
l’appareil/ erreur de fonctionnement du CD/
le disque
Lecture d’un
Ce lecteur CD peut jouer:
–tous les CD audio préenregistrés
–tous les CDR(W) audio finalisés
–les CD MP3 (les
1Réglez le sélecteur de source sur CD.
™ Affichage: ![]()
![]()
![]()
![]()
![]()
![]()
![]()
![]()
![]() est affiché brièvement.
est affiché brièvement.
(Voir 6).
Remarque: La lecture du contenu d’un CD MP3 peut prendre plus de 10 secondes.
2Pour ouvrir la porte de CD, soulevez le rebord portant l’indication LIFT TO OPEN.
3Introduisez un CD ou
4Appuyez sur 2; sur l’appareil pour démarrer la lecture.
5Pour interrompre provisoirement la lecture, appuyez sur la touche 2;. Appuyez une nouvelle fois sur 2; pour reprendre la lecture.
6Pour arrêter la lecture du CD, appuyez sur STOP 9.
Remarque: la lecture de CD s’arrête également lorsque:
–vous ouvrez le compartiment de CD;
–vous sélectionnez le tuner comme source (TUNER);
–le CD est arrivé au bout.
Sélection d’une autre plage
Pendant la lecture, vous pouvez utiliser ¡ ou ™ (ou pour un CD MP3, appuyez sur PRESET•TRACK
–Si vous avez sélectionné un numéro de plage en mode d'arrêt ou de pause, appuyez sur 2; pour démarrer la lecture.
•Appuyez une fois brièvement sur § pour sélectionner la plage suivante ou appuyez à plusieurs reprises jusqu’à ce que le numéro de plage désiré apparaisse sur l’affichage.
•Appuyez une fois brièvement sur ∞ pour retourner au début d’une plage en cours.
•Appuyez plusieurs fois et brièvement sur ∞ pour une la plage précédente.
•Appuyez une ou plusieurs fois sur PRESET•TRACK
Recherche d’un passage au sein d’une plage
1Maintenez enfoncé ∞ ou §.
• La lecture du CD se fait à vitesse rapide.
2Lorsque vous entendez le passage désiré, relâchez ∞ ou §.
™La lecture normale se poursuit.
Remarque: Pendant la lecture d’un CD, d’un CD MP3, d’un programme ou lorsque la fonction SHUFFLE/REPEAT est activée, la recherche n’est possible qu’à l’intérieur d’une plage.
Différents modes de lecture: Shuffle et Repeat
La touche PROG•MODE vous permet de sélectionner des modes de lecture différents. Les modes peuvent être sélectionnés ou modifiés pendant la lecture d’un CD entier/ programme CD dans l’ordre suivant: shuffle – lecture de toutes les plages dans un ordre
aléatoire
shuffle repeat all – répétition de la totalité du CD dans un ordre aléatoire
repeat all – lecture du CD total de façon continue repeat – lecture de la plage en cours de façon continue
1Pendant la lecture, appuyez une ou plusieurs fois sur PROG•MODE jusqu’à ce que l’affichage indique le mode de lecture désiré.
™Affichage: le mode sélectionné clignote
2 secondes avant que la lecture démarre.
•Vous pouvez utilisez ¡ ou ™ (ou pour un CD MP3, appuyez sur PRESET•TRACK
•Les modes de lecture shuffle/ repeat peuvent être combinés et utilisés avec un programme. Par exemple shuffle/ repeat all répète la totalité du programme de CD dans un ordre aléatoire.
2Pour revenir à la lecture normale, appuyez sur PROG•MODE jusqu'à ce que les modes shuffle/ repeat ne s'affichent plus.
•Vous pouvez également appuyer sur 9 pour sortir du mode de lecture.
Programmation des numéros de plage
Vous pouvez mémoriser jusqu'à 20 plages dans l'ordre voulu. Si vous le voulez, vous pouvez mémoriser une certaine plage plus d'une fois.
1En mode d'arrêt, appuyez sur ¡ ou ™ (ou pour un CD MP3, appuyez sur PRESET•TRACK
2Lorsque le numéro de plage voulu s'affiche, appuyez une seule fois sur PROG•MODE pour mémoriser la plage.
™![]()
![]()
![]()
![]()
![]() est affiché, le numéro de la plage sélectionnée et la durée du programme cumulée sont affichés.
est affiché, le numéro de la plage sélectionnée et la durée du programme cumulée sont affichés.
™Si vous essayez de programmer sans sélectionner d’abord un numéro de plage, ![]()
![]()
![]()
![]()
![]()
![]()
![]()
![]() est affiché.
est affiché.
1 |
|
1 | 4 |
2 | 5 |
3 | 6 |
| # |
Erasing a programme
You can erase the contents of the memory by:
–opening the CD door;
–selecting TUNER source;
–pressing 9 (twice during playback or in the stop position).
™Display: shows ![]()
![]()
![]()
![]()
![]()
![]()
![]() briefly when programme is cancelled. (See @)
briefly when programme is cancelled. (See @)
Precautions & General Maintenance (See #)
MAINTENANCE
CD player and CD handling (See $)
• | The lens of the CD player should never be touched! |
• | Sudden changes in the surrounding temperature |
| can cause condensation to form and the lens of |
| your CD player to cloud over. Playing a CD is then |
| not possible. Do not attempt to clean the lens but |
| leave the set in a warm environment until the |
| moisture evaporates. |
• Always close the CD door to keep the CD | |
| compartment |
TROUBLESHOOTING
Troubleshooting
If a fault occurs, first check the points listed below before taking the set for repair. Do not open the set as there is a risk of electric shock.
If you are unable to remedy a problem by following these hints, consult your dealer or service centre.
WARNING: Under no circumstances should you try to repair the set yourself, as this will invalidate the guarantee.
– | Problem |
| or | indication |
• | Solution |
| ||
|
|
| ||
|
|
|
|
|
|
|
|
|
|
|
|
|
|
|
|
|
|
|
|
|
|
|
|
|
LECTEUR DE
3Répétez les étapes 1 et 2 pour sélectionner et mémoriser toutes les plages désirées de la même manière.
™![]()
![]()
![]()
![]() s'affiche si vous tentez de programmer plus de 20 plages.
s'affiche si vous tentez de programmer plus de 20 plages.
4Pour démarrer la lecture de votre programme, appuyez sur 2;.
Vérification du programme
• En mode d'arrêt, maintenez enfoncé PROG•MODE |
ENTRETIEN
• | Ne recouvrez pas l’appareil. Veillez à ce qu’il y ait |
| suffisamment de ventilation autour de l’appareil; |
| il faut prévoir un espace minimum de 15 cm pour |
| éviter la surchauffe de l’appareil. |
• | Les pièces mécaniques de l’appareil contiennent |
| des paliers lubrifiés à vie qu’il ne faut donc ni |
| huiler ni lubrifier. |
• | |
| le coffret. N'utilisez jamais de produits nettoyants |
| contenant de l'alcool, de l'ammoniac, du benzène |
|
|
|
|
DÉPANNAGE
Dépannage
Si une panne se produit, vérifiez d’abord les points énumérés
AVERTISSEMENT: En aucun cas, vous ne devez essayer de réparer
– Problème | ou | indication | |
• Remède | |||
|
|
La lecture de
45
6 |
9 |
• Place the set on a hard and flat surface so that the |
compartment with a soft dry cloth. |
pendant plus d’une seconde. |
ou autres composants abrasifs qui risqueraient |
Absence de son/puissance
– Pas de CD dans l’appareil |
7 | 9 | |
| 0 | |
8 | ! | |
0 | ||
| ||
| @ | |
| $ | |
| % | |
| 1 | |
| 2 | |
| 3 | |
2 | 3 |
| system does not tilt. |
• | Do not expose the set, batteries or CDs to |
| humidity, rain, sand or excessive heat caused by |
| heating equipment or direct sunlight. |
• | Do not cover the set. Adequate ventilation with a |
| minimum gap of 6 inches between the ventilation |
| holes and surrounding surfaces is necessary to |
| prevent heat |
• | The mechanical parts of the set contain self- |
| lubricating bearings and must not be oiled or |
| lubricated. |
• | To clean the set, use a soft dry cloth. Do not use |
| any cleaning agents containing alcohol, ammonia, |
| benzene or abrasives as these may harm the |
| housing. |
• | To clean the CD, wipe in a straight line from the |
| centre towards the edge using a soft, |
| cloth. Do not use cleaning agents as they may |
| damage the disc. |
• | Never write on a CD or attach any stickers to it. |
No sound /power
–Volume not adjusted
• Adjust the VOLUME
–Power cord not securely connected
• Connect the AC power cord properly
–Batteries dead/ incorrectly inserted
• Insert (fresh) batteries correctly
Display does not function does not function properly/ No reaction to operation of any of the controls
– Electrostatic discharge
•Switch off and unplug the set. Reconnect after a few seconds
–No disc inserted
• Insert a disc
–Disc badly scratched or dirty
• Replace/ clean disc (see Maintenance)
– Laser lens steamed up
• Wait until lens has recovered to room temperature
–
• Use a finalized
–Incompatible format used for MP3
•Check if your disc format is ISO 9960, Joliet, finalized multisession
–Not all known encrypted and protected CDs are compatible
•Make sure to deactivate the protection option in the encoder software before creating the music files
The disc skips tracks
–Disc damaged or dirty
• Replace or clean disc
–Shuffle or a programme is active
• Quit shuffle/ programme mode(s)
Sound skips during MP3 playback
– MP3 file made at compression level exceeding |
320kbps |
™ L’affichage indique toutes les plages |
mémorisées dans l’ordre sélectionné. |
Effacement d'un programme
Vous pouvez effacer le contenu de la mémoire de l'une des manières suivantes:
–en ouvrant la porte de CD;
–en sélectionnant la source TUNER;
–en appuyant sur 9 (deux fois en cours de lecture ou en mode d’arrêt).
™Affichage: ![]()
![]()
![]()
![]()
![]()
![]()
![]() est brièvement indiqué lorsque le programme est effacé. (Voir @)
est brièvement indiqué lorsque le programme est effacé. (Voir @)
Précautions & Entretien Général (Voir #)
•Placez l’appareil sur une surface dure et plane pour lui éviter de basculer.
•N’exposez pas l’appareil, les CD ou piles à l’humidité, à la pluie, au sable ou à une chaleur excessive causée par un équipement de chauffage ou par exposition directe aux rayons du soleil.
d'endommager le boîtier. |
Entretien du lecteur de CD et des CD (Voir $)
•Ne touchez jamais la lentille du laser CD!
•De soudaines variations de la température ambiante risquent de provoquer de la condensation dans le lecteur de CD. Vous ne pouvez alors plus utiliser l'appareil. N'essayez pas de nettoyer la buée mais placez l'appareil dans un endroit plus chaud et sec et attendez que toute trace d'humidité ait disparu.
•Laissez toujours le compartiment CD fermé pour éviter que de la poussière ne se dépose sur la lentille. Pour nettoyer,
•Nettoyez le CD à l'aide d'un chiffon propre non- pelucheux, toujours en ligne droite du centre vers le bord. N'utilisez aucun produit de nettoyage qui pourrait abîmer le disque.
•N'écrivez jamais sur le disque et ne collez aucun autocollant.
–VOLUME mal réglé
• Réglez le VOLUME
–Cordon secteur mal branché
• Branchez adéquatement le cordon secteur
–Piles à plat/ incorrectement insérées
• Insérez de nouvelles piles correctement
L’affichage ne fonctionne pas correctement/ L’appareil ne réagit pas aux commandes
– Décharge électrostatique
•Eteignez l’appareil et débranchez la fiche secteur. Rebranchez au bout de quelques secondes
• | Insérez un CD |
– | CD sérieusement rayé ou contaminé |
• Remplacez/ nettoyez le CD (voir Entretien)
– Lentille de laser embuée
• Attendez que la lentille s'acclimate
–Le
• Utilisez un
– Format incompatible pour MP3
•Contrôlez si le format de disque est ISO 9960, Joliet,
–Pas tous les CD cryptés et protégés connus sont compatibles
•Veillez à désactiver l'option de protection dans le logiciel de codage avant de créer les fichiers de musique
Le lecteur de CD saute des plages
–CD endommagé ou contaminé
• Remplacez/nettoyez le CD
–Shuffle ou un programme a été activé
• Désactivez shuffle/ le mode de programmation
Le son est interrompu lors de la lecture MP3
0!
# | $ |
| X |
@
Informations relatives à l’environnement
– Le fichier MP3 a été créé à un niveau de |
2 x AAA/R03/UM4 |
6 x 1.5 V R14 /UM2 / C CELL
Environmental information
All unnecessary packing material has been omitted. The packing can be easily separated into three materials: cardboard, polystyrene and plastic.
Your set consists of materials which can be recycled if disassembled by a specialized company. Please observe the local regulations regarding the disposal of packing materials, dead batteries and old equipment.
•Use a lower compression level to record CD tracks into MP3 format
Cannot find desired MP3 title
–Wrong file extension/ used
• Change file extension to .MP3
Nous avons fait au mieux pour réduire l’emballage et le rendre facile à séparer en 3 matériaux: carton, pâte de papier et polyéthylène expansé.
Les matériaux qui entrent dans la composition de cet appareil peuvent être recyclés ou récupérés par une entreprise spécialisée. Veuillez respecter la législation en vigueur dans votre pays relative à la mise au rebut des emballages, des piles usagées et des équipements inutilisables.
compression e plus de 320 kbps |
•Utilisez un niveau de compression moins élevé pour l’enregistrement des pistes de CD en format MP3
Impossible de trouver le titre MP3 désiré
– Extension incorrecte du fichier
• Changez l’extension du fichier en .MP3