Mini digital terrestrial receiver | DTM150 | English |
|
User manual
Caution
· | Please do not place the Receiver and the remote control under |
| direct sun light |
· | The Receiver should be placed on a solid and safe base |
4.3 Change of channel
You can change the channel in different ways: By pressing the channel button + or
4.12 Channel selector
The Channel selector is activated by a press on OK while in viewing mode.
5.2.3 Factory setting
You can reset the Receiver to default setting. In doing so, the individually composed favourites list is deleted.
5.6.3 Access control
The parental control item allows you to enable or disable the locking management.
1 Follow the same step as 5.6 User preference. |
Disposal of your old product
Your product is designed and manufactured with high quality materials and components, which can be recycled and reused.
Manuel d’utilisation Manual del usuario Manual do usuàrio
Content
1 | Control elements | 5 | Settings |
| and functional | 5.1 | Favourites lists |
| components | 5.1.1 | Creating a favourite list |
1.1 | What’s in the box? | 5.1.2 | Modifying a favourite list |
1.2 | Front side (see figure 1) | 5.1.3 | Delete a favourite list |
1.3 | Back side (see figure 1) | 5.2 | Setup |
1.4 | Remote Control (see | 5.2.1 | TV configuration |
| figure 2) | 5.2.2 | Time setting |
2 | Safety precautions | 5.2.3 | Factory setting |
3 | Connecting other | 5.3 | New channels |
| devices | 5.4 | Installation |
4 | Operation | 5.4.1 | Signal information |
4.1 | 5.4.2 | Channels installation | |
4.2 | 5.5 | Timers | |
4.3 | Change of channel | 5.5.1 | Add Timer |
4.4 | Volume control | 5.5.2 Modify timer from the | |
4.5 | Calling up program |
| list |
| information banner | 5.5.3 Delete timer from the | |
4.6 | TV/ Radio Switching |
| list |
4.7 | Subtitle | 5.5.4 Sleep timer | |
4.8 | Immediate Timer | 5.6 | User Preferences |
4.9 | Electronic program | 5.6.1 | Languages |
| guide (EPG) | 5.6.2 | Appearance |
4.10 | Language | 5.6.3 | Access control |
4.11 | Using Teletext | 6 | Troubleshooting |
4.12 | Channel selector |
|
|
· | The location should not be selected as a room with high |
| humidity, as the condensation, arising in the kitchen for example, |
| may cause malfunction or damage the Receiver |
· | Heating or other thermal radiation under the Receiver also may |
| cause malfunction or damage the Receiver |
· | Hot air, which arises during the operation, should be ventilated |
| with sufficient air circulation. Please do not put the Receiver into |
| closed areas and do not cover it. |
· | Please avoid the contact of the Receiver and of the remote |
| control with water or humidity. Do not put into operation near |
| bath, swimming pools. |
· | Connect the power supply of the Receiver only after the |
| installation is ready. |
· | The outdoor antenna has to be grounded correctly. For this you |
| have to follow the appropriate regulations. |
· | Take care to provide good air circulation. Place the Receiver in a |
| location with adequate ventilation to prevent heating up of the |
| Receiver. |
· | No naked flame sources such as lighted candles should be placed |
| on the apparatus. |
· | Never stack other electronic equipment on top of the Receiver. |
· Remove batteries from the remote control when it is not to be | |
| used for a long period. Otherwise it can be damaged due to any |
| leakage of batteries. |
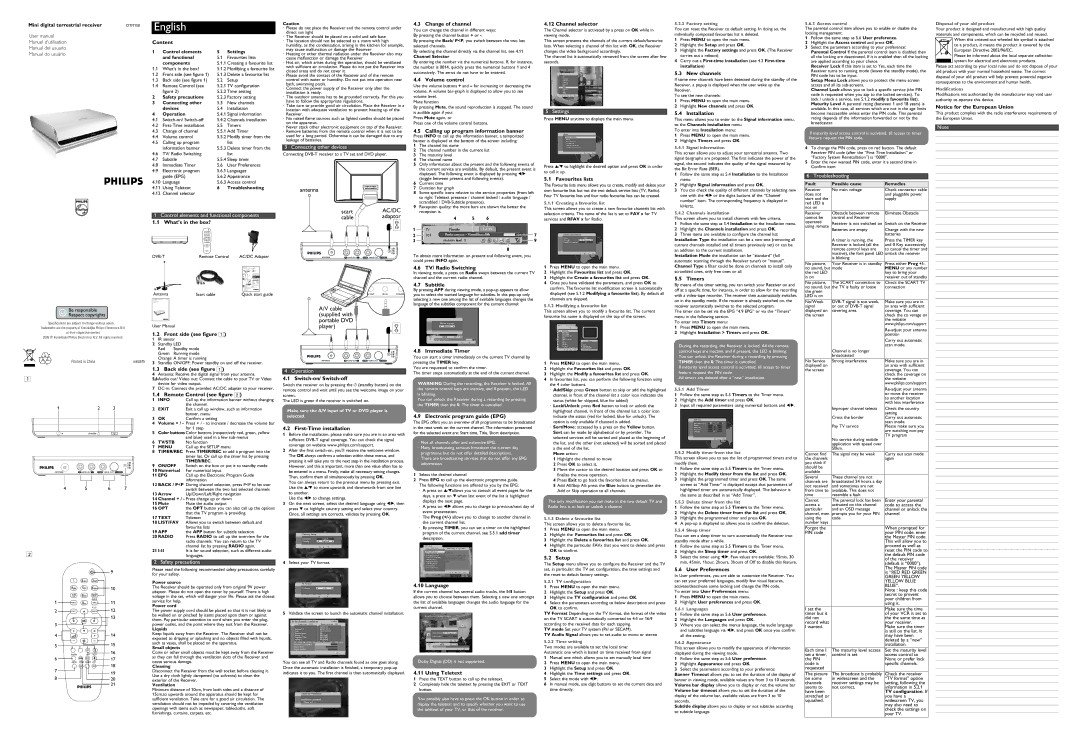
3 Connecting other devices
Connecting
antenna
By pressing the Back/ P<P, you switch between the two last selected channels.
By selecting the channel directly via the channel list, see 4.11
Channel Selector
By entering the number via the numerical buttons. If, for instance, the number is 0014, quickly press the numerical buttons 1 and 4 successively. The zeros do not have to be entered.
4.4 Volume control
Use the volume buttons + and – for increasing or decreasing the volume. A volume
Mute function
By pressing Mute, the sound reproduction is stopped. The sound is audible again if you:
Press Mute again, or
Press one of the volume control buttons.
4.5 Calling up program information banner
Press INFO to call up the information banner, a temporized banner is displayed at the bottom of the screen including:
1 | The channel list name |
2 | The channel number in the current list |
3 | The maturity level |
4 | The channel name |
5 | Only information about the present and the following events of |
| the current service are available. By default, the present event is |
| displayed. The following event is displayed by pressing 1/2 |
6 | (toggle between present and following events). |
Current time | |
7 | Duration bar graph |
8 | Some specific icons relative to the service properties (from left |
| to right Teletext presence / channel locked / audio language / |
9 | scrambled / |
Reception quality: the more bars are shown the better the |
This screen presents the channels of the current default/favourite lists. When selecting a channel of this list with OK, the Receiver changes the video background accordingly.
The channel list is automatically removed from the screen after few seconds.
5 Settings
Press MENU anytime to displays the main menu.
Press 3/4 to highlight the desired option and press OK in order to call it up.
5.1 Favourites lists
The Favourite lists menu allows you to create, modify and delete your own favourite lists but not the two default service lists (TV, Radio). Four TV favourite lists and four radio favourite lists can be created.
5.1.1 Creating a favourite list
1Press MENU to open the main menu.
2Highlight the Setup and press OK.
3Highlight the Factory settings and press OK. (The Receiver carries out a reboot)
4Carry out a
5.3New channels
If some new channels have been detected during the standby of the Receiver, a popup is displayed when the user wake up the Receiver.
To see the new channels:
1Press MENU to open the main menu.
2Highlight New channels and press OK.
5.4 Installation
This menu allows you to enter to the Signal information menu, to the Channels installation menu.
To enter into Installation menu:
1Press MENU to open the main menu.
2Highlight Timers and press OK.
5.4.1 Signal information
This screen allows you to adjust your terrestrial antenna. Two signal bargraphs are proposed. The first indicates the power of the signal, the second indicates the quality of the signal measured by the Bit Error Rate (BER).
1 | Follow the same step as 5.4 Installation to the Installation |
| menu. |
2 | Highlight Signal information and press OK. |
3 | You can check the quality of different channels by selecting new |
| one with the 1/2 or the digits buttons of the “Channel |
| number” item. The corresponding frequency is displayed in |
| kHertz. |
2 Highlight the Access control and press OK. |
3 Select the parameters according to your preference: |
Parental Control If the parental control item is disabled then |
all the locking are deactivated, If it is enabled then all the locking |
are applied according to your choice. |
Receiver Lock If this item is set to Yes, each time the |
Receiver turns to running mode (leaves the standby mode), the |
PIN code has to be input. |
Setup Menu Lock allows you to protect the menu screen |
access and all its |
Channel Lock allows you to lock a specific service (the PIN |
code is requested when you zap to the locked services). To |
lock / unlock a service, see 5.1.2 modify a favourite list). |
Maturity Level A parental rating (between 1 and 18 years) is |
available. In this case, all services which are not in the age limits |
become inaccessible unless enter the PIN code. This parental |
rating depends of the information forwarded or not by the |
broadcaster. |
If maturity level access control is activated, all access to timer feature request the PIN code.
4To change the PIN code, press on red button. The default Receiver PIN code (after the “First Time Installation” or “Factory System Reinstallation”) is “0000”.
5Enter the new wanted PIN code, enter it a second time in Confirm item.
6 Troubleshooting
Fault | Possible cause | Remedies |
Receiver | No main voltage | Check connector cable |
does not |
| and pluggable power |
start and the |
| supply |
red LED is |
|
|
When this
Please be informed about the local separate collection system for electrical and electronic products.
Please act according to your local rules and do not dispose of your old product with your normal household waste. The correct disposal of your old product will help prevent potential negative consequences to the environment and human health.
Modifications
Modifications not authorized by the manufacturer may void user authority to operate this device.
Notice for the European Union
This product complies with the radio interference requirements of the European Union.
Note
1 Control elements and functional components
1.1 What’s in the box?
|
|
| Remote Control | AC/DC Adapter | |||
|
|
|
|
| Quick start guide | ||
|
|
|
|
|
| 1 | Connect |
|
|
|
|
|
| 2 | Enjoy |
|
|
|
|
| What’s in the box |
|
|
|
|
|
|
| 1 Connect | B |
|
|
|
|
|
|
|
| |
|
|
|
|
|
| C |
|
|
|
|
|
| 2 Enjoy Need help? | ||
|
|
|
|
| A |
| philips |
|
|
|
|
|
|
| |
|
| Antenna | Scart cable | Quick start guide | |||
|
| Mini digital terrestrial receiver |
|
|
|
| |
|
| User manual |
|
|
|
|
|
|
| Manuel d'utilisation |
|
|
|
| |
|
| Manual del usuario |
|
|
|
| |
Specifications are subject to change without notice. |
| User Manual |
|
|
| ||
Trademarks are the property of Koninklijke Philips Electronics N.V. |
|
|
|
| |||
|
|
|
|
|
|
| |
or their respective owners |
| 1.2 Front side (see figure 1) |
|
|
| ||
2006 © Koninklijke Philips Electronics N.V. All rights reserved. |
|
|
|
| |||
| 1 | IR sensor |
|
|
| ||
|
|
|
|
| |||
|
| 2 | Standby LED |
|
|
| |
|
|
| Red | Standby mode |
|
|
|
|
|
| Green | Running mode |
|
|
|
Printed in China | wk6345 | 3 | Orange A timer is running |
|
|
| |
Standby ON/OFF: Power standby on and off the receiver. | |||||||
1.3 Back side (see figure 1)
4 Antenna: Receive the digital signal from your antenna.
15,6Audio out/ Video out: Connect the cable to your TV or Video device for video output.
7
1.4 Remote Control (see figure 2)
|
|
| 1 | INFO | Call up the information banner without changing |
1 | 2 | 3 | 2 | EXIT | the channel. |
Exit a call up window, such as information | |||||
|
|
| 3 | OK | banner, menu |
|
|
| Confirm a setting | ||
|
|
| 4 | Volume + / - Press + / - to increase / decrease the volume bar | |
|
|
|
|
| for 1 step. |
|
|
| 5 | Color buttons Color buttons (respectively red, green, yellow | |
|
|
| 6 | TV/STB | and blue) used in a few |
|
|
| No function | ||
|
|
| 7 | MENU | Call up the SETUP menu |
|
|
| 8 | TIMER/REC | Press TIMER/REC to add a program into the |
|
|
|
|
| timer list. Or call up the timer list by pressing |
|
|
| 9 | ON/OFF | TIMER/REC. |
|
|
| Switch on the box or put it to standby mode | ||
|
|
| 10 Numerical | For numerical input | |
|
|
| 11 EPG | Call up the Electronic Program Guide | |
|
|
|
|
| information |
|
|
| 12 BACK / P<P During channel selection, press P<P to let user | ||
4 | 5 | 6 | 7 |
| switch between the two last selected channels |
|
|
| 13 Arrow | Up/Down/Left/Right navigation | |
|
|
| 14 Channel + / - Press change up or down | ||
|
|
| 15 Mute | Mute the audio output | |
|
|
| 16 OPT | the OPT button you can also call up the options | |
|
|
| 17 TEXT | that the TV program is providing | |
|
|
| Teletext | ||
|
|
| 18 LIST/FAV | Allows you to switch between default and | |
|
|
|
|
| favourite lists |
|
|
| 19 APP | the APP button for subtitle selection | |
|
|
| 20 RADIO | Press RADIO to call up the overview for the | |
|
|
|
|
| radio channels. You can return to the TV |
|
|
| 21 | channel list by pressing RADIO again. | |
2 |
|
| It is for sound selection, such as different audio | ||
|
|
|
| languages. | |
2 Safety precautions
scart | AC/DC |
cable | adaptor |
A/V cable (supplied with portable DVD  player)
4 Operation
4.1 Switch-on/ Switch-off
Switch the receiver on by pressing the y (standby button) on the remote control and wait until you see the welcome image on your screen.
The LED is green if the receiver is switched on.
Make sure the A/V input of TV or DVD player is selected.
4.2 First-Time installation
1Before the installation, please make sure you are in an area with sufficient
2After the first
You can always return to the previous menu by pressing exit. Use the 3/4 to move upwards and downwards from one line to another.
Use the 1/2 to change settings.
3On the next screen, select the desired language using 1/2, then press 4 to highlight country setting and select your country. Once, all settings are corrects, validate by pressing OK.
4Select your TV format.
reception is. |
4 | 5 | 6 |
1 |
|
|
2 |
| 7 |
3 |
| 9 |
|
| 8 |
To obtain more information on present and following event, you could press INFO again.
4.6 TV/ Radio Switching
In viewing mode, a press on Radio swaps between the current TV channel and the current radio channel.
4.7 Subtitle
By pressing APP during viewing mode, a
4.8 Immediate Timer
You can start a timer immediately on the current TV channel by pressing the TIMER key.
You are requested to confirm the timer.
The timer stops automatically at the end of the current channel.
WARNING During the recording, the Receiver is locked. All the remote control keys are inactive, and if present, the LED is blinking,
You can unlock the Receiver during a recording by pressing the TIMER then the 0. The timer is cancelled.
4.9 Electronic program guide (EPG)
The EPG offers you an overview of all programmes to be broadcasted in the next week on the current channel. The information presented for the selected event are: Start time, Title, Short description.
·Not all channels offer and extensive EPG.
·Many broadcasting services broadcast the current day programme but do not offer detailed descriptions.
·There are broadcasting services that do not offer any EPG information.
1Select the desired channel
2Press EPG to call up the electronic programme guide. The following functions are offered to you by the EPG:
·A press on 3/4allows you to consult all event pages for the days, a press on 4 when last event of the list is highlighted displays the next page.
·A press on 1/2 allows you to change to previous/next day of event presentation.
·The Prog
·By pressing TIMER, you can set a timer on the highlighted program of the current channel, see 5.5.1 add timer description.
This screen allows you to create a new favourite channels list with selection criteria. The name of the list is set to FAV x for TV services and RFAV x for Radio.
1Press MENU to open the main menu.
2Highlight the Favourites list and press OK.
3Highlight the Create a favourites list and press OK.
4Once you have validated the parameters, and press OK to confirm. The favourite list modification screen is automatically displayed (see 5.1.2 Modifying a favourite list). By default all channels are skipped.
5.1.2 Modifying a favourite list
This screen allows you to modify a favourite list. The current favourite list name is displayed on the top of the screen.
1Press MENU to open the main menu.
2Highlight the Favourites list and press OK.
3Highlight the Modify a favourites list and press OK.
4In favourites list, you can perform the following function using the 4 color buttons.
·Add/Skip: press Green button to skip or add the highlighted channel, in front of the channel list a color icon indicates the status (white for skipped, blue for added)
·Lock/Unlock: press Red button to lock or unlock the highlighted channel, in front of the channel list a color icon indicate the status (red for locked, blue for unlock). The option is only available if channed is added.
·Sort/Move: accessed by a press on the Yellow button. Sort can be made by alphabetical or by provider. The selected services will be sorted and placed at the beginning of the list, and the other (not selected) will be sorted and placed a the end of the list.
Move action:
1 Highlight the channel to move
2 Press OK to select it,
3 Move the cursor to the desired location and press OK to finalize the move operation.
4 Press Exit to go back the favorites list sub menus.
5 Add All/Skip All: press the Blue button to generalize the Add or Skip operation to all channels.
The only modification you can make in the two default TV and Radio lists is to lock or unlock a channel.
5.1.3 Delete a favourite list
This screen allows you to delete a favourite list.
1Press MENU to open the main menu.
2Highlight the Favourites list and press OK.
3Highlight the Delete a favourites list and press OK.
4Highlight the particular FAVx that you want to delete and press OK to confirm.
5.2 Setup
The Setup menu allows you to configure the Receiver and the TV
5.4.2 Channels installation
This screen allows you to install channels with few criteria.
1Follow the same step as 5.4 Installation to the Installation menu.
2Highlight the Channels installation and press OK.
3Three items are available to configure the channel list: Installation Type the installation can be a new one (removing all current channels installed and all timers previously set) or can be an addition to the current installation.
Installation Mode the installation can be “standard” (full automatic scanning through the Receiver tuner) or “manual”. Channel Type a filter could be done on channels to install only scrambled ones, only free ones or all
5.5 Timers
By means of the timer setting, you can switch your Receiver on and off at a specific time, for instance, in order to allow for the recording with a
The timer can be set via the EPG “4.9 EPG” or via the “Timers” menu in the following section.
To enter into Timers menu:
1Press MENU to open the main menu.
2Highlight Installation > Timers and press OK.
During the recording, the Receiver is locked. All the remote control keys are inactive, and if present, the LED is blinking, You can unlock the Receiver during a recording by pressing TIMER then the 0. The timer is cancelled.
If maturity level access control is activated, all access to timer feature request the PIN code.
All timers are deleted after a “new” installation.
5.5.1 Add Timer
1Follow the same step as 5.5 Timers to the Timer menu.
2Highlight the Add timer and press OK.
3Input all required parameters using numerical buttons and 1/2.
5.5.2 Modify timer from the list
This screen allows you to see the list of programmed timers and to modify them.
1Follow the same step as 5.5 Timers to the Timer menu.
2Highlight the Modify timer from the list and press OK.
3Highlight the programmed timer and press OK. The same screen as “Add Timer” is displayed except that parameters of highlighted timer are automatically displayed. The behavior is the same as described in as “Add Timer”.
5.5.3 Delete timer from the list
1Follow the same step as 5.5 Timers to the Timer menu.
2Highlight the Delete timer from the list and press OK.
3Highlight the programmed timer and press OK.
4A
5.5.4 Sleep timer
You can set a sleep timer to turn automatically the Receiver into standby mode after a while.
1Follow the same step as 5.5 Timers to the Timer menu.
2Highlight the Sleep timer and press OK.
3Select the timer using 1/2. Few values are available: 15min, 30 min, 45min, 1hour, 2hours, 3hours of Off to disable this feature.
not on |
|
|
Receiver | Obstacle between remote | Eliminate Obstacle |
cannot be | control and Receiver |
|
operated | Receiver is not switched on | Switch on the Receiver |
using remote | ||
| Batteries are empty | Change with the new |
|
| batteries |
| A timer is running, the | Press the TIMER key |
| Receiver is locked (all the | and 0 Key successively |
| remote control keys are | to cancel the timer and |
| inactive), the font panel LED | unlock the receiver |
| is blinking |
|
|
|
|
No picture, | Your Receiver is in standby | Press either Prog |
no sound, but | mode | MENU or any number |
the red LED |
| key to bring your |
is on |
| receiver out of standby |
No picture, | The SCART connection to | Check the SCART TV |
no sound, but the TV is faulty or loose | connection | |
the green |
|
|
LED is on |
|
|
|
|
|
No/Week | Make sure you are in | |
signal | or out of | an area with sufficient |
displayed on | covering area. | coverage. You can |
the screen |
| check the co verage on |
|
| the website |
|
| www.philips.com/support |
|
| |
|
| position |
|
| Carry out automatic |
|
| scan mode. |
| Channel is no longer |
|
| broadcasted |
|
No Service | Strong interference | Make sure you are in |
displayed on |
| an area with sufficient |
the screen |
| coverage. You can |
|
| check the coverage on |
|
| the website |
|
| www.philips.com/support |
|
| |
|
| or move the receiver |
|
| to another location |
|
| with less interference |
| Improper channel selects | Check the country |
|
| setting |
| Cross the border | Carry out automatic |
|
| scan mode. |
| Pay TV service | Please make sure you |
|
| are watching |
| No service during mobile | TV program |
|
| |
| application with speed over |
|
| 50km. |
|
Cannot find | The signal may be weak | Carry out scan mode |
the channels |
| again |
you think if |
|
|
should be |
|
|
available |
|
|
Several | These channel are not |
|
channels are | broadcasted 24 hours a day |
|
not received | and sometimes are not |
|
from time to | available. This does not |
|
time | resemble a fault |
|
Cannot | The parental lock has been | Enter your parental |
access a | activated on this channel | code to access the |
particular | and an OSD message | channel or unlock the |
channel, even | prompts you for your PIN | channel |
using the | code |
|
number keys |
|
|
Forgot the |
| When prompted for |
PIN code |
| your PIN code, enter |
|
| the Master PIN code. |
|
| This will allow you to |
|
| proceed as well as |
|
| reset the PIN code to |
|
| the default PIN code |
|
| of the receiver |
|
| (default is “0000”). |
|
|
| 9 |
|
|
|
| 10 |
|
| 1 | |||
|
| 11 |
| |
| 2 |
| 12 |
|
|
|
| 13 |
|
| 3 |
|
|
|
| 4 |
| 14 |
|
| 5 |
| 15 |
|
|
|
| 16 |
|
| 6 |
| 17 |
|
| 7 |
| 18 |
|
|
| 19 |
| |
| 8 |
|
| |
|
| 20 |
| |
|
|
| 21 |
|
|
|
|
|
|
Please read the following recommended safety precautions carefully for your safety.
Power source
The Receiver should be operated only from original 9V power adaptor. Please do not open the cover by yourself. There is high voltage in the set, which will danger your life. Please ask the closest service for help.
Power cord
The power supply cord should be placed so that it is not likely to be walked on or pinched by items placed upon them or against them. Pay particular attention to cord when you enter the plug, power outlet, and the point where they exit from the Receiver.
Liquids
Keep liquids away from the Receiver. The Receiver shall not be exposed to dripping or splashing and no objects filled with liquids, such as vases, shall be placed on the apparatus.
Small objects
Coins or other small objects must be kept away from the Receiver as they can fall through the ventilation slots of the Receiver and cause serious damage.
Cleaning
Disconnect the Receiver from the wall socket before cleaning it. Use a dry cloth lightly dampened (no solvents) to clean the exterior of the Receiver.
Ventilation
Minimum distance of 10cm, from both sides and a distance of 15cm,to upwards around the apparatus should be kept for sufficient ventilation. Take care for a good air circulation. The ventilation should not be impeded by covering the ventilation openings with items such as newspaper, tablecloths, soft furnishings, curtains, carpets, etc.
5Validate the screen to launch the automatic channel installation:
You can see all TV and Radio channels found as one goes along. Once the automatic installation is finished, a temporary
4.10 Language
If the current channel has several audio tracks, the
Dolby Digital (DD) is not supported.
4.11 Using Teletext
1Press the TEXT button to call up the teletext.
2Completely hide the teletext by pressing the EXIT or TEXT button.
You possibly also have to press the OK button in order to display the teletext and to specify whether you want to use the teletext of your TV, or that of the receiver.
set, in particular: the TV set configuration, the time settings and the reset to default factory settings.
5.2.1 TV configuration
1Press MENU to open the main menu.
2Highlight the Setup and press OK.
3Highlight the TV configuration and press OK.
4Select the parameters according to below description and press OK to confirm.
TV Format Depending on the TV format, the format of the video on the TV SCART is automatically converted to 4:3 or 16:9 according to the received data for each zapping.
TV mode Set your TV system (Pal or SECAM).
TV Audio Signal allows you to set audio to mono or stereo
5.2.2 Time setting
Two modes are available to set the local time:
Automatic one which is based on time received from signal
1Manual one which allows you to set manually local time
2Press MENU to open the main menu.
3Highlight the Setup and press OK.
4Highlight the Time settings and press OK.
5Select the mode with 1/2.
6In manual mode, use digit buttons to set the current date and time directly.
5.6 User Preferences
In User preferences, you are able to customize the Receiver. You can set your preferred languages, modify few visual features, activate/deactivate some locking and change the PIN code.
To enter into User Preferences menu:
1Press MENU to open the main menu.
2Highlight User preferences and press OK.
5.6.1 Languages
1Follow the same step as 5.6 User preference.
2Highlight the Languages and press OK.
3Where you can select the menus language, the audio language and subtitles language via 1/2, and press OK once you confirm all the setting.
5.6.2 Appearance
This screen allows you to modify the appearance of information displayed during the viewing mode.
1Follow the same step as 5.6 User preference.
2Highlight Appearance and press OK.
3Select the parameters according to your preference:
Banner Timeout allows you to set the duration of the display of banner in viewing mode, available values are from 3 to 10 seconds. Volume bar display allows you to display or not the volume bar Volume bar timeout allows you to set the duration of the display of the volume bar, available values are from 3 to 10 seconds.
Subtitle display allows you to display or not subtitles according to subtitle language.
|
| The Master PIN code |
|
| is “RED RED GREEN |
|
| GREEN YELLOW |
|
| YELLOW BLUE |
|
| BLUE”. |
|
| Note : keep this code |
|
| secret to prevent |
|
| your children from |
|
| using it. |
I set the |
| Make sure the time |
timer but it |
| of your VCR is set to |
did not |
| the the same time as |
record what |
| your receiver. |
I wanted. |
| Make sure the timer |
|
| is still on the list. It |
|
| may have been |
|
| deleted by a “new” |
|
| installation. |
Each time I | The maturity level access | Set the maturity level |
set a timer, | control is set | access control to |
the PIN |
| None or prefer lock |
code is |
| specific channels. |
requested |
|
|
The picture | The broadcast is probably | Check the receiver |
on some | in widescreen and the | “TV format” option |
channels | receiver settings may be | setting, following the |
seems to | not correct. | information in 5.2.1 |
have been |
| TV configuration. If |
stretched or |
| you have a |
squashed. |
| widescreen TV, you |
|
| may also need to |
|
| check the settings on |
|
| your TV. |