SET-UP AND QUICK USE - TV AND REMOTE OPERATION

TELEVISION


SMART


HELP

BEGIN


Remember,

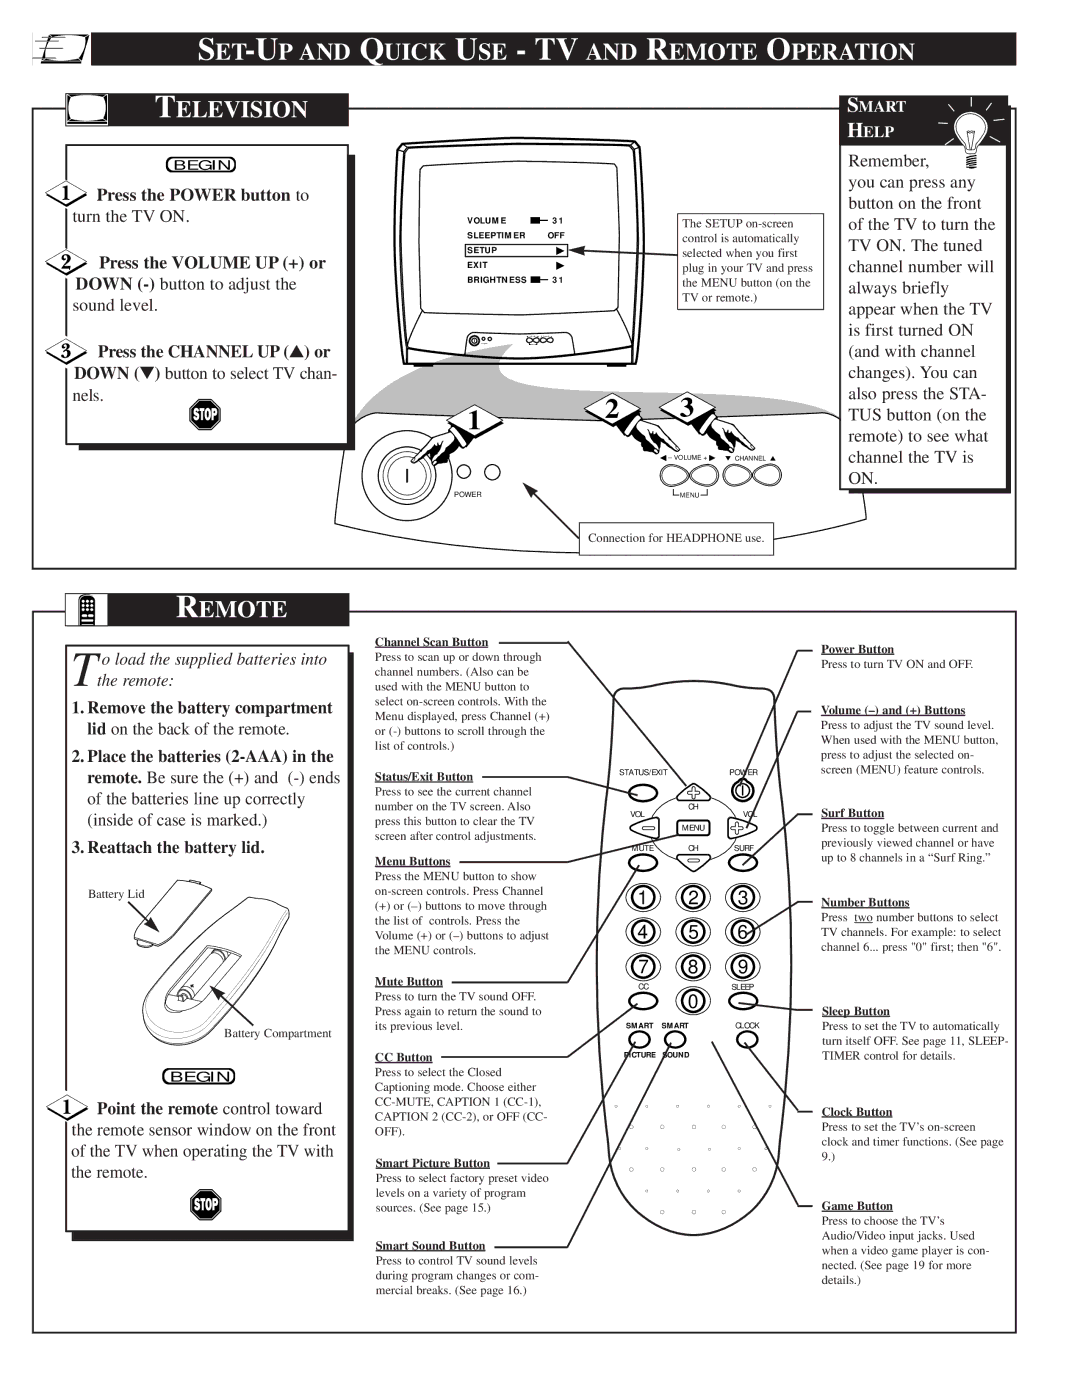
Press the POWER button to


you can press any


button on the front

turn the TV ON.


VOLUME

31

The SETUP on-screen

of the TV to turn the


SLEEPTIMER

OFF


control is automatically

TV ON. The tuned

Press the VOLUME UP (+) or

SETUP

selected when you first


channel number will

EXIT

plug in your TV and press

DOWN (-)button to adjust the

BRIGHTNESS

31

the MENU button (on the

always briefly


TV or remote.)

sound level.


appear when the TV


is first turned ON

Press the CHANNEL UP () or


(and with channel

DOWN () button to select TV chan-


changes). You can

nels.

1

2

3

also press the STA-


TUS button (on the


remote) to see what


– VOLUME + CHANNEL

channel the TV is


ON.


POWER


MENU


Connection for HEADPHONE use.


REMOTE

T o load the supplied batteries into the remote:

1.Remove the battery compartment lid on the back of the remote.

2.Place the batteries (2-AAA) in the remote. Be sure the (+) and (-) ends of the batteries line up correctly (inside of case is marked.)

3.Reattach the battery lid.

Battery Lid

Battery Compartment

BEGIN

Point the remote control toward the remote sensor window on the front of the TV when operating the TV with the remote.

Channel Scan Button

Press to scan up or down through channel numbers. (Also can be used with the MENU button to select on-screen controls. With the Menu displayed, press Channel (+) or (-) buttons to scroll through the list of controls.)

Status/Exit Button

Press to see the current channel number on the TV screen. Also press this button to clear the TV screen after control adjustments.

Menu Buttons

Press the MENU button to show on-screen controls. Press Channel

(+)or (–) buttons to move through the list of controls. Press the Volume (+) or (–) buttons to adjust the MENU controls.

Mute Button

Press to turn the TV sound OFF. Press again to return the sound to its previous level.

CC Button

Press to select the Closed Captioning mode. Choose either CC-MUTE, CAPTION 1 (CC-1), CAPTION 2 (CC-2), or OFF (CC- OFF).

Smart Picture Button

Press to select factory preset video levels on a variety of program sources. (See page 15.)

Smart Sound Button

Press to control TV sound levels during program changes or com- mercial breaks. (See page 16.)

STATUS/EXIT


POWER

VOL

CH

VOL


MENU


MUTE

CH

SURF

1

2

3

4

5

6

7

8

9

CC

0

SLEEP


SMART

SMART

CLOCK

PICTURE SOUND


Power Button

Press to turn TV ON and OFF.

Volume (–) and (+) Buttons

Press to adjust the TV sound level. When used with the MENU button, press to adjust the selected on- screen (MENU) feature controls.

Surf Button

Press to toggle between current and previously viewed channel or have up to 8 channels in a “Surf Ring.”

Number Buttons

Press two number buttons to select TV channels. For example: to select channel 6... press "0" first; then "6".

Sleep Button

Press to set the TV to automatically turn itself OFF. See page 11, SLEEP- TIMER control for details.

Clock Button

Press to set the TV’s on-screen clock and timer functions. (See page 9.)

Game Button

Press to choose the TV’s Audio/Video input jacks. Used when a video game player is con- nected. (See page 19 for more details.)

Page 6
Image 6
Philips PS 1964C warranty SET-UP and Quick USE TV and Remote Operation, Television

PS 1964C specifications

The Philips PS 1964C is a standout turntable that embodies the charm and quality of vintage audio equipment. Launched in the mid-1960s, this model was designed to cater to audiophiles seeking a superior listening experience. Combining technological innovation with timeless aesthetics, the PS 1964C is a remarkable piece of engineering.

One of the key features of the Philips PS 1964C is its belt-driven mechanism. This design minimizes vibrations from the motor, allowing for smoother playback and improved sound quality. The belt drive system is essential in maintaining the integrity of the audio signal, making it a preferred choice among audiophiles looking for accuracy in sound reproduction.

The PS 1964C also boasts an automatic tonearm mechanism, which simplifies the user experience. This feature allows the tonearm to automatically lift and return to its rest position at the end of a record, preventing wear on both the stylus and the vinyl. This automation strikes a balance between convenience and precision, ensuring that users can enjoy their records without the hassle of manual operation.

The turntable is equipped with an adjustable counterweight and an anti-skating mechanism, which ensures that the stylus maintains optimal tracking force throughout playback. These characteristics help reduce record wear and distortion, resulting in clearer audio output. The adjustable settings cater to various cartridge weights, adding versatility for users who may choose to upgrade their stylus.

Another notable aspect of the Philips PS 1964C is its elegant wooden plinth. This not only enhances the aesthetic appeal of the turntable but also contributes to its overall stability by reducing unwanted resonance. The design reflects the craftsmanship of the time, making it a beautiful addition to any audio setup.

In terms of connectivity, the PS 1964C offers a standard RCA output, allowing for easy integration with a variety of amplifiers and speakers. This flexibility ensures that users can easily connect their vintage turntable to modern audio systems, preserving the classic sound without compromising on quality.

With its combination of classic design and advanced features, the Philips PS 1964C remains an enduring favorite among vinyl enthusiasts. Its blend of aesthetic beauty and audio precision captures the essence of the golden age of analog sound while still appealing to the needs of contemporary listeners.