Connecting the Units
<ENGLISH>
Installation | <ENGLISH> |
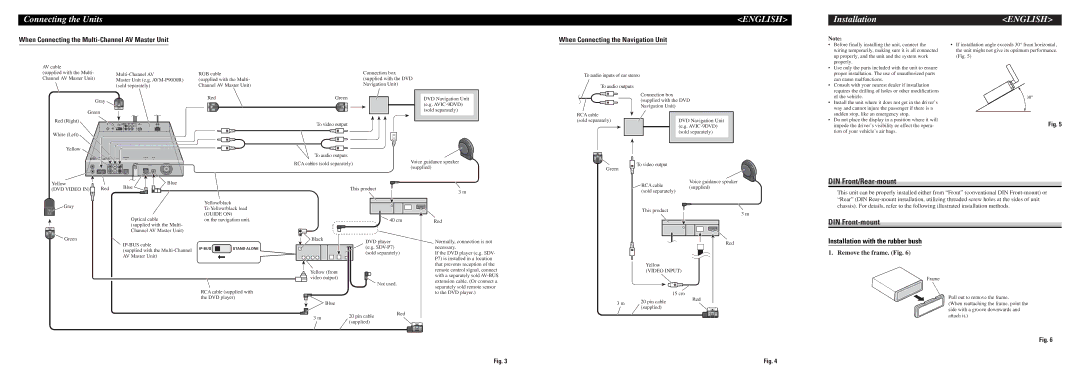
When Connecting the Multi-Channel AV Master Unit
AV cable |
|
|
|
|
|
|
|
(supplied with the Multi- | RGB cable | ||||||
Channel AV Master Unit) | Master Unit (e.g. | (supplied with the Multi- | |||||
| (sold separately) | Channel AV Master Unit) | |||||
| Gray |
|
|
| Red | ||
|
|
| |||||
|
|
|
|
|
|
| |
|
|
|
|
|
|
|
|
|
|
|
|
|
|
|
|
|
|
|
|
|
|
|
|
Green
Red (Right)
White (Left)
Yellow
Connection box (supplied with the DVD Navigation Unit)
Green | DVD Navigation Unit |
| (e.g. |
| (sold separately) |
To video output
To audio outputs |
| |
RCA cables (sold separately) | Voice guidance speaker | |
(supplied) | ||
|
When Connecting the Navigation Unit
To audio inputs of car stereo
To audio outputs
Connection box (supplied with the DVD Navigation Unit)
RCA cable |
|
|
|
| |
|
|
|
| ||
(sold separately) |
|
|
| DVD Navigation Unit |
|
|
|
|
| (e.g. |
|
|
|
| |||
|
|
|
| (sold separately) |
|
|
|
|
|
|
|
|
|
|
|
|
|
To video output
Green
Note:
•Before finally installing the unit, connect the wiring temporarily, making sure it is all connected up properly, and the unit and the system work properly.
•Use only the parts included with the unit to ensure proper installation. The use of unauthorized parts can cause malfunctions.
•Consult with your nearest dealer if installation requires the drilling of holes or other modifications of the vehicle.
•Install the unit where it does not get in the driver’s way and cannot injure the passenger if there is a sudden stop, like an emergency stop.
•Do not place the display in a position where it will impede the driver’s visibility or affect the opera- tion of your vehicle’s air bags.
•If installation angle exceeds 30° from horizontal, the unit might not give its optimum performance. (Fig. 5)
30°
Fig. 5
Yellow
(DVD VIDEO IN)
Gray
Blue
Red Blue
Yellow/black
To Yellow/black lead (GUIDE ON)
This product
3 m
Voice guidance speaker
![]() RCA cable(supplied) (sold separately)
RCA cable(supplied) (sold separately)
This product
3 m
DIN Front/Rear-mount
This unit can be properly installed either from “Front” (conventional DIN
Green
Optical cableon the navigation unit. (supplied with the Multi-
Channel AV Master Unit)
| STAND ALONE | ||
(supplied with the |
| ||
|
|
| |
AV Master Unit) |
|
|
|
RCA cable (supplied with the DVD player)
Black
Yellow (front video output)
Blue
40 cm
DVD player (e.g.
Not used.
Red
Normally, connection is not necessary.
If the DVD player (e.g. SDV- P7) is installed in a location that prevents reception of the remote control signal, connect with a separately sold
Red
Yellow
(VIDEO INPUT)
|
| 15 cm |
3 m | 20 pin cable | Red |
| ||
(supplied) |
| |
|
|
DIN Front-mount
Installation with the rubber bush
1. Remove the frame. (Fig. 6)
Frame
Pull out to remove the frame.
(When reattaching the frame, point the side with a groove downwards and
3 m | 20 pin cable | Red |
| ||
(supplied) |
| |
|
|
attach it.)
Fig. 6
Fig. 3 | Fig. 4 |