BEFORE OPERATIONS

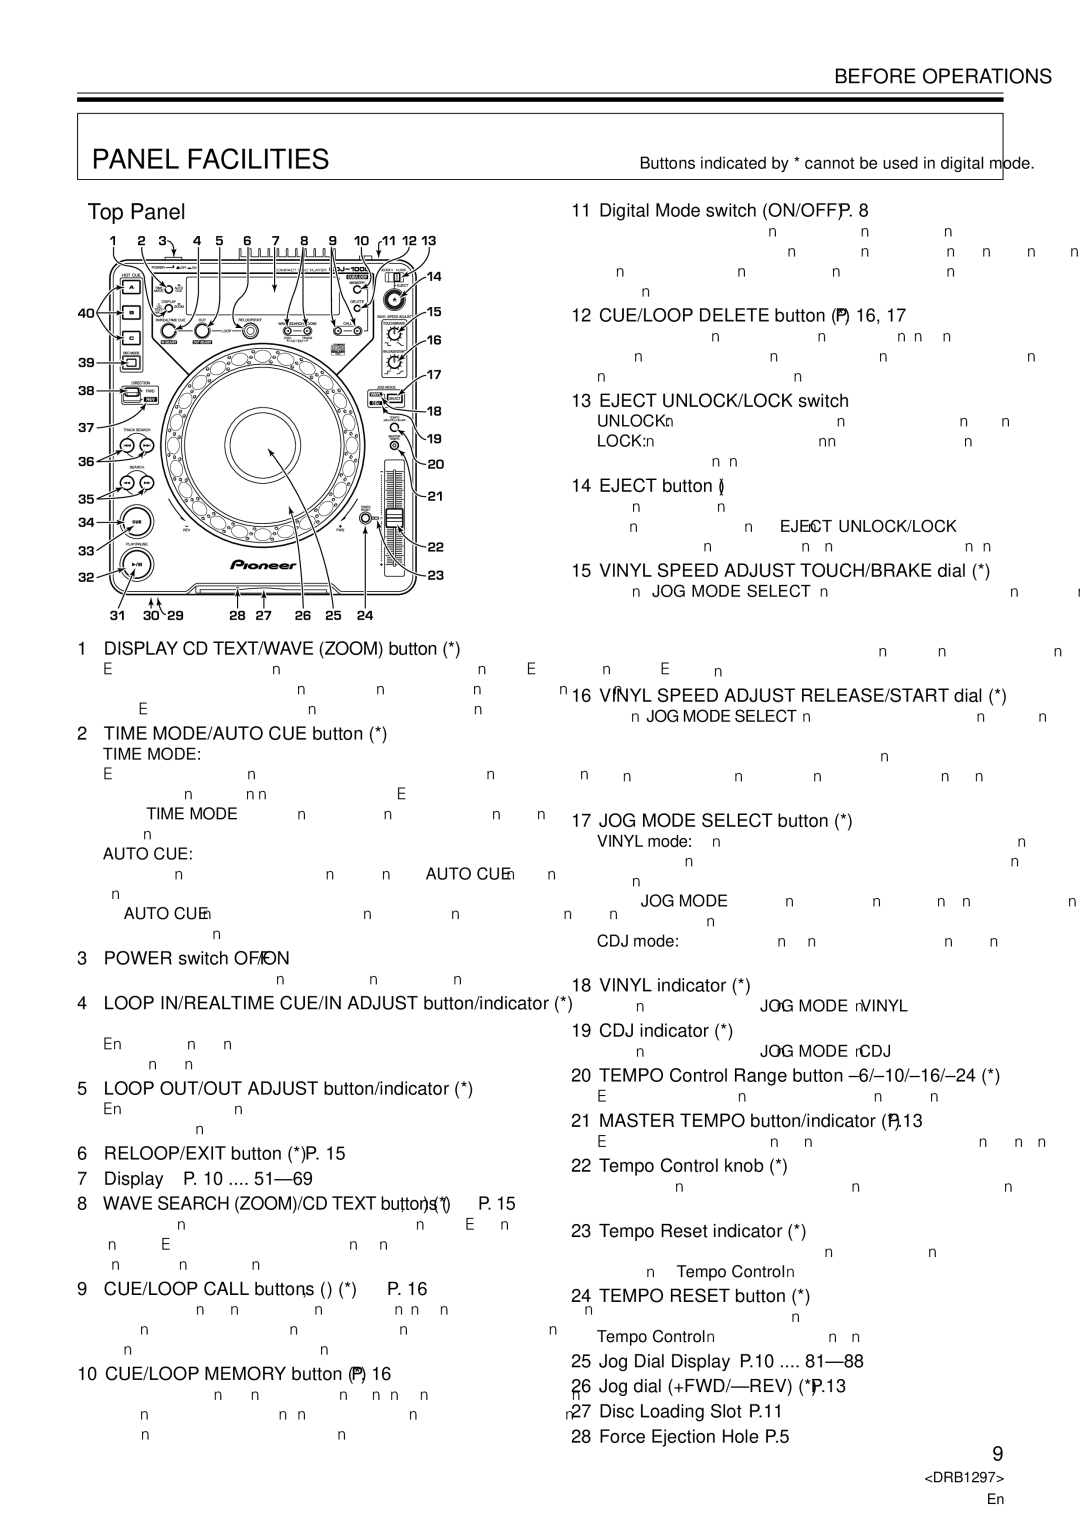
PANEL FACILITIES

Buttons indicated by * cannot be used in digital mode.

Top Panel

11 Digital Mode switch (ON/OFF) P. 8

1DISPLAY CD TEXT/WAVE (ZOOM) button (*)

Each press of this button toggles the display between WAVE display and CD-TEXT disc/track title display. When the button is held down for 1 second or longer, the WAVE display cycles between the 1 track full-scale and 2x zoom scale.

2TIME MODE/AUTO CUE button (*)

TIME MODE:

Each time this button is pressed, the time display changes between elapsed play- back time and remaining playback time (REMAIN) of each track.

÷The TIME MODE is stored in memory and persists even when the power is turned off.

AUTO CUE:

Hold down this key for 1 second or longer to toggle between AUTO CUE on and off. P.11

÷AUTO CUE on/off status is stored in memory and persists even when the power is turned off.

3POWER switch OFF /ON _

This switch is located on the rear panel of the unit.

4LOOP IN/REALTIME CUE/IN ADJUST button/indicator (*)

Real-time cue P. 13 Enter loop in point P. 14 Loop in point adjust P. 14

5LOOP OUT/OUT ADJUST button/indicator (*)

Enter loop out point P. 14 Loop out point adjust P. 14

6RELOOP/EXIT button (*) P. 15

7Display P. 10 .... 51–69

8WAVE SEARCH (ZOOM)/CD TEXT buttons (2, 3) (*) P. 15

This button moves the displayed area when WAVE is in zoom display mode. In the TEXT display mode, pressing the 2 button will display the disc title and pressing the 3button will display the track title.

9CUE/LOOP CALL buttons (2, 3) (*) P. 16

Calls Cue points and Loop points stored in internal memory or external memory (when a memory card is inserted). (When a memory card is inserted, the ex- ternal memory takes precedence.)

10CUE/LOOP MEMORY button (*) P. 16

Stores Cue points and Loop points in internal memory or external memory (when a memory card in inserted). (When a memory card is inserted, the external memory takes precedence.)

This switch is located on the rear panel of the unit. Set to ON when the digital output is to be used. When set to On, the DJ functions do not function. (Func- tions marked * do not operate in this mode.) And the muted pause mode is used instead of the audible pause mode.

12CUE/LOOP DELETE button (*) P. 16, 17

Deletes Cue points or Loop points stored in internal memory or external memory (when memory card is inserted). (When a memory card is inserted, the exter- nal memory takes precedence.)

13EJECT UNLOCK/LOCK switch

UNLOCK: In this mode the disc can be ejected even during playback.

LOCK: In this mode, the disc cannot be ejected during playback. The disc can be ejected when in pause mode.

14EJECT button (0)

When this button is pressed the disc is ejected through the disc insertion slot when it stops rotating. When the EJECT UNLOCK/LOCK switch is set to [LOCK] position, the disc can only be ejected when in pause mode.

15VINYL SPEED ADJUST TOUCH/BRAKE dial (*)

When the JOG MODE SELECT button is set to [VINYL] position, you can use this dial to adjust the speed by which the playback stops when the surface of the Jog dial is pressed.

Playback stops faster as the dial is turned counterclockwise and stops slower as the dial is turned clockwise.

16VINYL SPEED ADJUST RELEASE/START dial (*)

When the JOG MODE SELECT button is set to [VINYL] position, you can use this dial to adjust the speed by which playback starts after you take your hand off the surface of the Jog dial. Playback starts normal speed faster as the dial is turned counterclockwise and takes longer time to return to normal speed when turned clockwise.

17JOG MODE SELECT button (*)

VINYL mode: when the surface of the Jog dial is pressed during playback, play- back stops and if the dial is rotated, music is output according to the speed the dial is turned.

The JOG MODE is stored in memory and remains in memory even if the power is turned off.

CDJ mode: above operation is not performed even when the Jog dial surface is pressed.

18VINYL indicator (*)

This indicator lights when the JOG MODE is in VINYL mode.

19CDJ indicator (*)

This indicator lights when the JOG MODE is in CDJ mode.

20TEMPO Control Range button ±6/±10/±16/±24 (*)

Each time the button is pressed, the range changes (±6%/±10%/±16%/±24%).

21MASTER TEMPO button/indicator (*) P.13

Each press of the button turns the master tempo function on or off.

22Tempo Control knob (*)

Slide the knob towards you (+) to increase the tempo and slide it away from you (–) to decrease it.

23Tempo Reset indicator (*)

Shows that the tempo has been reset to [0] (normal tempo) regardless of the position of the Tempo Control knob.

24TEMPO RESET button (*)

Resets the tempo to [0] (normal tempo) regardless of the position of the Tempo Control knob. Press button once more to release it.

25Jog Dial Display P.10 .... 81–88

26Jog dial (+FWD/–REV) (*) P.13

27Disc Loading Slot P.11

28Force Ejection Hole P.5

9

<DRB1297>

En

Page 9
Image 9
Pioneer CDJ-1000 operating instructions Panel Facilities, Top Panel

CDJ-1000 specifications

The Pioneer CDJ-1000, introduced in the early 2000s, became an iconic digital turntable that transformed the world of DJing. Its blend of advanced technology and user-friendly design made it a preferred choice for both amateur and professional DJs.

One of the CDJ-1000's standout features is its large, pressure-sensitive jog wheel, which allows for precise control over track playback. This innovative design enables DJs to scratch, pitch-bend, and manipulate tracks intuitively, imitating the feel of traditional vinyl turntables. The jog wheel is surrounded by an LED display that provides real-time feedback on track position, pitch adjustments, and BPM, ensuring that DJs stay aligned with the music.

Another significant feature is the CDJ-1000's playback capability. It supports various audio formats, including standard CDs, CD-Rs, and MP3 files. This versatility allows DJs to curate performances using a broad array of music, making the device suitable for various events, from club gigs to festivals.

The CDJ-1000 also boasts a built-in memory function, enabling users to store cue points and loops, facilitating seamless transitions between tracks. DJs can easily navigate through their playlists, saving valuable time during performances. Additionally, the unit utilizes a digital audio output to maintain signal quality, ensuring the best possible sound reproduction.

The unit's compatibility with other Pioneer equipment, such as mixers, means that it can easily integrate into existing setups. This connectivity is enhanced through its digital link feature, which allows multiple CDJ-1000 units to be connected for synchronized play, creating a cohesive performance environment.

In terms of build quality, the CDJ-1000 is robust and designed to endure the rigors of live performance. Its layout is intuitive, with a user-friendly interface that enables quick access to essential functions.

Overall, the Pioneer CDJ-1000 redefined DJing by integrating digital technology without sacrificing the tactile experience of vinyl. Its combination of innovative features, support for multiple music formats, and reliable build quality cemented its status as a staple in the DJ industry, influencing future designs and technologies in the realm of digital DJing. It remains a beloved piece of equipment among many DJs today, reflecting its lasting impact on the art of mixing and performance.