CONNECTIONS

When connecting or changing the connection of units, make sure to first turn off the power switch and disconnect the power cord from the outlet.

This mixer is not furnished with any connection cables; when performing connections, use the cables that came provided with your player and other components, or purchase commercially available audio cables.

1. Connecting Input Components


[DJ CD Player]


Analog turntable 2

CDJ-800, CDJ-1000, CDJ-1000MK2,

Analog turntable 1


CDJ-100S, CDJ-700S, CDJ-500II,


CMX-3000, CMX-5000, DMP-555


Player B

Player A


Cassette deck, etc.


Cassette deck, etc.

2

1


R L

R L

1

R L

2

Microphone

CH-2

L R

SEND

RETURN


CH-1

MIC

R

L

R

L

R

L

L


CD


MASTER 2


CD


R

L

PHONO

(MONO)

(MONO)


R


/ LINE

MASTER 1


PHONO

R

L


PHONO

3 COLD

/ LINE

PHONO


1 GND


SIGNAL LINE


SIGNAL

LINE

GND


R 2 HOT

GND

SESSION IN

BOOTH/

CH-2 PLAYER

L CH-1 PLAYER


SESSION OUT

CONTROL


CONTROL


3

L

R

4

CH-1 PHONO/LINE

CH-2 PHONO/LINE

Other mixer output

selector switch

selector switch


DJ CD Players 1

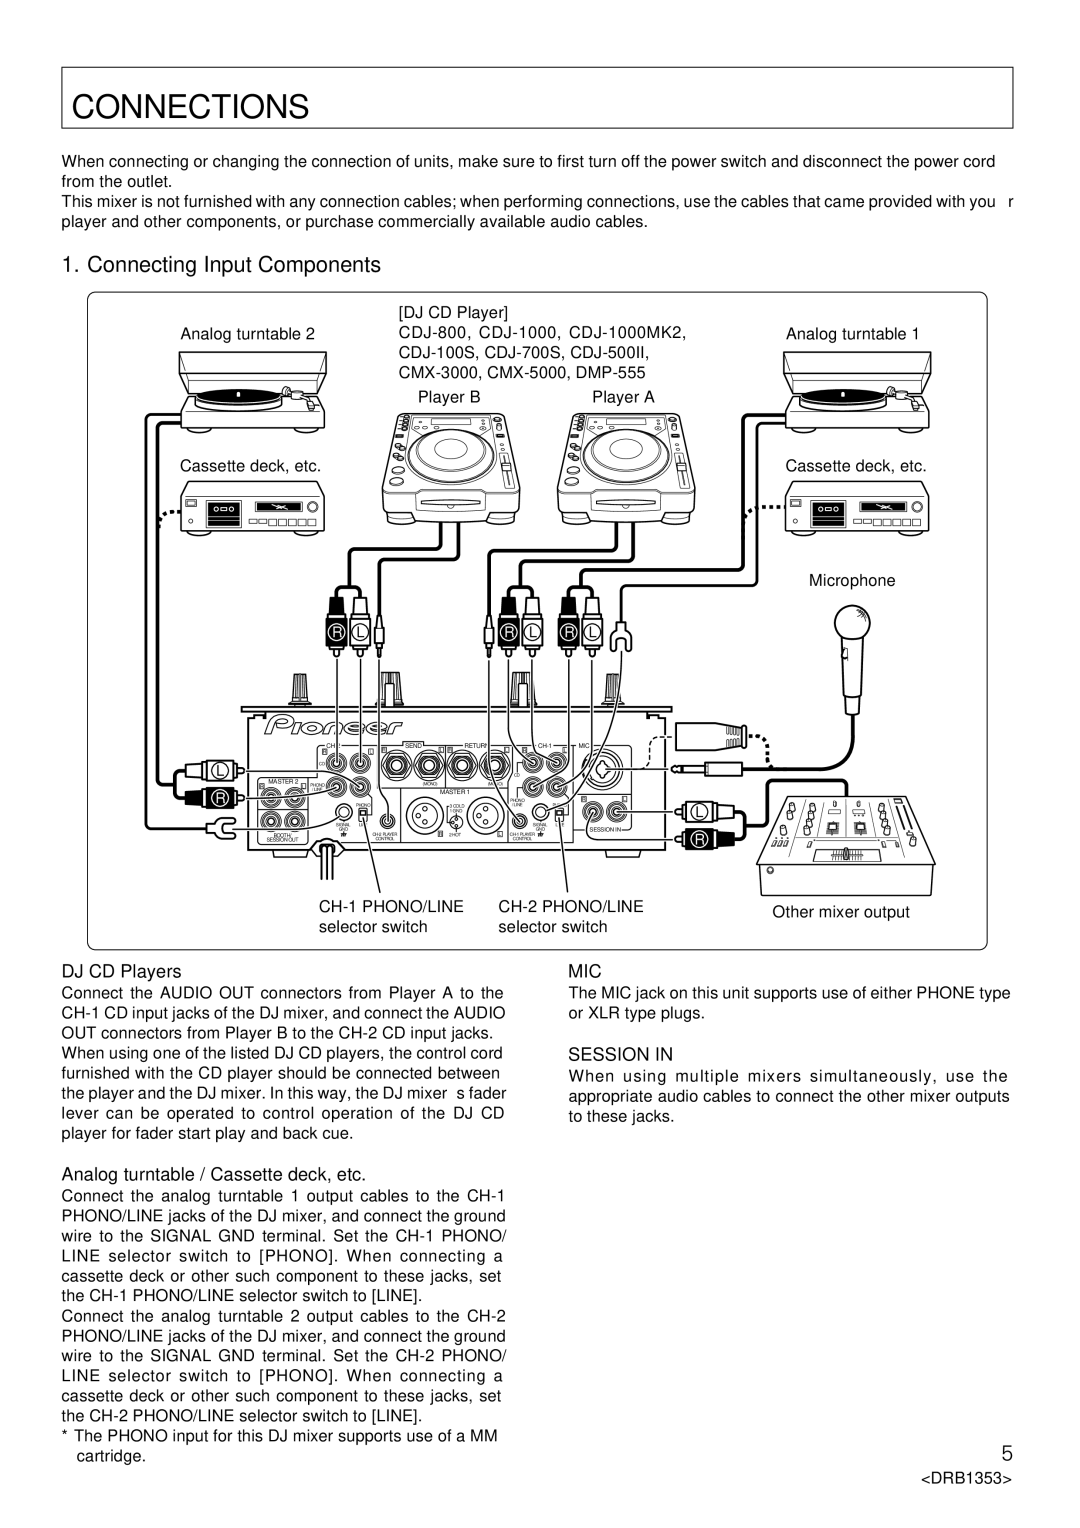
Connect the AUDIO OUT connectors from Player A to the CH-1 CD input jacks of the DJ mixer, and connect the AUDIO OUT connectors from Player B to the CH-2 CD input jacks.

When using one of the listed DJ CD players, the control cord furnished with the CD player should be connected between the player and the DJ mixer. In this way, the DJ mixer’s fader lever can be operated to control operation of the DJ CD player for fader start play and back cue.

MIC 3

The MIC jack on this unit supports use of either PHONE type or XLR type plugs.

SESSION IN 4

When using multiple mixers simultaneously, use the appropriate audio cables to connect the other mixer outputs to these jacks.

Analog turntable / Cassette deck, etc. 2

Connect the analog turntable 1 output cables to the CH-1 PHONO/LINE jacks of the DJ mixer, and connect the ground wire to the SIGNAL GND terminal. Set the CH-1 PHONO/ LINE selector switch to [PHONO]. When connecting a cassette deck or other such component to these jacks, set the CH-1 PHONO/LINE selector switch to [LINE].

Connect the analog turntable 2 output cables to the CH-2 PHONO/LINE jacks of the DJ mixer, and connect the ground wire to the SIGNAL GND terminal. Set the CH-2 PHONO/ LINE selector switch to [PHONO]. When connecting a cassette deck or other such component to these jacks, set the CH-2 PHONO/LINE selector switch to [LINE].

*The PHONO input for this DJ mixer supports use of a MM cartridge.

5

<DRB1353>

Page 5
Image 5
Pioneer DJM-707 operating instructions Connections, Connecting Input Components, Mic, Session

DJM-707 specifications

The Pioneer DJM-707 is a versatile and powerful DJ mixer that has earned its place in the professional DJ community. Launched as part of Pioneer’s renowned DJM series, it brings together a range of sophisticated features and technologies designed for both live performances and studio use.

One of the standout features of the DJM-707 is its 4-channel configuration. This allows DJs to mix multiple audio sources seamlessly, making it ideal for those who want to incorporate various types of sound into their sets. Each channel is equipped with three-band EQ, enabling precise control over the low, mid, and high frequencies. This feature is essential for tailoring sounds and ensuring that tracks blend well together.

The mixer is known for its high-quality audio processing capabilities. It utilizes a 24-bit digital signal processing engine, which ensures that the audio remains clear and free of distortion, even at high volumes. Additionally, the built-in effects processor supports a range of creative effects, including echoes, flangers, and filters. DJs can apply these effects in real-time, enhancing their mixes and providing unique soundscapes during performances.

Another important characteristic of the DJM-707 is its user-friendly interface. The layout is designed with the DJ in mind, featuring large, easily accessible knobs and faders that allow for quick adjustments. The mixer also includes a comprehensive LED metering system, which gives operators immediate visual feedback on levels, promoting better mixing accuracy.

Connectivity options are extensive on the DJM-707, with multiple inputs and outputs available. This includes both balanced and unbalanced outputs, allowing for compatibility with various sound systems. The mixer also supports USB connectivity, making it possible to connect to a computer for seamless integration with digital audio workstations or DJ software.

Furthermore, the DJM-707’s robust build quality ensures durability for the rigors of frequent transport and use in live settings. The chassis is designed to withstand rigorous handling, making it a reliable choice for touring DJs.

In conclusion, the Pioneer DJM-707 stands out for its rich feature set, high-quality audio processing, user-friendly interface, and robust connectivity options. Whether you're a seasoned professional or an aspiring DJ, the DJM-707 provides the tools necessary to create captivating performances and engage your audience effectively. Its combination of technology and practicality has made it a respected choice in the world of DJing.