HTP-2500/2600 Quick Start Guide

1

Check that you have all the


2

Put the batteries in the remote

accessories.


control and stick the non-skid pads


to the base of the speakers.


STANDBY/ON


MUTE

1

Open the battery compartment on


SLEEP

STATUS

DIMMER


Speaker cord (x1)

INPUT SELECTOR

TUNER


the rear of the remote control.


DIGITAL

STB

DVD/DVR

EDIT


FM/AM

TAPE/VCR

TV

CLASS


TUNING

STATION

2

Insert the supplied batteries


+

+

following the markings inside the


SYSTEM

VOLUME


SETUP

CH LEVEL


battery compartment to align


+


FM wire antenna


ENTER


them correctly.


ROOM


TEST


SETUP

TONE


3

Replace the battery compartment


AUTO

SURROUND

STEREO


Batteries (x2)

OFF

SOUND

TONE

MPX


cover.


BASS

TREBLE


+

+


4

Stick the self-adhesive non-skid


pads to the underside of each


RECEIVER


speaker, and to the underside of


the subwoofer. Use four pads per


AM loop


Remote control


speaker (see below).


antenna


Brackets (x4)


You should also have:


Screws (x4)

• Speakers (x5)


• Subwoofer

Non-skid pads


• Operating instructions

(1x20, 1x4)


• Warranty card

Front and surround speakers

Center speaker

Subwoofer

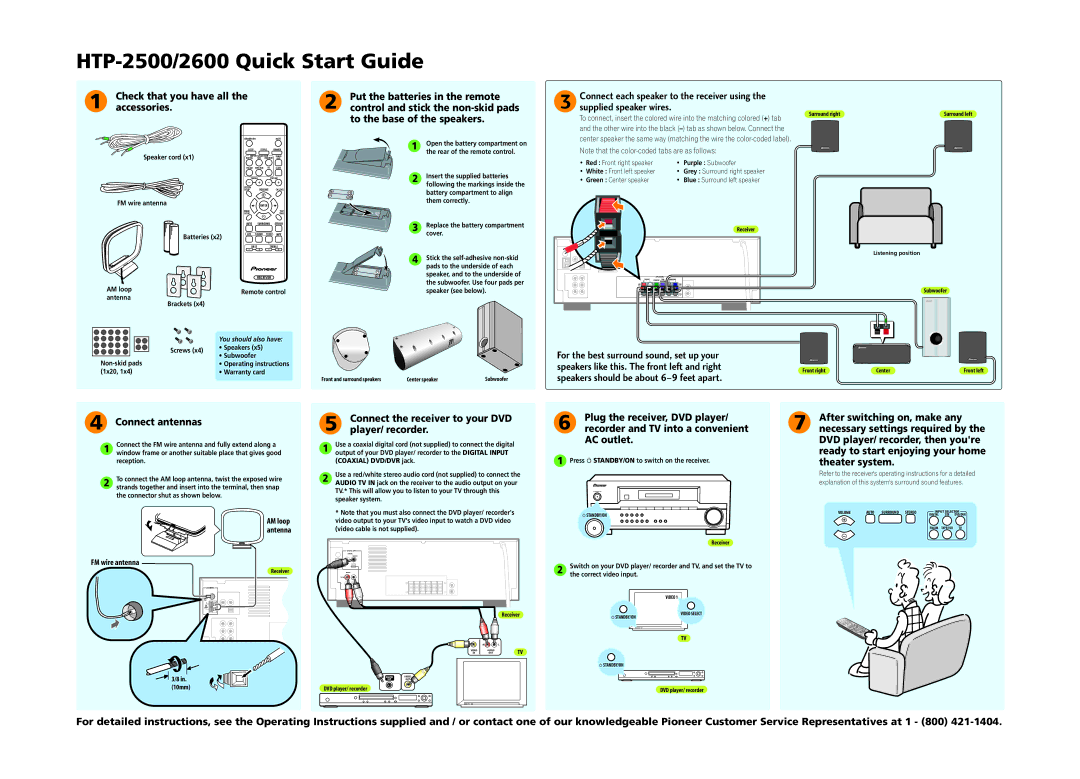
Connect each speaker to the receiver using the


3 supplied speaker wires.

Surround right

Surround left

To connect, insert the colored wire into the matching colored (+) tab


and the other wire into the black () tab as shown below. Connect the


center speaker the same way (matching the wire the color-coded label).


Note that the color-coded tabs are as follows:

Red : Front right speaker

Purple : Subwoofer

White : Front left speaker

Grey : Surround right speaker

Green : Center speaker

Blue : Surround left speaker


Receiver

Listening position

SPEAKERS

R

FRONT

CENTER

SUB

SURROUND

L


WOOFER

R

L

+

+


Subwoofer

For the best surround sound, set up your


speakers like this. The front left and right

Front right

Center

Front left

speakers should be about 6–9 feet apart.


4 Connect antennas

Connect the FM wire antenna and fully extend along a

1 window frame or another suitable place that gives good reception.

2

To connect the AM loop antenna, twist the exposed wire


strands together and insert into the terminal, then snap

the connector shut as shown below.

5

Connect the receiver to your DVD

player/ recorder.

1

Use a coaxial digital cord (not supplied) to connect the digital


output of your DVD player/ recorder to the DIGITAL INPUT


(COAXIAL) DVD/DVR jack.

2

Use a red/white stereo audio cord (not supplied) to connect the


AUDIO TV IN jack on the receiver to the audio output on your

TV.* This will allow you to listen to your TV through this speaker system.

6

Plug the receiver, DVD player/

7

After switching on, make any

recorder and TV into a convenient

necessary settings required by the


AC outlet.


DVD player/ recorder, then you're

1 Press ￿ STANDBY/ON to switch on the receiver.


ready to start enjoying your home


theater system.

Refer to the receiver's operating instructions for a detailed explanation of this system's surround sound features.

￿STANDBY/ON


* Note that you must also connect the DVD player/ recorder's

AM loop

video output to your TV's video input to watch a DVD video

antenna

(video cable is not supplied).


DIGITAL INPUT


(COAXIAL)


DVD/DVR


FM wire antenna


Receiver

AUDIO


TV IN


IN

+

+


ANTENNA


OUT


L


FM


UNBAL


75


￿


AM


LOOP


Receiver


R


L


VIDEO

AUDIO

TV


IN

OUT

3/8 in.

DIGITAL

VIDEO


OUT

OUT


(10mm)

DVD player/ recorder


￿ STANDBY/ON

VOLUME

AUTO

SURROUND STEREO

INPUT SELECTOR

+


DIGITAL

STB

DVD/DVR


FM/AM

TAPE/VCR

TV


Receiver


2

Switch on your DVD player/ recorder and TV, and set the TV to


the correct video input.

VIDEO 1

VIDEO SELECT

￿ STANDBY/ON

TV

￿STANDBY/ON

DVD player/ recorder

For detailed instructions, see the Operating Instructions supplied and / or contact one of our knowledgeable Pioneer Customer Service Representatives at 1 - (800) 421-1404.

Page 1
Image 1
Pioneer HTP-600 warranty Speakers should be about 6-9 feet apart, Connect antennas, Connect the receiver to your DVD

HTP-600, HTP-500 specifications

The Pioneer HTP-500 and HTP-600 are exceptional home theater systems designed to elevate the audio-visual experience. Both systems cater to audio enthusiasts and casual viewers alike, integrating advanced technology with user-friendly features to deliver immersive sound and stunning visuals.

The HTP-500 is known for its compact design and outstanding sound quality. It includes a 5.1-channel surround sound system, featuring one subwoofer, four satellite speakers, and an easy-to-set-up front speaker. The subwoofer is powered, ensuring deep bass that enriches movie watching and music listening experiences. The system supports various audio formats, including Dolby Digital and DTS, which enables users to enjoy multi-channel sound that fills their living spaces.

On the other hand, the HTP-600 offers enhanced features and connectivity options. With a more robust amplifier and additional satellite speakers, this system elevates the acoustic performance further, making it ideal for larger rooms. The HTP-600's advanced sound processing capabilities efficiently decode high-definition audio formats, providing users with a cinema-like experience without the complexity often associated with such systems.

A key characteristic of both systems is their user-friendly setup. Pioneer has designed these models with intuitive controls, allowing users to configure sound settings with ease. The inclusion of automatic calibration technology means the systems can adjust to the acoustics of the room, optimizing sound output for the best performance no matter the environment.

In addition to superior sound capabilities, the HTP-500 and HTP-600 also feature various input options, including HDMI, optical, and auxiliary connections. This versatility allows users to connect multiple devices, such as gaming consoles, Blu-ray players, and streaming services, making them suitable for the modern entertainment landscape.

Both systems also emphasize robust build quality and stylish design, seamlessly fitting into home decor. Their sleek appearance doesn't just add to the aesthetic appeal; it ensures that they are suitable for various installation options, whether mounted on walls or placed on shelves.

In summary, the Pioneer HTP-500 and HTP-600 are exemplary home theater systems that cater to diverse audio-visual needs. With their stellar sound performance, versatile connectivity, and ease of use, they create an engaging entertainment experience that appeals to audiophiles and casual users alike.