Pioneer PD-F19PD-F27 Connections, Making connections, Connecting to the Digital OUT Jack

Models: PD-F19PD-F27

1 28
Download 28 pages 52.56 Kb
Page 6
Image 6

CONNECTIONS

Before making or changing the connections, switch off the power and disconnect the power cord from the AC outlet.

Normal conections


Stereo amplifier


Cassette deck

C D

DIGITAL

COAXIAL

CONTROL

CD-DECK

R L

OPTICAL IN


OUT

SYNCHRO

When connecting another PD-F27 to create a 602-disc changer, make the normal connections, then also make the connec- tions shown below.

R L R L

SLAVE unit

Red R

L White

B


D


Optical

B

Control cable C


fiber


cable

Coaxial output cable

Audio cable


CDDECK

A-1


R

L


SYNCHRO


Red

White


cable

R

L

R

L

OPTICAL

COAXIAL

CD-DECK

SLAVE

MASTER

IN

OUT

LINE OUT

SLAVE

DIGITAL OUT

SYNCHRO


LINE IN


MASTER SLAVE

CONTROL

To the CONTROL IN jack of the Pioneer component bearing the ëmark.

C

IN OUT

CONTROL

RSLAVE MASTER

L IN OUT


LINE OUT

MASTER SLAVE


CONTROL

Stereo

Red R L White


amplifier


Control cable


E-1


E-2


R

L

R

L


R

L

R

L

OPTICAL COAXIAL

CD-DECK

SLAVE

MASTER

IN OUT

IN

OUT


LINE OUT

SLAVE


DIGITAL OUT

SYNCHRO

MASTER SLAVE

CONTROL


LINE IN


CONTROL


R

L

R

L

OPTICAL COAXIAL

CD-DECK

SLAVE

MASTER

IN OUT


IN

OUT


LINE OUT

SLAVE

DIGITAL OUT

SYNCHRO


CONTROL


LINE IN


MASTER SLAVE

CONTROL


A-2

PD-F27

Power cord


R L

R L

OPTICAL COAXIAL

SLAVE MASTER

IN OUT

MASTER

IN OUT

unit

LINE OUT

SLAVE

DIGITAL OUT


CONTROL


LINE IN


MASTER SLAVE

CONTROL

AMaking connections

1Connect the LINE OUT jacks of this unit to the input jacks (CD or AUX) of the amplifier. Make sure that the white plugs are connected to the left (L) jacks and the red plugs to the right (R) jacks.

Be sure not to connect this unit to the amplifier’s PHONO jacks, as sound will be distorted and normal playback will not be possible.

2Connect the power cord to a household AC wall outlet.

• Make sure plugs are inserted fully into the wall outlet.

Note!!

If you connect the power cord to a “SWITCHED” AC outlet on an amplifier, you will not be able to use this unit's memory function.

CSystem remote control with a Pioneer stereo

amplifier that has the ë mark

When a Pioneer stereo amplifier bearing the ë mark is used, connect the CONTROL IN jack on the rear panel of the CD player to the CONTROL OUT jack of the amplifier. This will enable the CD player to be controlled using the remote control unit supplied with the stereo amplifier. If you do not plan to use this feature, it is not necessary to connect the CONTROL IN/OUT jacks.

The remote control unit supplied with the amplifier can be used to control Play, Stop, Pause, Track/Disc Search and Disc Change operations.

For instructions regarding connections and operation, refer to the operating instructions provided with your stereo amplifier.

Note!!

BConnecting to the DIGITAL OUT JACK

This unit can be connected to an amplifier equipped with an optical digital jack or coaxial digital jack.

Note!!

No sound may be produced if optical connection are made with an amplifier having different optical signal standard.

When using the OPTICAL DIGITAL OUT jack:

1.Remove the protective dust cap from this unit’s OPTICAL DIGI- TAL OUT jack.

2.Use an optical fiber cable to connect the OPTICAL DIGITAL OUT jack of this unit to the optical input jack of the amplifier.

ÖAlign the plug of the optical fiber cable with the optical digital jack and fully insert the plug to make a secure connection.

Use a separately sold optical fiber cable for the optical digital jack connections.

When using the COAXIAL DIGITAL OUT jack:

Use coaxial output cable to connect the COAXIAL DIGITAL OUT jack of this unit to the coaxial digital input jack of the amplifier.

When a control cable is connected to the player’s CONTROL IN jack, direct control of the player with the remote control unit is not possible. Operate the player with the remote control unit by aiming it at the amplifier.

Be sure to connect both of the control cable's plugs securely to the CONTROL IN and CONTROL OUT jacks. Do not connect only one end of the cable.

Be sure to turn off the power of the amplifier before connect- ing the power cord and output cable.

When only the digital output is connected, the remote sensor of the amplifier does not function. To operate it, connect the output cable to the stereo amplifier as well as connecting the digital output.

DCD•Deck synchro function

If you have a Pioneer cassette deck provided with the CDDeck synchro function, connect the CD•DECK SYNCHRO jacks of the CD player and cassette deck. With this function, synchro recording can be carried out between the player and deck.

For details on connections and operation, refer to the operating instructions supplied with the cassette deck.

The CDDECK SYNCHRO cable is not supplied with the CD player.

When CDDeck synchro recording is carried out on several discs, use the program playback function. (Refer to page 16 for details of program playback.)

Note!!

6

In order to enable the CDDECK SYNCHRO recording function, the


output cable must be connected to the stereo amplifier.

Page 6
Image 6
Pioneer PD-F19PD-F27 Connections, Making connections, Connecting to the Digital OUT Jack, CDDeck synchro function

PD-F19PD-F27 specifications

The Pioneer PD-F19 and PD-F27 are notable members of the Pioneer CD player lineup, well-regarded for their reliability and robust performance. These models are designed to cater to audiophiles who appreciate quality audio reproduction and user-friendly features.

The PD-F19 is recognized for its innovative Multi-CD carousel design, allowing users to load up to 6 CDs at once. This feature not only enhances convenience but also ensures that listeners can enjoy extended playback without interruption. The unit supports a variety of disc formats, including CD-DA, CD-R, and CD-RW, making it versatile for different music collections.

The PD-F27 takes this convenience a step further by integrating advanced digital processing technologies. It features a high-quality 1-bit DAC (Digital-to-Analog Converter), which significantly reduces distortion and improves audio clarity. This technology ensures that the sound quality is crisp and detailed, allowing users to appreciate the nuances in their favorite tracks.

Both models include direct track access and programmable playback options, giving users greater control over their listening experience. The PD-F27 is equipped with a more sophisticated remote control, offering additional functionalities for ease of use. The inclusion of a large, informative display on both models provides essential information at a glance, such as track number, elapsed time, and remaining time.

Additional features of the PD-F27 include a seamless repeat function, which caters to those who want to listen to specific tracks or albums on loop. The anti-vibration chassis design is another critical characteristic that contributes to sound quality by minimizing unwanted resonances and enhancing playback stability.

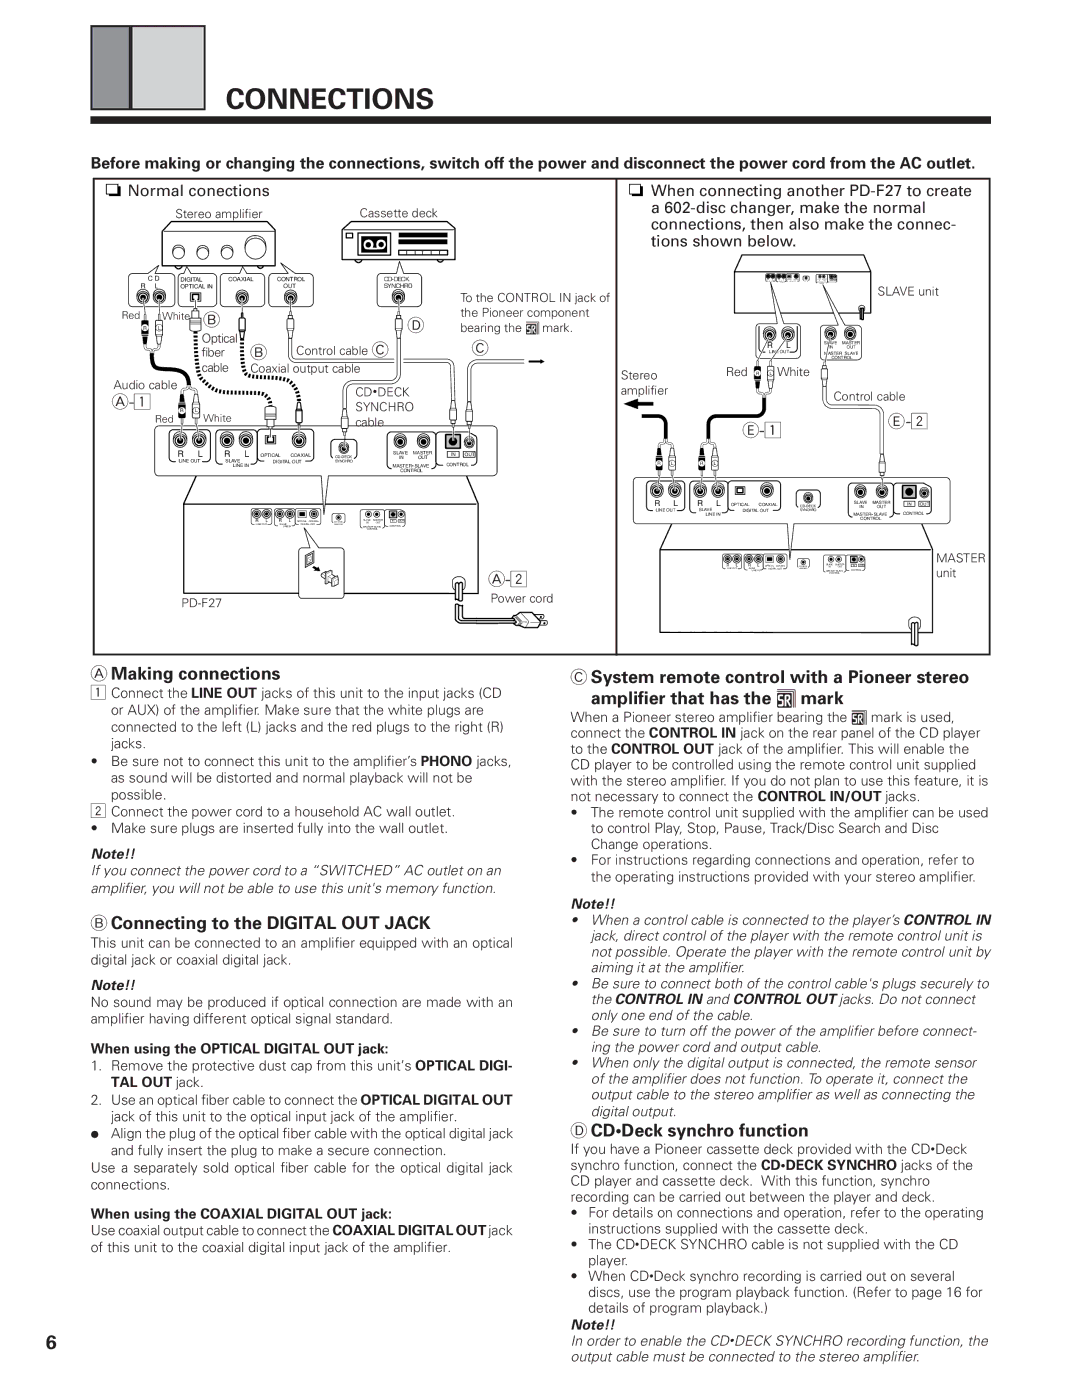
In terms of connectivity, both models come with analog outputs, allowing users to connect to a variety of audio systems easily. The PD-F27 may also offer digital outputs, enabling connection to external DACs and modern audio equipment, further enhancing versatility.

Overall, the Pioneer PD-F19 and PD-F27 CD players exemplify the brand's commitment to superior sound quality and user-centric design. With their unique features and robust performance, they remain valued choices for enthusiasts looking to enrich their audio experience.