Your AMR130 Center Channel Speaker can be mounted three ways:
1.On top of your video monitor. Use the adjustable sliding Easel Stand [figure 7] on the back of the Center Speaker to compensate for the shape of your monitor. Depress the lever on the sliding easel to aim the speaker driver toward your listening position. If your monitor has a small flat area on top and you want to to adhere the speaker to the monitor, use the supplied double-stick pads.
2.Directly below your monitor. Remove the adjustable sliding Easel Stand on the back of the Center Speaker to aim the speaker driver toward your listening position.
3.On the wall above your monitor. Use the two built-in keyhole slots on the back of the Center Speaker to wall mount the speaker.
W A L L - M O U N T I N G Y O U R A M R 1 3 0 R E A R S U R R O U N D S A T E L L I T E S A N D C E N T E R C H A N N E L S P E A K E R
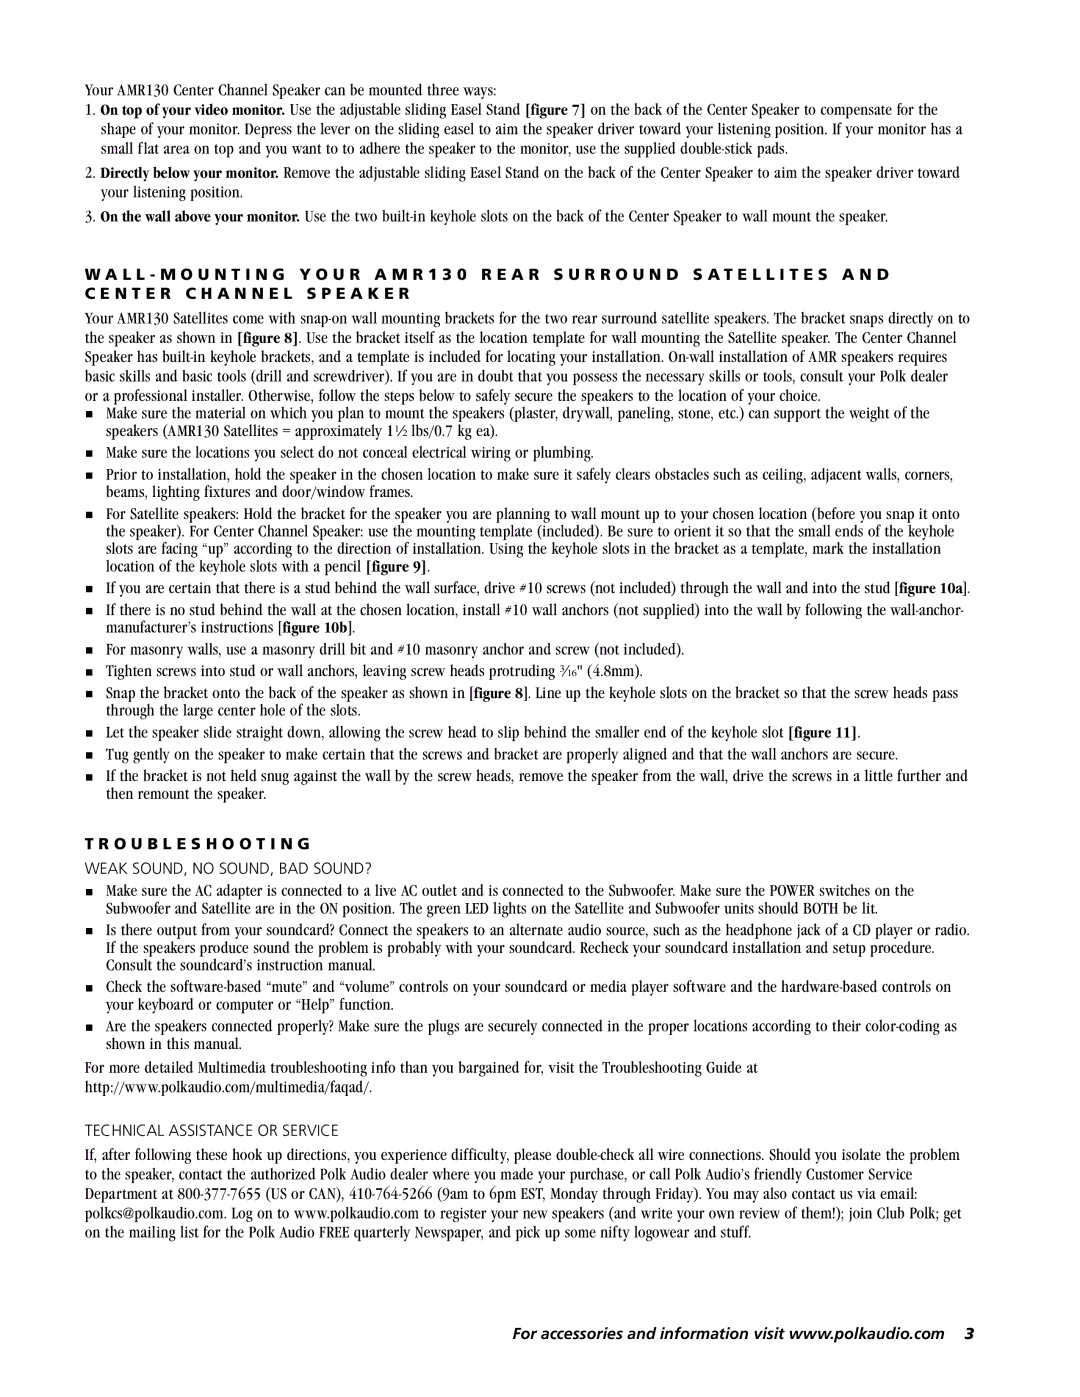
Your AMR130 Satellites come with snap-on wall mounting brackets for the two rear surround satellite speakers. The bracket snaps directly on to the speaker as shown in [figure 8]. Use the bracket itself as the location template for wall mounting the Satellite speaker. The Center Channel Speaker has built-in keyhole brackets, and a template is included for locating your installation. On-wall installation of AMR speakers requires basic skills and basic tools (drill and screwdriver). If you are in doubt that you possess the necessary skills or tools, consult your Polk dealer or a professional installer. Otherwise, follow the steps below to safely secure the speakers to the location of your choice.
∀Make sure the material on which you plan to mount the speakers (plaster, drywall, paneling, stone, etc.) can support the weight of the speakers (AMR130 Satellites = approximately 12 lbs/0.7 kg ea).
∀Make sure the locations you select do not conceal electrical wiring or plumbing.
∀Prior to installation, hold the speaker in the chosen location to make sure it safely clears obstacles such as ceiling, adjacent walls, corners, beams, lighting fixtures and door/window frames.
∀For Satellite speakers: Hold the bracket for the speaker you are planning to wall mount up to your chosen location (before you snap it onto
the speaker). For Center Channel Speaker: use the mounting template (included). Be sure to orient it so that the small ends of the keyhole slots are facing “up” according to the direction of installation. Using the keyhole slots in the bracket as a template, mark the installation location of the keyhole slots with a pencil [figure 9].
∀If you are certain that there is a stud behind the wall surface, drive #10 screws (not included) through the wall and into the stud [figure 10a].
∀If there is no stud behind the wall at the chosen location, install #10 wall anchors (not supplied) into the wall by following the wall-anchor- manufacturer’s instructions [figure 10b].
∀For masonry walls, use a masonry drill bit and #10 masonry anchor and screw (not included).
∀Tighten screws into stud or wall anchors, leaving screw heads protruding x" (4.8mm).
∀Snap the bracket onto the back of the speaker as shown in [figure 8]. Line up the keyhole slots on the bracket so that the screw heads pass through the large center hole of the slots.
∀Let the speaker slide straight down, allowing the screw head to slip behind the smaller end of the keyhole slot [figure 11].
∀Tug gently on the speaker to make certain that the screws and bracket are properly aligned and that the wall anchors are secure.
∀If the bracket is not held snug against the wall by the screw heads, remove the speaker from the wall, drive the screws in a little further and then remount the speaker.
T R O U B L E S H O O T I N G
WEAK SOUND, NO SOUND, BAD SOUND?
∀Make sure the AC adapter is connected to a live AC outlet and is connected to the Subwoofer. Make sure the POWER switches on the Subwoofer and Satellite are in the ON position. The green LED lights on the Satellite and Subwoofer units should BOTH be lit.
∀Is there output from your soundcard? Connect the speakers to an alternate audio source, such as the headphone jack of a CD player or radio. If the speakers produce sound the problem is probably with your soundcard. Recheck your soundcard installation and setup procedure. Consult the soundcard’s instruction manual.
∀Check the software-based “mute” and “volume” controls on your soundcard or media player software and the hardware-based controls on your keyboard or computer or “Help” function.
∀Are the speakers connected properly? Make sure the plugs are securely connected in the proper locations according to their color-coding as shown in this manual.
For more detailed Multimedia troubleshooting info than you bargained for, visit the Troubleshooting Guide at http://www.polkaudio.com/multimedia/faqad/.
TECHNICAL ASSISTANCE OR SERVICE
If, after following these hook up directions, you experience difficulty, please double-check all wire connections. Should you isolate the problem to the speaker, contact the authorized Polk Audio dealer where you made your purchase, or call Polk Audio’s friendly Customer Service Department at 800-377-7655 (US or CAN), 410-764-5266 (9am to 6pm EST, Monday through Friday). You may also contact us via email: polkcs@polkaudio.com. Log on to www.polkaudio.com to register your new speakers (and write your own review of them!); join Club Polk; get on the mailing list for the Polk Audio FREE quarterly Newspaper, and pick up some nifty logowear and stuff.