DEUTSCH
MM840UM, MM840UM-DVC & MM1040UM SUBWOOFERS
Abbildung 4
Bündiger Einbau
HOCHTÖNER-MONTAGE
1.Prüfen Sie, ob genug Freiraum da ist. Der Kit zur bündigen Installation ist 22,2 mm tief.
2.Markieren Sie den Mittelpunkt des gewünschten Lochs und schneiden Sie mit einer Lochsäge, einem Bohrer oder einem Teppichmesser ein Loch mit 50,8 mm Durchmesser.
Hinweis: Der Becher und die Federhalteklammer werden als eine vorinstallierte Einheit ausgeliefert.
3.Führen Sie die Kabel durch den Ausschnitt und die runde Öffnung unten am Becher.
4.Drücken Sie die Becher/Federhalteklammerbaugruppe
in den Ausschnitt, bis die Arme der Federklammer einrasten.
5.Verbinden Sie die Drähte von den Hochtöneranschlüssen am Crossover mit dem Hochtöner selbst unter Verwendung der
Hinweis: Wenn die Hochtönerleitungen nicht lang genug sind, verwenden Sie die beiliegenden Verlängerungen.
6.Befestigen Sie den Hochtöner, indem Sie ihn in den bündigen Montagebecher einrasten lassen.
ENGLISH
PRECONDITIONING PERIOD
Mobile Monitor Subwoofers will achieve even greater perfor- mance once they are thoroughly broken in. To break
in your new MM Subwoofers, play 20 to 30 hours of music at moderate levels.
GET MORE INFORMATION ONLINE AT POLK
UNIVERSITY: www.polkaudio.com/education.php
OPTIMAL CROSSOVER SETTING
We recommend using an active crossover with a 12 to 24dB per octave low pass filter slope, and setting it to an initial setting of 80 to 90Hz as a good starting point. This is an optimal crossover setting for most vehicles.
INVERTING PHASE
to the speaker, contact the authorized Polk Audio dealer where you bought your speakers. Authorized Polk Audio dealers are the best source for advice and assistance. Polk Audio’s Customer Service Department is available from
You will find additional information, informative arti- cles, manual updates and cool stuff to buy
that has “Polk Audio” all over it by visiting: www.polkaudio.com.
FRANÇAIS
PÉRIODEDE RODAGE
Les subwoofers MM seront encore plus performants après
ITALIANO
Depending on the placement of your subwoofer enclosure and associated components, it may be necessary to invert the phase of one or another of your system’s connections in order to gain better
une période de rodage convenable. Pour bien roder vos nou- veaux subwoofers, jouez de la musique pour
Figura 4
Montaggio a filo
FISSAGGIO DEL TWEETER
1.Verificare che si possa assicurare lo spazio giusto:
il kit di montaggio a filo ha una profondità di 22,2 mm.
2.Contrassegnare il centro del punto di installazione e praticare un foro di diametro pari a 50,8 mm (2”) mediante una sega a tazza, una punta di trapano o un rasoio.
Nota: la cassa e la staffa elastica sono
3.Infilare i cavi nel foro praticato e quindi nell’apertura circolare sulla parte inferiore della cassa.
4.Spingere il gruppo cassa/staffa elastica nel foro finché i bracci della staffa non si bloccano con uno scatto.
5.Collegare i cavi dai terminali del crossover al tweeter mediante i connettori Faston, collegando il cavo rosso dal terminale positivo (+) dell’apposita uscita del crossover al cavo rosso positivo (+) del tweeter.
Nota: adoperare i cavi di prolunga acclusi se i cavi del tweeter non sono di lunghezza sufficiente.
6.Inserire il tweeter a filo nella cassa accertandosi che si blocchi con uno scatto.
phase simply means switching the positive connections with the negative connections at the amplifier. If you choose to do this, invert the phase of only one set of speakers (either your mains, or your subs, never both).
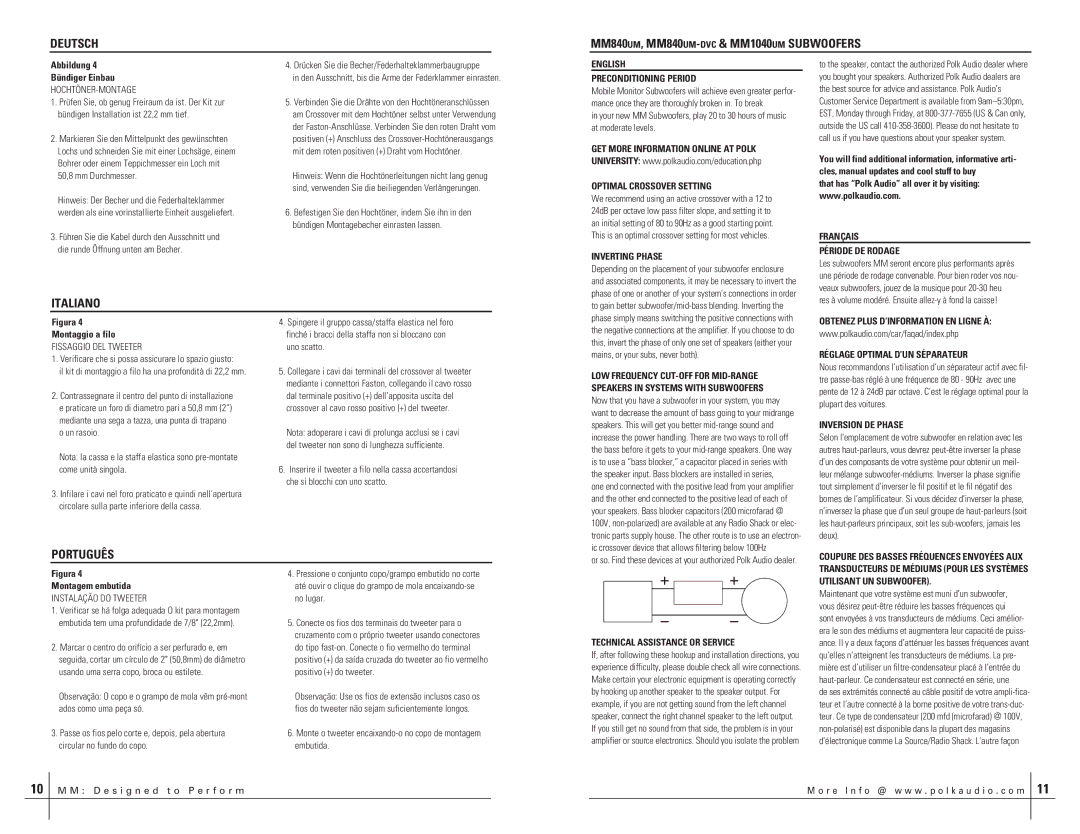
LOW FREQUENCY
Now that you have a subwoofer in your system, you may want to decrease the amount of bass going to your midrange speakers. This will get you better
OBTENEZ PLUS D’INFORMATION EN LIGNE À:
www.polkaudio.com/car/faqad/index.php
RÉGLAGE OPTIMALD’UN SÉPARATEUR
Nous recommandons l’utilisation d’un séparateur actif avec fil- tre
INVERSIONDE PHASE
Selon l’emplacement de votre subwoofer en relation avec les autres
PORTUGUÊS
or so. Find these devices at your authorized Polk Audio dealer.
COUPURE DES BASSES FRÉQUENCES ENVOYÉES AUX
Figura 4
Montagem embutida
INSTALAÇÃO DO TWEETER
1.Verificar se há folga adequada O kit para montagem embutida tem uma profundidade de 7/8" (22,2mm).
2.Marcar o centro do orifício a ser perfurado e, em seguida, cortar um círculo de 2" (50,8mm) de diâmetro usando uma serra copo, broca ou estilete.
Observação: O copo e o grampo de mola vêm
3.Passe os fios pelo corte e, depois, pela abertura circular no fundo do copo.
4.Pressione o conjunto copo/grampo embutido no corte até ouvir o clique do grampo de mola
5.Conecte os fios dos terminais do tweeter para o cruzamento com o próprio tweeter usando conectores do tipo
Observação: Use os fios de extensão inclusos caso os fios do tweeter não sejam suficientemente longos.
6.Monte o tweeter
|
|
|
|
|
| bass blocker |
|
|
|
|
|
|
|
|
|
|
|
|
|
|
|
|
|
|
| ||
|
|
|
|
|
| or capacitor |
|
|
|
|
|
|
|
| radio/amp |
|
|
|
|
|
|
|
|
| speaker | ||
|
|
|
|
|
|
|
|
|
|
| |||
|
|
|
|
|
|
|
|
|
|
|
|
|
|
|
|
|
|
|
|
|
|
|
|
|
|
|
|
|
|
|
|
|
|
|
|
|
|
|
|
|
|
TECHNICAL ASSISTANCE OR SERVICE
If, after following these hookup and installation directions, you experience difficulty, please double check all wire connections. Make certain your electronic equipment is operating correctly by hooking up another speaker to the speaker output. For example, if you are not getting sound from the left channel speaker, connect the right channel speaker to the left output. If you still get no sound from that side, the problem is in your amplifier or source electronics. Should you isolate the problem
TRANSDUCTEURS DE MÉDIUMS (POUR LES SYSTÈMES UTILISANT UN SUBWOOFER).
Maintenant que votre système est muni d’un subwoofer, vous désirez
de ses extrémités connecté au câble positif de votre
10
MM: Desi gned to P erf orm | M o r e I n fo @ w ww. p ol k au d i o. co m |
11