FIGURE 5a & 5b

[a]


[b]

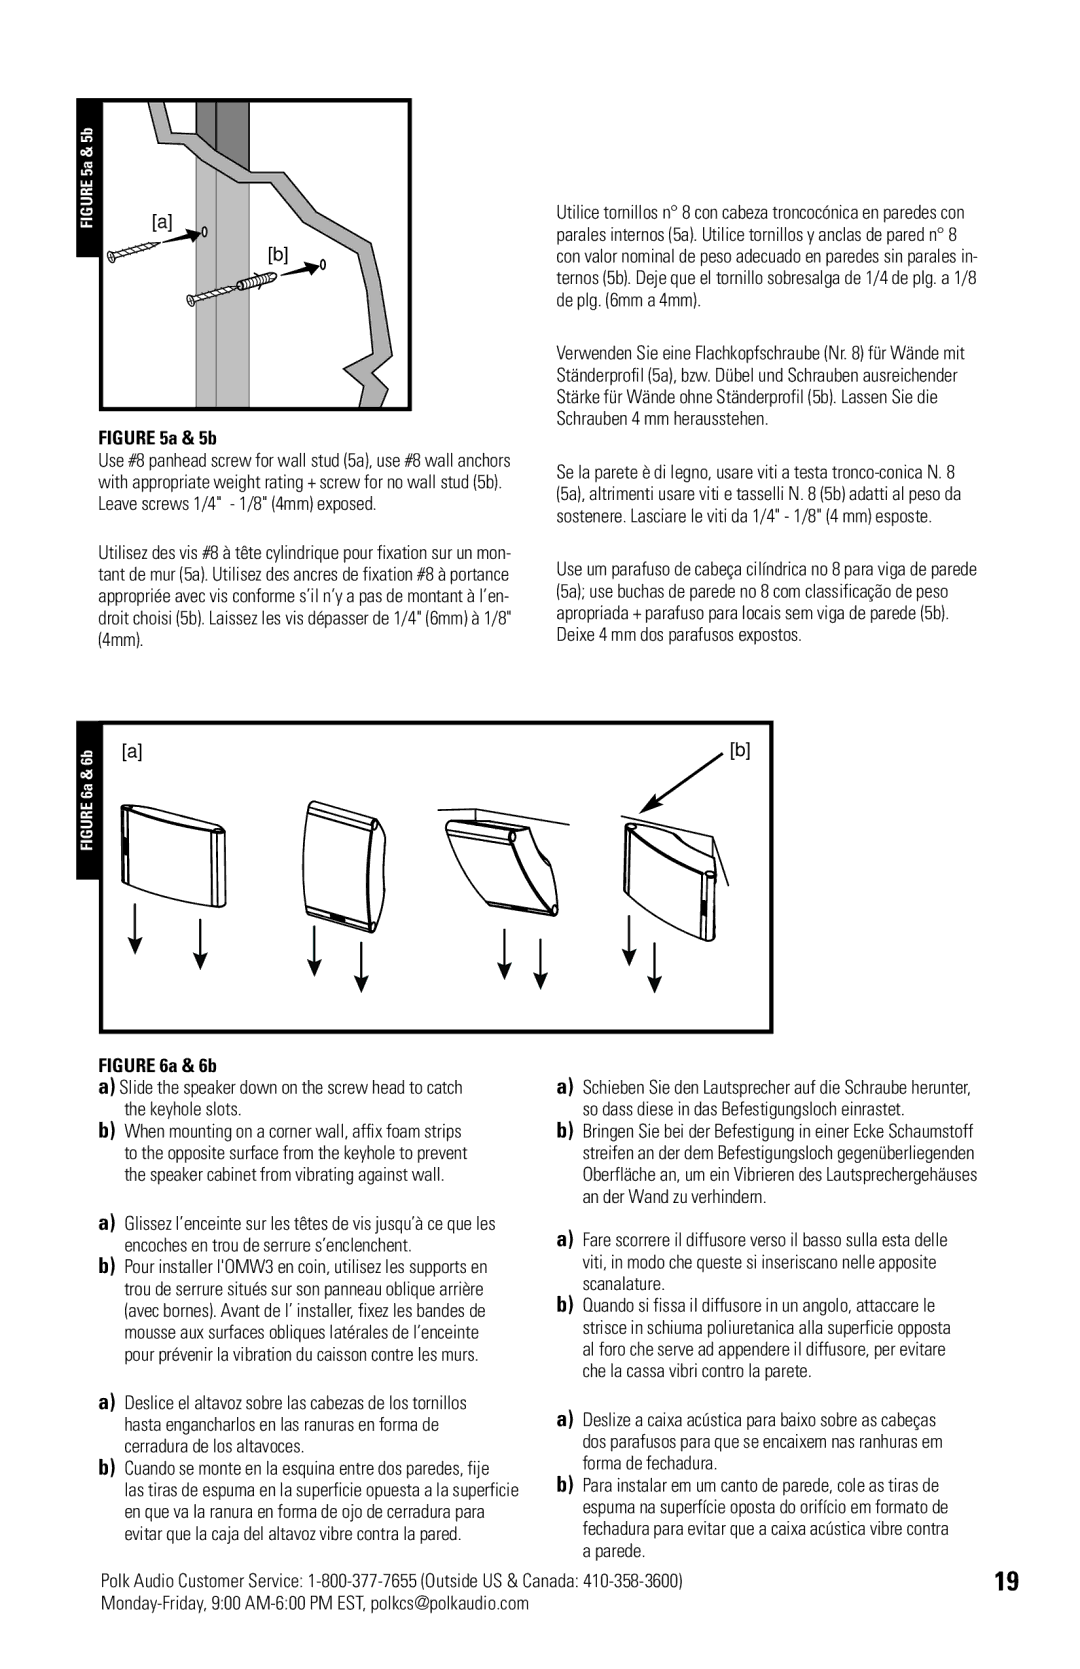
FIGURE 5a & 5b

Use #8 panhead screw for wall stud (5a), use #8 wall anchors with appropriate weight rating + screw for no wall stud (5b). Leave screws 1/4" - 1/8" (4mm) exposed.

Utilisez des vis #8 à tête cylindrique pour fixation sur un mon- tant de mur (5a). Utilisez des ancres de fixation #8 à portance appropriée avec vis conforme s’il n’y a pas de montant à l’en- droit choisi (5b). Laissez les vis dépasser de 1/4" (6mm) à 1/8" (4mm).

Utilice tornillos n° 8 con cabeza troncocónica en paredes con parales internos (5a). Utilice tornillos y anclas de pared n° 8 con valor nominal de peso adecuado en paredes sin parales in- ternos (5b). Deje que el tornillo sobresalga de 1/4 de plg. a 1/8 de plg. (6mm a 4mm).

Verwenden Sie eine Flachkopfschraube (Nr. 8) für Wände mit Ständerprofil (5a), bzw. Dübel und Schrauben ausreichender Stärke für Wände ohne Ständerprofil (5b). Lassen Sie die Schrauben 4 mm herausstehen.

Se la parete è di legno, usare viti a testa tronco-conica N. 8 (5a), altrimenti usare viti e tasselli N. 8 (5b) adatti al peso da sostenere. Lasciare le viti da 1/4" - 1/8" (4 mm) esposte.

Use um parafuso de cabeça cilíndrica no 8 para viga de parede (5a); use buchas de parede no 8 com classificação de peso apropriada + parafuso para locais sem viga de parede (5b). Deixe 4 mm dos parafusos expostos.

FIGURE 6a & 6b

[a]

FIGURE 6a & 6b

[b]

a)Slide the speaker down on the screw head to catch the keyhole slots.

b)When mounting on a corner wall, affix foam strips to the opposite surface from the keyhole to prevent the speaker cabinet from vibrating against wall.

a)Glissez l’enceinte sur les têtes de vis jusqu’à ce que les encoches en trou de serrure s’enclenchent.

b)Pour installer l'OMW3 en coin, utilisez les supports en trou de serrure situés sur son panneau oblique arrière (avec bornes). Avant de l’ installer, fixez les bandes de mousse aux surfaces obliques latérales de l’enceinte pour prévenir la vibration du caisson contre les murs.

a)Deslice el altavoz sobre las cabezas de los tornillos hasta engancharlos en las ranuras en forma de cerradura de los altavoces.

b)Cuando se monte en la esquina entre dos paredes, fije

las tiras de espuma en la superficie opuesta a la superficie en que va la ranura en forma de ojo de cerradura para evitar que la caja del altavoz vibre contra la pared.

a)Schieben Sie den Lautsprecher auf die Schraube herunter, so dass diese in das Befestigungsloch einrastet.

b)Bringen Sie bei der Befestigung in einer Ecke Schaumstoff streifen an der dem Befestigungsloch gegenüberliegenden Oberfläche an, um ein Vibrieren des Lautsprechergehäuses an der Wand zu verhindern.

a)Fare scorrere il diffusore verso il basso sulla esta delle viti, in modo che queste si inseriscano nelle apposite scanalature.

b)Quando si fissa il diffusore in un angolo, attaccare le strisce in schiuma poliuretanica alla superficie opposta al foro che serve ad appendere il diffusore, per evitare che la cassa vibri contro la parete.

a)Deslize a caixa acústica para baixo sobre as cabeças dos parafusos para que se encaixem nas ranhuras em forma de fechadura.

b)Para instalar em um canto de parede, cole as tiras de espuma na superfície oposta do orifício em formato de fechadura para evitar que a caixa acústica vibre contra a parede.

Polk Audio Customer Service: 1-800-377-7655 (Outside US & Canada: 410-358-3600)

19

Monday-Friday, 9:00 AM-6:00 PM EST, polkcs@polkaudio.com


Page 19
Image 19
Polk Audio OWM3 owner manual

OWM3 specifications

The Polk Audio OWM3 is a versatile speaker that has gained recognition for its remarkable sound quality and adaptable design. Ideal for both home theater systems and music playback, the OWM3's compact and sleek profile blends seamlessly into any decor while delivering outstanding audio performance.

One of the standout features of the OWM3 is its multi-directional design, which allows users to mount it on walls, place it on shelves, or position it in various orientations. This flexibility enables the speaker to function as a surround sound speaker in a home theater setup or as a main speaker in a stereo arrangement. The OWM3 comes equipped with a keyhole slot and threaded insert for easy wall mounting, making it an excellent option for spaces where floor space is limited.

The OWM3 is engineered with advanced technology to enhance audio fidelity. It utilizes a dynamic balance driver and a 0.75-inch silk dome tweeter, which work together to produce clear highs and rich mids. This combination ensures that vocals and instruments are rendered with precision, creating a soundstage that feels expansive and detailed. The speaker's frequency response spans from 80 Hz to 25 kHz, delivering a robust audio experience that caters to various listening preferences.

Another notable aspect of the OWM3 is its compatibility with various audio equipment. It operates seamlessly with a variety of amplifiers, receivers, and sound systems, allowing users to integrate it into their existing setups with ease. Whether used as part of a complete surround sound system or as standalone units, the OWM3 shines in delivering crystal-clear sound for movies, music, and gaming.

Durability is also a defining characteristic of the OWM3. It features a sturdy cabinet construction that minimizes resonance and unwanted vibrations, ensuring that the audio remains clean and accurate. The speaker is available in a stylish black or white finish, enabling it to match or complement any interior design.

In summary, the Polk Audio OWM3 impresses with its multi-directional design, high-quality drivers, and robust construction. Whether for cinematic experiences or musical enjoyment, the OWM3 offers versatility and performance, making it a favorite choice for audiophiles and casual listeners alike. Its combination of aesthetics, flexibility, and superior sound quality establishes the OWM3 as an excellent addition to any audio setup.