USING SPRING CLIP CONNECTORS

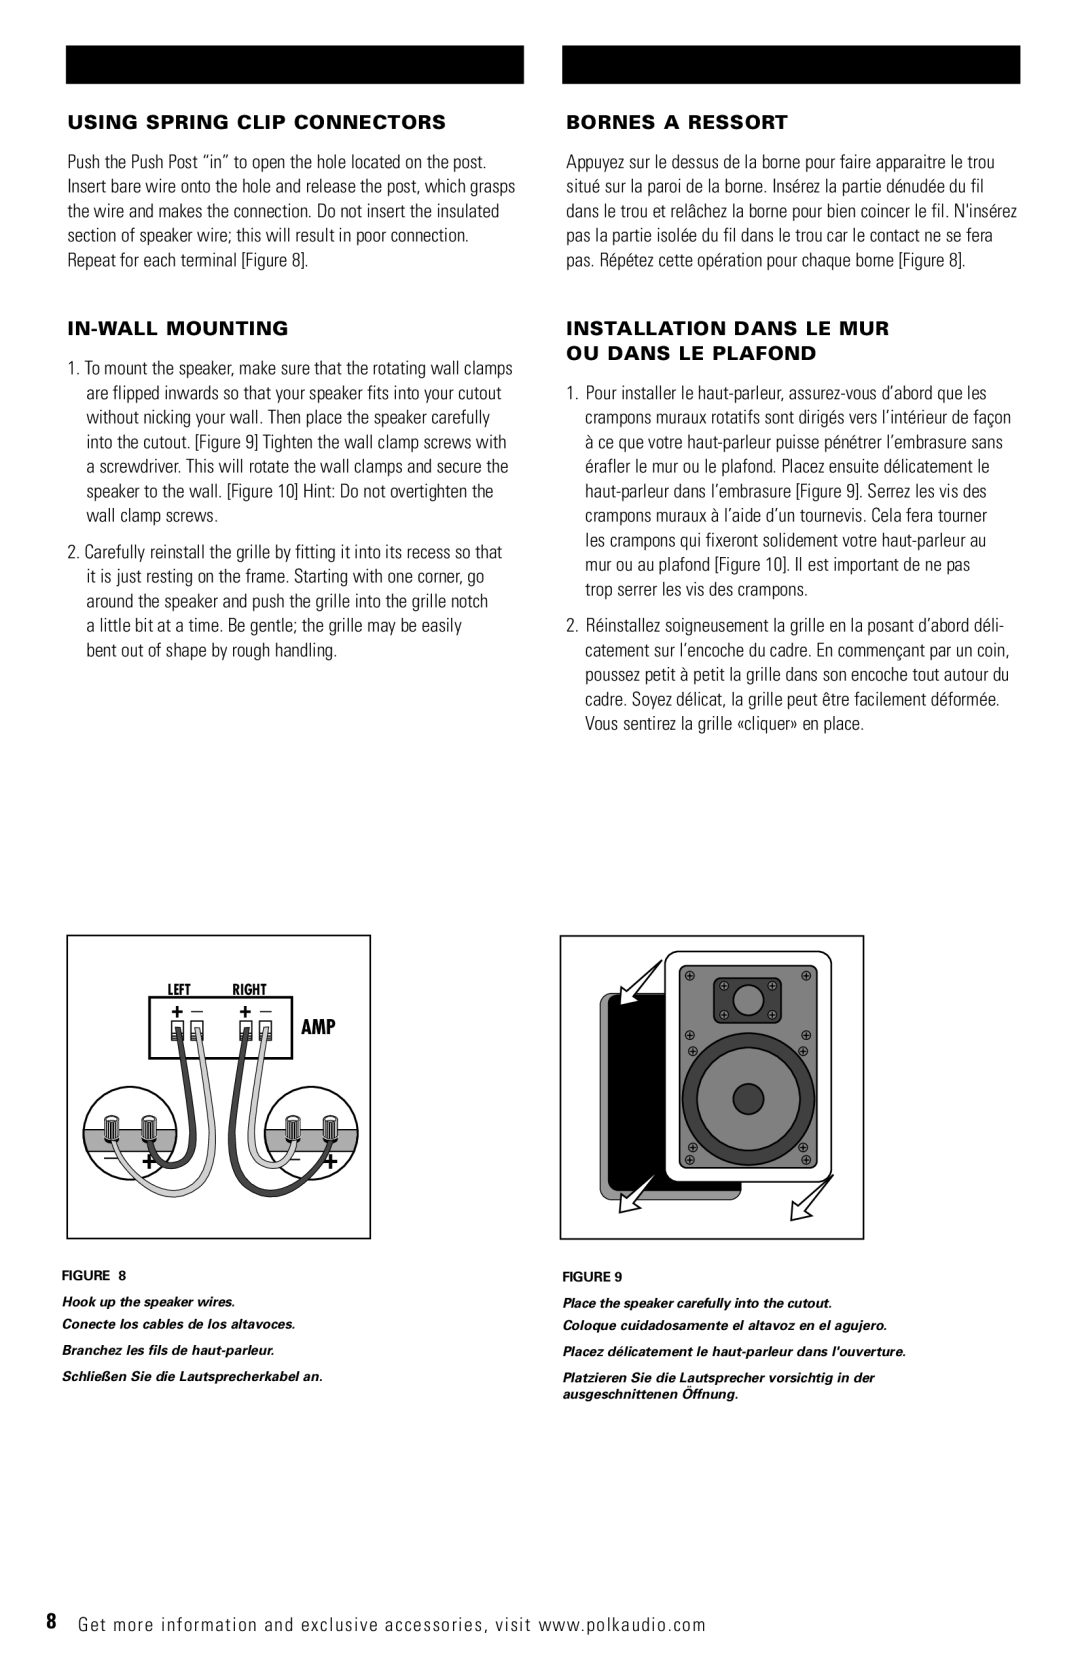
Push the Push Post “in” to open the hole located on the post. Insert bare wire onto the hole and release the post, which grasps the wire and makes the connection. Do not insert the insulated section of speaker wire; this will result in poor connection. Repeat for each terminal [Figure 8].

BORNES A RESSORT

Appuyez sur le dessus de la borne pour faire apparaitre le trou situé sur la paroi de la borne. Insérez la partie dénudée du fil dans le trou et relâchez la borne pour bien coincer le fil. N'insérez pas la partie isolée du fil dans le trou car le contact ne se fera pas. Répétez cette opération pour chaque borne [Figure 8].

IN-WALL MOUNTING

1.To mount the speaker, make sure that the rotating wall clamps are flipped inwards so that your speaker fits into your cutout without nicking your wall. Then place the speaker carefully into the cutout. [Figure 9] Tighten the wall clamp screws with a screwdriver. This will rotate the wall clamps and secure the speaker to the wall. [Figure 10] Hint: Do not overtighten the wall clamp screws.

2.Carefully reinstall the grille by fitting it into its recess so that it is just resting on the frame. Starting with one corner, go around the speaker and push the grille into the grille notch a little bit at a time. Be gentle; the grille may be easily bent out of shape by rough handling.

INSTALLATION DANS LE MUR

OU DANS LE PLAFOND

1.Pour installer le haut-parleur, assurez-vous d’abord que les crampons muraux rotatifs sont dirigés vers l’intérieur de façon à ce que votre haut-parleur puisse pénétrer l’embrasure sans érafler le mur ou le plafond. Placez ensuite délicatement le haut-parleur dans l’embrasure [Figure 9]. Serrez les vis des crampons muraux à l’aide d’un tournevis. Cela fera tourner les crampons qui fixeront solidement votre haut-parleur au mur ou au plafond [Figure 10]. Il est important de ne pas trop serrer les vis des crampons.

2.Réinstallez soigneusement la grille en la posant d’abord déli- catement sur l’encoche du cadre. En commençant par un coin, poussez petit à petit la grille dans son encoche tout autour du cadre. Soyez délicat, la grille peut être facilement déformée.

Vous sentirez la grille «cliquer» en place.

LEFT

_

RIGHT

+

+ _


AMP

_ +

_ +

FIGURE 8

Hook up the speaker wires. Conecte los cables de los altavoces.

Branchez les fils de haut-parleur.

Schließen Sie die Lautsprecherkabel an.

FIGURE 9

Place the speaker carefully into the cutout.

Coloque cuidadosamente el altavoz en el agujero.

Placez délicatement le haut-parleur dans l'ouverture.

Platzieren Sie die Lautsprecher vorsichtig in der ausgeschnittenen Öffnung.

8Get more information and exclusive accessories, visit www.polkaudio.com

Page 8
Image 8
Polk Audio RC6S owner manual Using Spring Clip Connectors, Bornes a Ressort, IN-WALL Mounting

RC6S specifications

The Polk Audio RC6S is a high-performance in-wall speaker designed to deliver exceptional sound quality while seamlessly integrating into your home environment. A part of Polk's extensive range of architectural speakers, the RC6S is designed for both audiophiles and casual listeners who appreciate premium audio without compromising on aesthetics.

One of the standout features of the RC6S is its innovative driver technology. It boasts a 6.5-inch Dynamic Balance composite driver that provides rich and detailed midrange and bass frequencies. This is complemented by a 1-inch silk dome tweeter that enhances high-frequency response, delivering clear and crisp sound quality across a wide frequency range. The combination of these elements allows the RC6S to reproduce music and dialogue with remarkable detail, making it an ideal choice for both home theaters and multi-room audio systems.

The RC6S also incorporates Polk's patented Power Port bass venting technology. This advanced design enhances the low-frequency response of the speaker, providing deeper, punchier bass without distortion. The Power Port technology allows for a smoother transition between the bass and midrange frequencies, resulting in a more dynamic listening experience.

Installation is made straightforward with the RC6S. It features an easy-to-install design, complete with a cut-out template and simple mounting clamps, enabling seamless integration into drywall and ensuring a secure fit. The low-profile grille can be painted to match your decor, allowing it to blend into any room without drawing attention.

In addition to its performance and design, the RC6S is engineered to be versatile. Whether you're listening to music, watching movies, or hosting parties, this speaker delivers a balanced and engaging soundstage. It is also compatible with other Polk Audio speakers, allowing for easy expansion of your audio system.

Durability is another notable characteristic of the RC6S. It is built with high-quality materials, ensuring long-lasting performance and reliability, even in challenging environments. The speaker is also moisture-resistant, making it suitable for use in humid areas like bathrooms or kitchens.

In summary, the Polk Audio RC6S is a premium in-wall speaker that combines advanced technology, high-quality sound reproduction, and versatile design. With features designed for both audiophiles and casual listeners alike, it represents a significant addition to any home audio system, offering a clean, unobtrusive aesthetic without sacrificing performance.