HOW TO USE THE SHEAR

Firmly support and clamp the workpiece to ensure control. Position the workpiece with the hidden or back surface of the material facing up to reduce marring of the exposed side. To achieve maximum cutting efficiency, hold the bottom of the stationary blades parallel to and against the workpiece.

TO REMOVE THE CUTTER BLADES

Disconnect the tool from the power source!


1.

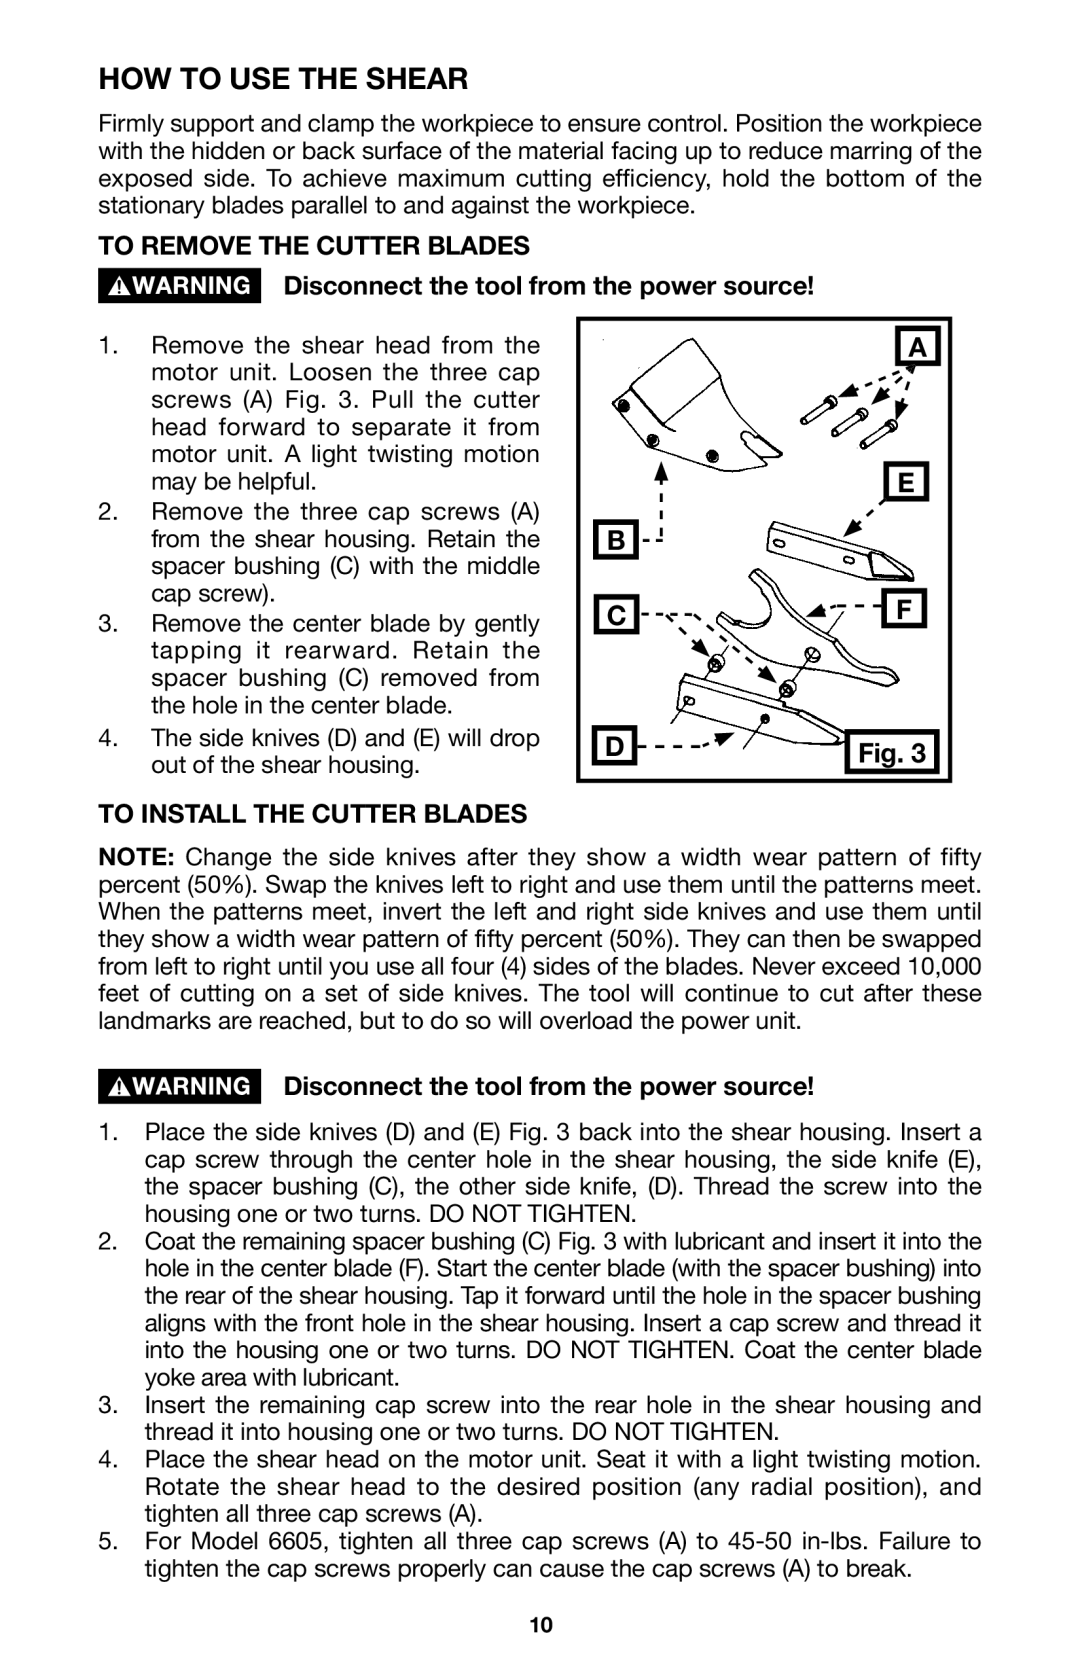
Remove the shear head from the


A


motor unit. Loosen the three cap


screws (A) Fig. 3. Pull the cutter


head forward to separate it from


motor unit. A light twisting motion


may be helpful.


E


2.

Remove the three cap screws (A)


from the shear housing. Retain the


B


spacer bushing (C) with the middle


cap screw).


3.

Remove the center blade by gently


C


F


tapping it rearward. Retain the


spacer bushing (C) removed from


the hole in the center blade.


4.

The side knives (D) and (E) will drop


D


Fig. 3


out of the shear housing.


TO INSTALL THE CUTTER BLADES

NOTE: Change the side knives after they show a width wear pattern of fifty percent (50%). Swap the knives left to right and use them until the patterns meet. When the patterns meet, invert the left and right side knives and use them until they show a width wear pattern of fifty percent (50%). They can then be swapped from left to right until you use all four (4) sides of the blades. Never exceed 10,000 feet of cutting on a set of side knives. The tool will continue to cut after these landmarks are reached, but to do so will overload the power unit.

Disconnect the tool from the power source!

1.Place the side knives (D) and (E) Fig. 3 back into the shear housing. Insert a cap screw through the center hole in the shear housing, the side knife (E), the spacer bushing (C), the other side knife, (D). Thread the screw into the housing one or two turns. DO NOT TIGHTEN.

2.Coat the remaining spacer bushing (C) Fig. 3 with lubricant and insert it into the hole in the center blade (F). Start the center blade (with the spacer bushing) into the rear of the shear housing. Tap it forward until the hole in the spacer bushing aligns with the front hole in the shear housing. Insert a cap screw and thread it into the housing one or two turns. DO NOT TIGHTEN. Coat the center blade yoke area with lubricant.

3.Insert the remaining cap screw into the rear hole in the shear housing and thread it into housing one or two turns. DO NOT TIGHTEN.

4.Place the shear head on the motor unit. Seat it with a light twisting motion. Rotate the shear head to the desired position (any radial position), and tighten all three cap screws (A).

5.For Model 6605, tighten all three cap screws (A) to 45-50 in-lbs. Failure to tighten the cap screws properly can cause the cap screws (A) to break.

10

Page 10
Image 10
Porter-Cable 6605 instruction manual HOW to USE the Shear, To Remove the Cutter Blades

6605 specifications

The Porter-Cable 6605 is a highly regarded tool in the realm of power saws, particularly known for its efficacy in making precision cuts in a variety of materials. Tailored for both professional contractors and DIY enthusiasts, this product blends performance, durability, and user-friendly features, making it a go-to choice for many woodworking and construction projects.

One of the standout features of the Porter-Cable 6605 is its powerful motor. Equipped with a robust 6.5-amp motor, this tool ensures the ability to handle intricate cuts and heavy-duty tasks with ease. The consistent power output enables smooth and efficient cutting through both soft and hard woods, while also providing versatility when working with engineered materials.

The design of the 6605 emphasizes user comfort and control. It boasts an ergonomic handle that reduces fatigue during extended use, allowing users to maintain precision without risking strain. Lightweight and compact, this saw is easy to maneuver, making it suitable for both overhead and intricate work. Additionally, the saw features a sturdy base that enhances stability during operation, resulting in straighter cuts.

In terms of technology, the Porter-Cable 6605 utilizes a keyless blade change system, which allows for quick and efficient blade swaps, enabling users to transition between various cutting tasks without delay. This feature aligns with the tool’s intended purpose of maximizing productivity on the job site or in the workshop. The tool is also compatible with a range of blade types, providing enhanced flexibility for different applications.

Another essential characteristic of the Porter-Cable 6605 is its adjustable cutting depth and bevel angle settings. With the capability to make cuts up to 2 inches deep and a bevel capacity of 45 degrees, users can achieve a range of cutting angles and depths, catering to diverse project requirements.

Furthermore, safety features, such as the blade guard and the safety switch, enhance the overall user experience by minimizing the risk of accidents. By prioritizing safety without compromising on performance, the Porter-Cable 6605 establishes itself as a reliable powerhouse in the toolkit of any woodworker or contractor.

In summary, the Porter-Cable 6605 combines power, precision, and versatility, offering an array of features that bolster its role as an essential tool for cutting tasks. With its user-centric design, advanced technology, and safety features, it remains a preferred choice for those seeking reliable performance in a portable electric saw.