![]() WARNING: In order to prevent ac- cidental starting when setting up, trans- porting, adjusting or making repairs, always disconnect spark plug wire and place wire where it cannot contact spark plug.
WARNING: In order to prevent ac- cidental starting when setting up, trans- porting, adjusting or making repairs, always disconnect spark plug wire and place wire where it cannot contact spark plug.
![]() CAUTION: Muffl er and other engine parts become extremely hot during operation and remain hot after engine has stopped. To avoid severe burns on contact, stay away from these areas.
CAUTION: Muffl er and other engine parts become extremely hot during operation and remain hot after engine has stopped. To avoid severe burns on contact, stay away from these areas.
![]() WARNING: Engine exhaust, some of its constituents, and certain vehicle compo- nents contain or emit chemicals known to the State of California to cause cancer and birth defects or other reproductive harm.
WARNING: Engine exhaust, some of its constituents, and certain vehicle compo- nents contain or emit chemicals known to the State of California to cause cancer and birth defects or other reproductive harm.
ASSEMBLY
Read these instructions and this manual in its entirety before you attempt to assemble or operate your new trimmer.
IMPORTANT: This trimmer is shipped WITHOUT OIL OR GASOLINE in the engine.
Your new trimmer has been assembled at the factory with the exception of those parts left unassembled for shipping purposes. All parts such as nuts, wash- ers, bolts, etc., necessary to complete the assembly have been placed in the parts bag. To ensure safe and proper operation of your trimmer, all parts and hardware you assemble must be tightened securely. Use the correct tools as necessary to ensure proper tightness.
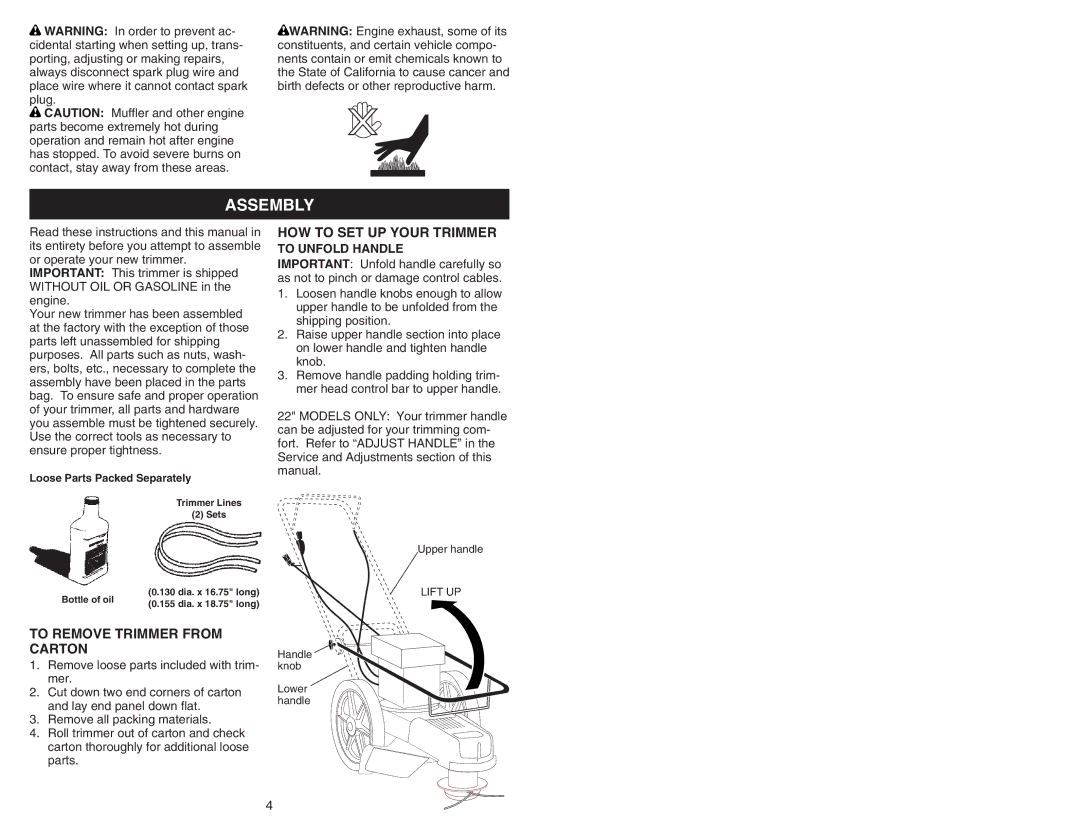
Loose Parts Packed Separately
Trimmer Lines
(2) Sets
Bottle of oil | (0.130 dia. x 16.75" long) | |
(0.155 dia. x 18.75" long) | ||
|
TO REMOVE TRIMMER FROM CARTON
1.Remove loose parts included with trim- mer.
2.Cut down two end corners of carton and lay end panel down fl at.
3.Remove all packing materials.
4.Roll trimmer out of carton and check carton thoroughly for additional loose parts.
HOW TO SET UP YOUR TRIMMER
TO UNFOLD HANDLE
IMPORTANT: Unfold handle carefully so as not to pinch or damage control cables.
1.Loosen handle knobs enough to allow upper handle to be unfolded from the shipping position.
2.Raise upper handle section into place on lower handle and tighten handle knob.
3.Remove handle padding holding trim- mer head control bar to upper handle.
22" MODELS ONLY: Your trimmer handle can be adjusted for your trimming com- fort. Refer to “ADJUST HANDLE” in the Service and Adjustments section of this manual.
Upper handle
LIFT UP
Handle knob
Lower handle
4