3.Close mulcher door (if equipped).
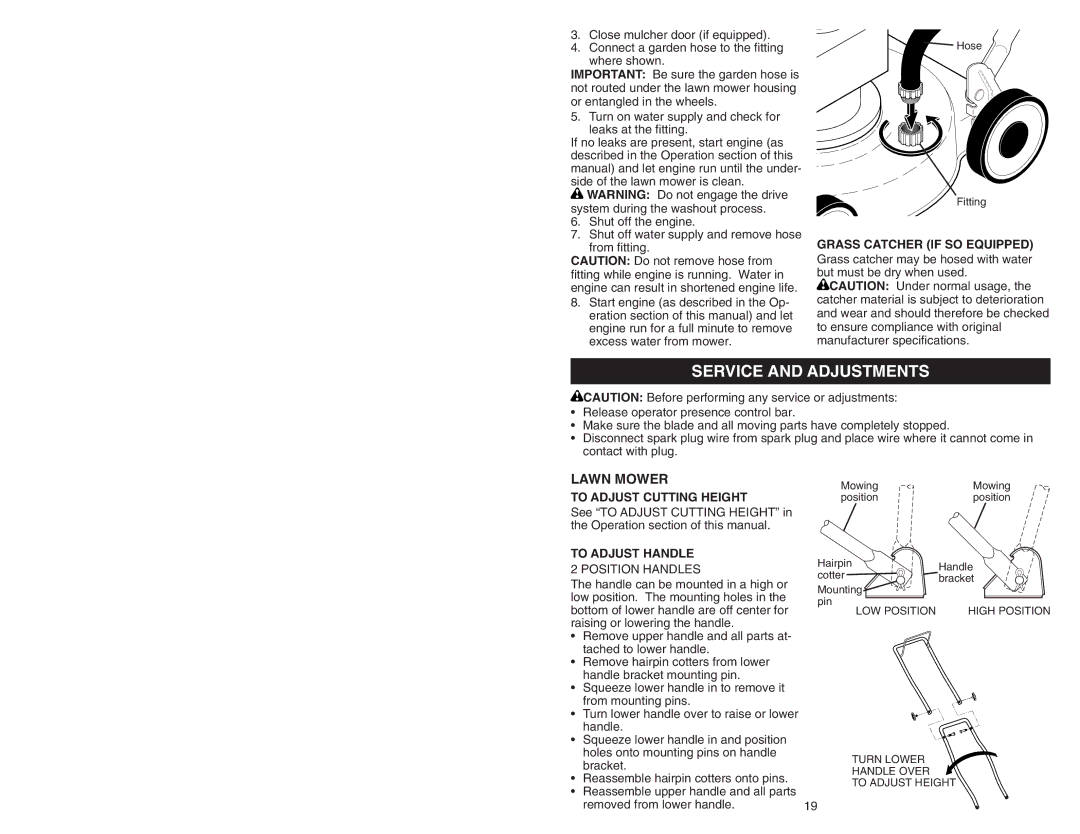
4.Connect a garden hose to the fitting where shown.
IMPORTANT: Be sure the garden hose is not routed under the lawn mower housing or entangled in the wheels.
5. Turn on water supply and check for leaks at the fitting.
If no leaks are present, start engine (as described in the Operation section of this manual) and let engine run until the under- side of the lawn mower is clean.
![]() WARNING: Do not engage the drive system during the washout process.
WARNING: Do not engage the drive system during the washout process.
6.Shut off the engine.
7.Shut off water supply and remove hose from fitting.
CAUTION: Do not remove hose from fitting while engine is running. Water in engine can result in shortened engine life.
8.Start engine (as described in the Op- eration section of this manual) and let engine run for a full minute to remove excess water from mower.
Hose
Fitting
GRASS CATCHER (IF SO EQUIPPED) Grass catcher may be hosed with water but must be dry when used.
![]() CAUTION: Under normal usage, the
CAUTION: Under normal usage, the
catcher material is subject to deterioration and wear and should therefore be checked to ensure compliance with original manufacturer specifications.
SERVICE AND ADJUSTMENTS
![]() CAUTION: Before performing any service or adjustments:
CAUTION: Before performing any service or adjustments:
•Release operator presence control bar.
•Make sure the blade and all moving parts have completely stopped.
•Disconnect spark plug wire from spark plug and place wire where it cannot come in contact with plug.
LAWN MOWER
TO ADJUST CUTTING HEIGHT
See “TO ADJUST CUTTING HEIGHT” in the Operation section of this manual.
TO ADJUST HANDLE
2 POSITION HANDLES
The handle can be mounted in a high or low position. The mounting holes in the bottom of lower handle are off center for raising or lowering the handle.
•Remove upper handle and all parts at- tached to lower handle.
•Remove hairpin cotters from lower handle bracket mounting pin.
•Squeeze lower handle in to remove it from mounting pins.
•Turn lower handle over to raise or lower handle.
•Squeeze lower handle in and position holes onto mounting pins on handle bracket.
•Reassemble hairpin cotters onto pins.
•Reassemble upper handle and all parts removed from lower handle.
Mowing | Mowing |
position | position |
Hairpin | Handle | |
cotter | ||
bracket | ||
Mounting | ||
| ||
pin | HIGH POSITION | |
LOW POSITION |
TURN LOWER
HANDLE OVER
TO ADJUST HEIGHT
19