SERVICE AND ADJUSTMENTS

WARNING: Belt replacement requires separation of the snow thrower. While separating the auger housing from the frame assembly, it is important that an assistant stand in the operating position and hold the snow thrower handles. Se- rious personal injury and/or damage to the unit could occur if the snow thrower should fall during the belt changing process.

FRAME

AUGER

ASSEMBLY

HOUSING

HANDLES

1.REMOVE GASOLINE FROM FUELTANK - Drain gaso- line from fuel tank into a suitable container, outdoors, away from fire or flame. Wipe up any spilled gasoline.

2.REMOVE DISCHARGE CHUTE - Loosen locknut securing chute rotator head to mounting bracket only enough to allow chute rotator head to be raised and discharge chute to be removed from snow thrower.

3.REMOVE BELT COVER - See “TO REMOVE BELT COVER” in this section of this manual.

4.REMOVE ENGINE PULLEY - Remove bolt, lockwasher and flat washer securing pulley to engine crankshaft. Remove outside (auger) pulley only from crankshaft.

5.SEPARATE SNOW THROWER - With your assistant standing in the operating position holding the handles, remove the two (2) bolts and lock washers holding auger housing and frame together.

WARNING: As the last bolt is removed, have your assistant carefully lower the handles down to the ground.

6.REMOVE AUGER BELT from around pulley.

7.RELIEVETENSIONONTRACTIONDRIVEBELTIDLER and remove traction drive belt from around pulleys.

HINT: Insert a 3/8" drive ratchet (in the “ON” position) into the square hole in idler arm and rotate ratchet clockwise to relieve tension.

8.With tension relieved on idler, install new traction drive belt around pulleys and inside belt keepers.

9.Place auger belt around and inside the groove of auger pulley only.

10.While your assistant slowly raises handles to rejoin the auger housing and frame assembly, pull up on the auger belt and squeeze sides together above pulley so belt is fully seated in groove of pulley.

11.Bring snow thrower completely together and check carefully for proper routing of belts. If auger belt has become dislodged from the pulley (by catching the idler arm bracket while bringing snow thrower together), separate the snow thrower and repeat step 10. Belt

must be fully seated in pulley groove when bringing


the snow thrower together.

16

12.Install the two (2) hex bolts and lock washers and tighten securely.

13.INSTALL ENGINE PULLEY - Place belt in pulley groove and slide pulley on crankshaft. Install flat washer, lock- washer and bolt and tighten securely (30-35 ft. lbs. torque). Make sure belt is inside belt keeper.

14.INSTALL BELT COVER and two (2) screws. Tighten securely.

15.INSTALL DISCHARGE CHUTE – See “INSTALL DIS- CHARGE CHUTE / CHUTE ROTATER HEAD” in the Assembly / Pre-Operation section of this manual.


BELT KEEPER


TRACTION DRIVE BELT


ENGINE

FLAT WASHER


PULLEY


LOCKWASHER


BOLT

IDLER ARM


AUGER

SQUARE


BELT

HOLE


CLUTCHING


IDLER ARM


BRACKET


AUGER PULLEY


BOLT

LOCK


WASHER

FRAME

AUGER


HOUSING


FIG. 20

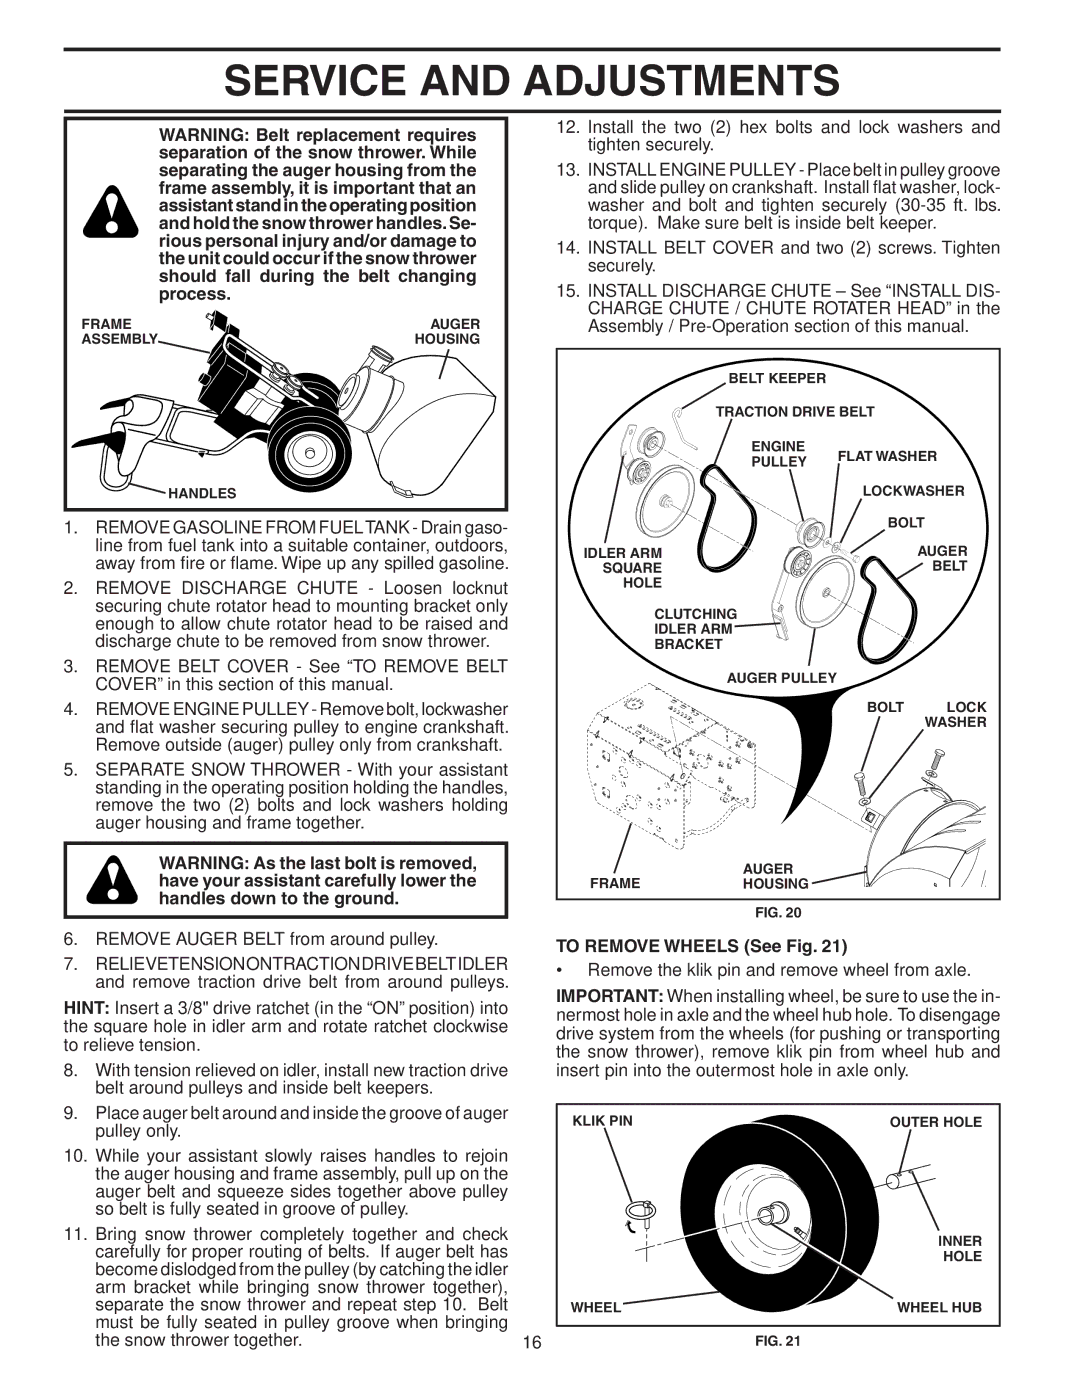
TO REMOVE WHEELS (See Fig. 21)

Remove the klik pin and remove wheel from axle.

IMPORTANT: When installing wheel, be sure to use the in- nermost hole in axle and the wheel hub hole. To disengage drive system from the wheels (for pushing or transporting the snow thrower), remove klik pin from wheel hub and insert pin into the outermost hole in axle only.

KLIK PIN

OUTER HOLE


INNER


HOLE

WHEEL

WHEEL HUB

FIG. 21

Page 16
Image 16
Poulan 96192000900, 403919 owner manual To Remove Wheels See Fig

403919, 96192000900 specifications

The Poulan 403919,96192000900 is a highly regarded chainsaw model designed for both professional and home use. Known for its reliability and performance, it is ideal for a variety of tasks, including tree trimming, firewood cutting, and general yard work. This chainsaw combines advanced technology with user-friendly features, making it a top choice for those who require power and efficiency.

One of the standout features of the Poulan 403919 is its powerful engine. Equipped with a robust 2-cycle engine, this chainsaw provides users with the necessary power to tackle even the toughest jobs. With an engine displacement that ensures optimal performance, users can enjoy quick cutting speeds and reduced vibration, making it comfortable for extended use.

The chainsaw features an adjustable automatic oiler that supplies the bar and chain with the right amount of lubrication. This not only extends the life of the chain and bar but also ensures smooth and efficient operation. Additionally, the easy-access air filter allows for simpler maintenance, ensuring that the engine runs clean and cool, contributing to its longevity.

Safety is also a priority with the Poulan 403919. It is equipped with a chain brake for enhanced safety, allowing users to stop the chain quickly in case of kickback. The ergonomic design provides a comfortable grip, reducing fatigue during prolonged use. Furthermore, the front and rear hand guards are designed to protect the user from debris and accidental contact with the chain.

The Poulan 403919 also features a tool-less chain tensioning system, enabling users to adjust the chain quickly and easily without the need for additional tools. This feature enhances convenience, allowing for quick adjustments in the field, which is especially useful for those who need to switch tasks frequently.

Overall, the Poulan 403919,96192000900 is a versatile, powerful, and user-friendly chainsaw that combines safety and efficiency, making it an excellent choice for both professionals and DIY enthusiasts. With its robust construction, easy maintenance features, and advanced safety measures, it stands out as a reliable tool that can handle a variety of cutting tasks with ease. Whether you're pruning trees or cutting firewood, the Poulan 403919 delivers the performance you need.