SERVICE AND ADJUSTMENTS

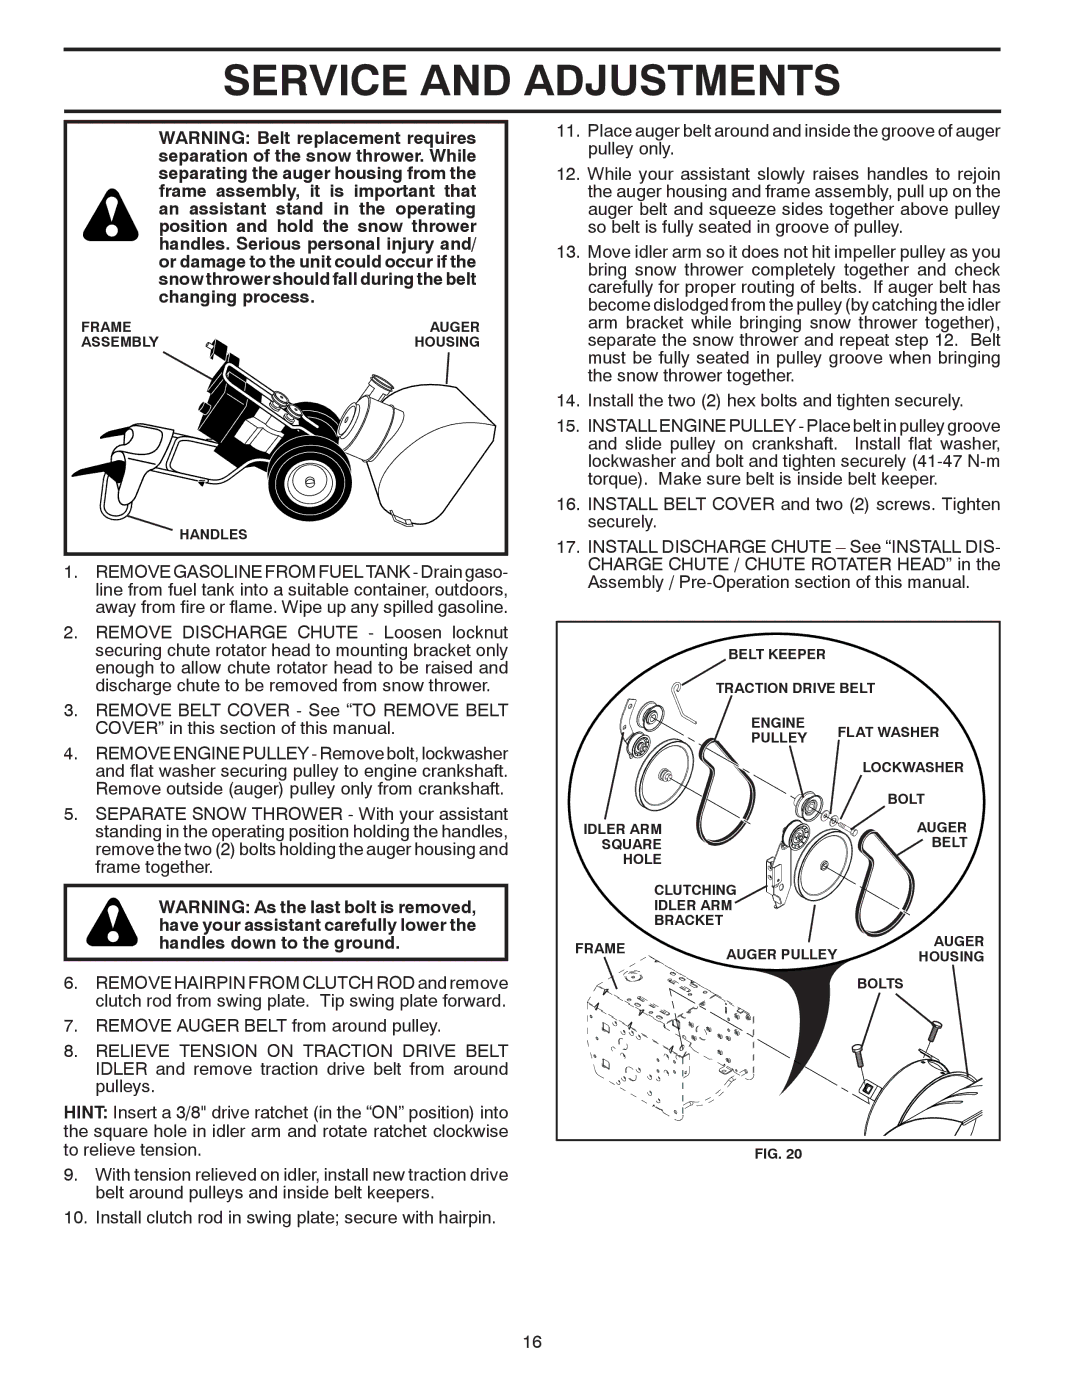
WARNING: Belt replacement requires separation of the snow thrower. While separating the auger housing from the frame assembly, it is important that an assistant stand in the operating position and hold the snow thrower handles. Serious personal injury and/ or damage to the unit could occur if the snow thrower should fall during the belt changing process.

FRAME

AUGER

ASSEMBLY

HOUSING

HANDLES

1.REMOVE GASOLINE FROM FUEL TANK - Drain gaso- line from fuel tank into a suitable container, outdoors, away from fire or flame. Wipe up any spilled gasoline.

2.REMOVE DISCHARGE CHUTE - Loosen locknut securing chute rotator head to mounting bracket only enough to allow chute rotator head to be raised and discharge chute to be removed from snow thrower.

3.REMOVE BELT COVER - See “TO REMOVE BELT COVER” in this section of this manual.

4.REMOVE ENGINE PULLEY - Remove bolt, lockwasher and flat washer securing pulley to engine crankshaft. Remove outside (auger) pulley only from crankshaft.

5.SEPARATE SNOW THROWER - With your assistant standing in the operating position holding the handles, remove the two (2) bolts holding the auger housing and frame together.

WARNING: As the last bolt is removed, have your assistant carefully lower the handles down to the ground.

6.REMOVE HAIRPIN FROM CLUTCH ROD and remove clutch rod from swing plate. Tip swing plate forward.

7.REMOVE AUGER BELT from around pulley.

8.RELIEVE TENSION ON TRACTION DRIVE BELT IDLER and remove traction drive belt from around pulleys.

HINT: Insert a 3/8" drive ratchet (in the “ON” position) into the square hole in idler arm and rotate ratchet clockwise to relieve tension.

9.With tension relieved on idler, install new traction drive belt around pulleys and inside belt keepers.

10.Install clutch rod in swing plate; secure with hairpin.

11.Place auger belt around and inside the groove of auger pulley only.

12.While your assistant slowly raises handles to rejoin the auger housing and frame assembly, pull up on the auger belt and squeeze sides together above pulley so belt is fully seated in groove of pulley.

13.Move idler arm so it does not hit impeller pulley as you bring snow thrower completely together and check carefully for proper routing of belts. If auger belt has become dislodged from the pulley (by catching the idler arm bracket while bringing snow thrower together), separate the snow thrower and repeat step 12. Belt must be fully seated in pulley groove when bringing the snow thrower together.

14.Install the two (2) hex bolts and tighten securely.

15.INSTALL ENGINE PULLEY - Place belt in pulley groove and slide pulley on crankshaft. Install flat washer, lockwasher and bolt and tighten securely (41-47 N-m torque). Make sure belt is inside belt keeper.

16.INSTALL BELT COVER and two (2) screws. Tighten securely.

17.INSTALL DISCHARGE CHUTE – See “INSTALL DIS- CHARGE CHUTE / CHUTE ROTATER HEAD” in the Assembly / Pre-Operation section of this manual.


BELT KEEPER


TRACTION DRIVE BELT


ENGINE

FLAT WASHER


PULLEY


LOCKWASHER


BOLT

IDLER ARM

AUGER

SQUARE

BELT

HOLE


CLUTCHING


IDLER ARM


BRACKET


FRAME

AUGER PULLEY

AUGER

HOUSING


BOLTS

FIG. 20

16

Page 16
Image 16
Poulan 96192001706, 421899 owner manual Frame Auger Assembly Housing Handles

96192001706, 421899 specifications

The Poulan 421899,96192001706 is a powerful and versatile outdoor tool designed to meet the needs of both homeowners and professionals. This particular product is known for its reliability and effectiveness in various landscaping tasks, including trimming, pruning, and even cutting through tougher branches.

One of the standout features of this model is its robust engine, which provides ample power to tackle challenging outdoor jobs. The engine is designed for optimal performance, ensuring that users can complete their tasks swiftly without sacrificing efficiency. The combination of a strong engine and lightweight design allows for prolonged use without significant fatigue, making it a favorite among those who require a dependable tool for extended periods.

In terms of technology, the Poulan 421899,96192001706 boasts advanced anti-vibration features that significantly enhance user comfort. This technology minimizes the amount of vibration felt during operation, allowing for smoother handling and greater precision when trimming or cutting. Users will appreciate how this feature reduces strain on their arms and hands, making it easier to handle the tool over long durations.

The design of the Poulan 421899,96192001706 also prioritizes user-friendliness. The easy-start system ensures that the tool can be fired up with minimal effort, which can be particularly beneficial for those who may struggle with traditional starting methods. Additionally, the ergonomic handle provides a comfortable grip, further enhancing control and maneuverability.

Durability is another key characteristic of this model. Built from high-quality materials, it is designed to withstand the rigors of outdoor use, whether in residential settings or more demanding commercial environments. The materials used in construction are resistant to wear and tear, ensuring that the tool lasts for many years with proper maintenance.

Another notable aspect of the Poulan 421899,96192001706 is its versatility. With compatible attachments and a range of performance options, it can easily adapt to various tasks. This multifunctional capability makes it an invaluable addition to any toolkit, whether for landscaping, gardening, or general outdoor maintenance.

In conclusion, the Poulan 421899,96192001706 is a well-rounded outdoor tool that combines power, advanced technology, and ease of use. Its robust engine, anti-vibration features, and ergonomic design make it a top choice for those looking for efficiency and comfort in their outdoor tasks. With its durability and versatility, it stands out in the market, proving itself to be a reliable partner for both amateur gardeners and professional landscapers alike.