SPECIAL NOTICE: Exposure to vibra- tions through prolonged use of gasoline pow- ered hand tools could cause blood vessel or nerve damage in the fingers, hands, and joints of people prone to circulation disorders or abnormal swellings. Prolonged use in cold weather has been linked to blood vessel dam- age in otherwise healthy people. If symptoms occur such as numbness, pain, loss of strength, change in skin color or texture, or loss of feeling in the fingers, hands, or joints, discontinue the use of this tool and seek med- ical attention. An
SPECIAL NOTICE: This unit is equipped with a temperature limiting muffler and spark arresting screen which meets the require- ments of California Codes 4442 and 4443. All U.S. forest land and the states of California, Idaho, Maine, Minnesota, New Jersey, Ore- gon, and Washington require by law that many internal combustion engines be equipped with a spark arresting screen. If you operate in a locale where such regulations ex- ist, you are legally responsible for maintaining the operating condition of these parts. Failure to do so is a violation of the law. For normal homeowner use, the muffler and spark arrest- ing screen will not require any service. After 50 hours of use, we recommend that your muffler be serviced or replaced by your Au- thorized Service Dealer.
It is normal for the fuel filter to rattle in the empty fuel tank. Finding fuel or oil residue on muffler is normal due to carburetor adjust- ments and testing done by the manufacturer.
ASSEMBLY
![]() WARNING: If received assembled, repeat all steps to ensure your unit is properly assembled and all fasteners are secure.
WARNING: If received assembled, repeat all steps to ensure your unit is properly assembled and all fasteners are secure.
TOOLS REQUIRED:
S2 hex key wrenches (provided)
SAdjustable wrench or large pliers S Phillips screwdriver
ATTACH THE TUBE TO THE EN- GINE
SSlip the tube with drive shaft into the engine. S Insert and tighten two screws, washers,
and nuts into clamp holes in engine.
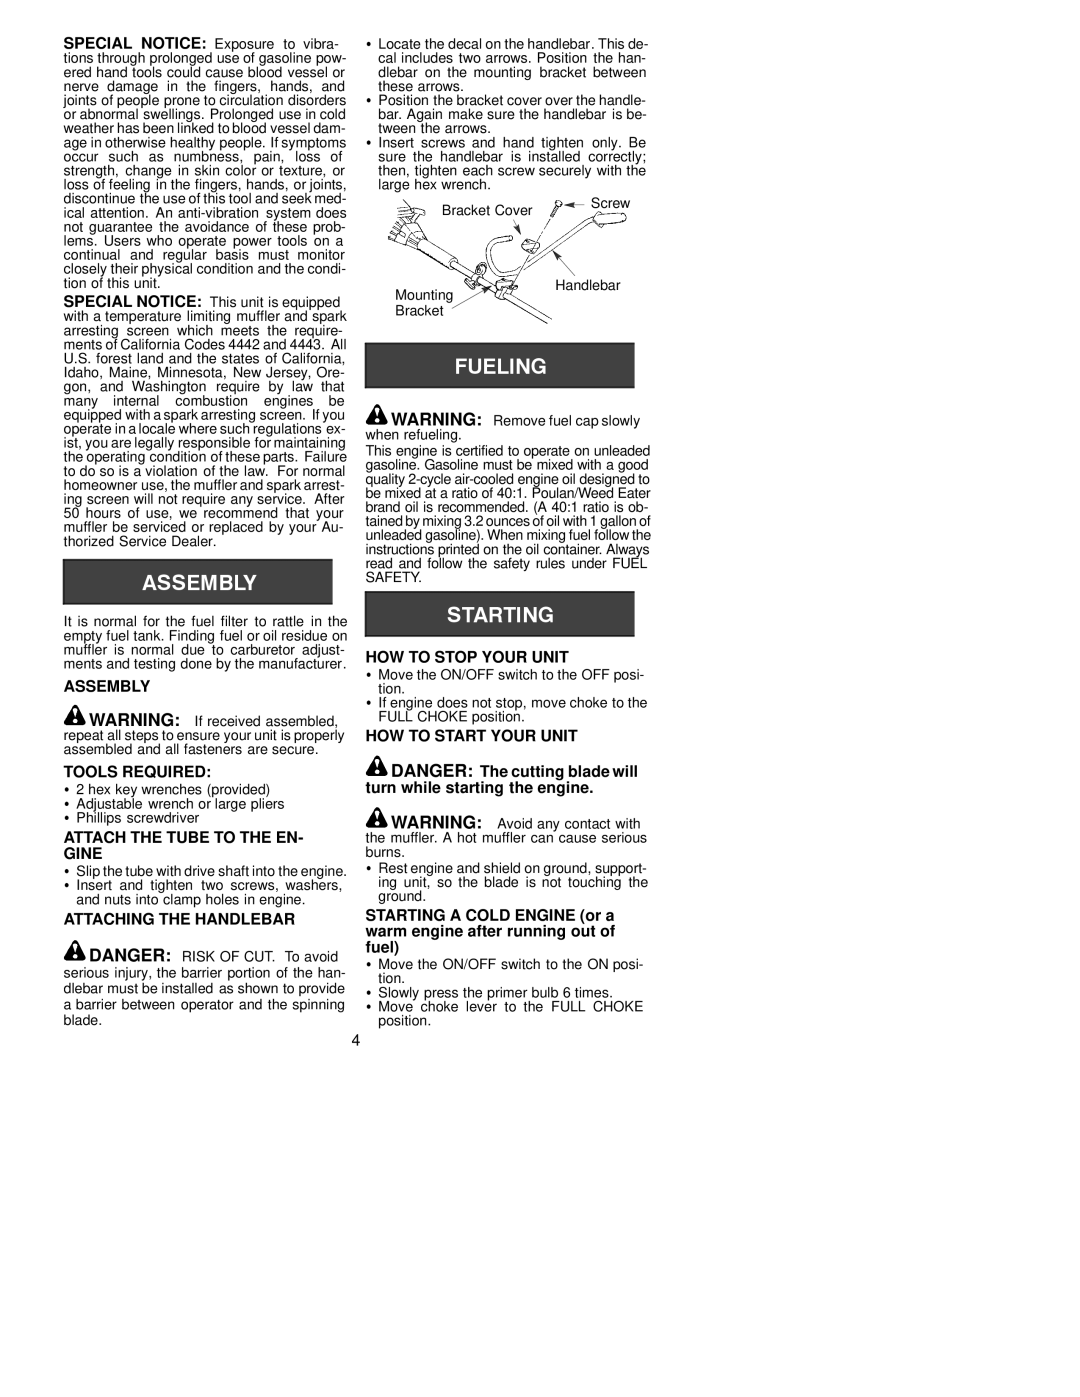
ATTACHING THE HANDLEBAR
![]() DANGER: RISK OF CUT. To avoid serious injury, the barrier portion of the han- dlebar must be installed as shown to provide a barrier between operator and the spinning blade.
DANGER: RISK OF CUT. To avoid serious injury, the barrier portion of the han- dlebar must be installed as shown to provide a barrier between operator and the spinning blade.
4
SLocate the decal on the handlebar. This de- cal includes two arrows. Position the han- dlebar on the mounting bracket between
these arrows.
SPosition the bracket cover over the handle- bar. Again make sure the handlebar is be- tween the arrows.
S Insert screws and hand tighten only. Be sure the handlebar is installed correctly; then, tighten each screw securely with the large hex wrench.
Bracket Cover |
|
|
|
|
| Screw | |||||
|
|
|
|
| |||||||
|
|
|
|
|
| ||||||
|
|
|
|
|
|
|
| ||||
|
|
|
|
|
|
|
| ||||
Mounting |
|
|
|
|
| Handlebar | |||||
|
|
|
|
|
|
|
|
|
| ||
Bracket |
|
|
|
|
|
| |||||
|
|
|
|
|
|
|
|
|
|
|
|
|
|
|
|
|
|
|
|
|
|
|
|
![]() WARNING: Remove fuel cap slowly when refueling.
WARNING: Remove fuel cap slowly when refueling.
This engine is certified to operate on unleaded gasoline. Gasoline must be mixed with a good quality
HOW TO STOP YOUR UNIT
SMove the ON/OFF switch to the OFF posi- tion.
SIf engine does not stop, move choke to the FULL CHOKE position.
HOW TO START YOUR UNIT
![]() DANGER: The cutting blade will turn while starting the engine.
DANGER: The cutting blade will turn while starting the engine.
![]() WARNING: Avoid any contact with the muffler. A hot muffler can cause serious burns.
WARNING: Avoid any contact with the muffler. A hot muffler can cause serious burns.
SRest engine and shield on ground, support- ing unit, so the blade is not touching the ground.
STARTING A COLD ENGINE (or a warm engine after running out of fuel)
SMove the ON/OFF switch to the ON posi- tion.
SSlowly press the primer bulb 6 times.
S Move choke lever to the FULL CHOKE position.
