CONFIGURING YOUR UNIT

You can configure your unit using a cutting head for grass and light weeds, or a weed blade for cutting grass, weeds, and brush up to 1/2 inch in diameter. To assemble your unit, go to the section for the desired configuration and follow the instructions.

ASSEMBLY INFORMATION -

TRIMMER HEAD

TRIMMER

HEAD

NOTE: Remove the blade and metal shield be- fore attaching the plastic shield and trimmer head. To remove blade, push in locking lever and hold. Rotate blade nut until the locking lever falls into one of the grooves in the dust cup. Continue to hold the locking lever. This will keep the shaft from turning while loosening the blade nut. Remove blade nut by turning clockwise. Release locking lever. Remove both washers and blade. To remove metal shield, loosen and remove the four mounting screws. See AT- TACHING THE METAL SHIELD and INSTAL- LATION OF THE METAL BLADE for illustra- tions. Be sure to store all parts and instructions for future use.

ATTACHING THE PLASTIC SHIELD AND TRIMMER HEAD

WARNING: The shield must be prop- erly installed. The shield provides partial protection to the operator and others from the risk of thrown objects, and is equipped with a line limiter blade which cuts excess line to the proper length. The line limiter blade (on un- derside of shield) is sharp and can cut you.

1.Remove wing nut from shield.

2.Insert bracket into slot on shield.

3.Pivot shield until bolt passes through hole in bracket.

4.Tighten the wing nut securely.

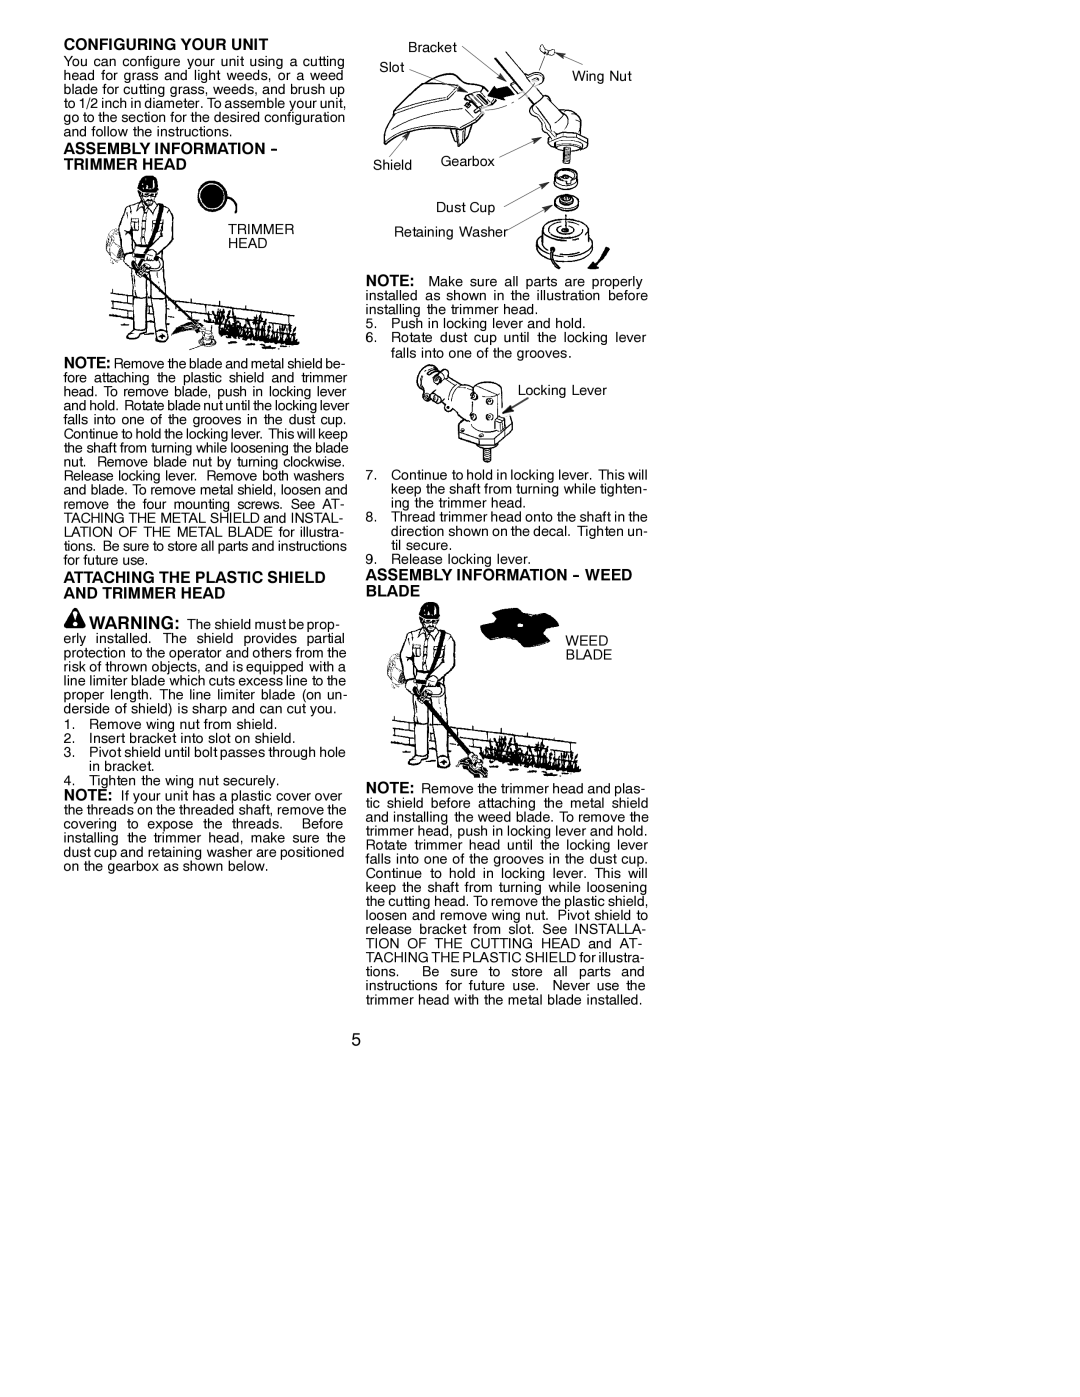
NOTE: If your unit has a plastic cover over the threads on the threaded shaft, remove the covering to expose the threads. Before installing the trimmer head, make sure the dust cup and retaining washer are positioned on the gearbox as shown below.


Bracket

Slot

Wing Nut


Shield Gearbox

Dust Cup

Retaining Washer

NOTE: Make sure all parts are properly installed as shown in the illustration before installing the trimmer head.

5.Push in locking lever and hold.

6.Rotate dust cup until the locking lever falls into one of the grooves.

Locking Lever

7.Continue to hold in locking lever. This will keep the shaft from turning while tighten- ing the trimmer head.

8.Thread trimmer head onto the shaft in the direction shown on the decal. Tighten un- til secure.

9.Release locking lever.

ASSEMBLY INFORMATION - WEED BLADE

WEED

BLADE

NOTE: Remove the trimmer head and plas- tic shield before attaching the metal shield and installing the weed blade. To remove the trimmer head, push in locking lever and hold. Rotate trimmer head until the locking lever falls into one of the grooves in the dust cup. Continue to hold in locking lever. This will keep the shaft from turning while loosening the cutting head. To remove the plastic shield, loosen and remove wing nut. Pivot shield to release bracket from slot. See INSTALLA- TION OF THE CUTTING HEAD and AT- TACHING THE PLASTIC SHIELD for illustra- tions. Be sure to store all parts and instructions for future use. Never use the trimmer head with the metal blade installed.

5

Page 5
Image 5
Poulan S31BC Configuring Your Unit, Assembly Information Trimmer Head, Attaching the Plastic Shield and Trimmer Head

S31BC specifications

The Poulan S31BC is a versatile and powerful piece of outdoor equipment designed to meet the demands of both homeowners and landscaping professionals. This trimmer stands out for its efficiency, durability, and user-friendly features, making it a popular choice for tackling a variety of trimming tasks.

One of the standout features of the Poulan S31BC is its robust 31cc, 2-cycle engine. This powerful engine delivers the necessary torque to handle thick underbrush and tough weeds effortlessly. The 2-cycle engine is designed for high performance while remaining lightweight, which is crucial for extended use without causing fatigue to the operator. Additionally, the engine offers easy starting technology coupled with a smooth operation, allowing for hassle-free trimming in various environments.

The design of the Poulan S31BC also embraces ergonomic principles. Its lightweight frame and adjustable handle provide optimal control and comfort, reducing strain on the user's hands and back during extended use. This trimmer is equipped with a "split-shaft" construction that allows for easy attachment changes. Users can seamlessly switch between various attachments such as brush cutters or pole saws, enhancing the tool's versatility and making it suitable for multiple landscaping tasks.

Another noteworthy feature is the dual-line feed system that efficiently manages line advancement. This allows for quicker trimming sessions and less downtime for line replacement. The S31BC utilizes a bump feed mechanism, enabling users to quickly advance more line simply by tapping the trimmer head on the ground. This feature is especially valuable when tackling larger areas, as it allows for continuous operation without interrupting workflow.

Moreover, the Poulan S31BC is designed with durability in mind. Its rugged construction ensures that it withstands the rigors of regular use, offering reliable performance season after season. Additionally, the machine's lightweight design means that it is highly portable, making it easy to transport from one job site to another.

In conclusion, the Poulan S31BC is an excellent choice for anyone seeking an efficient and reliable trimmer. With its powerful 31cc engine, ergonomic design, interchangeable attachments, and user-friendly features, it caters to a range of trimming needs, making lawn care and maintenance much simpler. Whether you're a weekend warrior or a professional landscaper, the Poulan S31BC is engineered to deliver high performance, making it an invaluable addition to your outdoor toolkit.