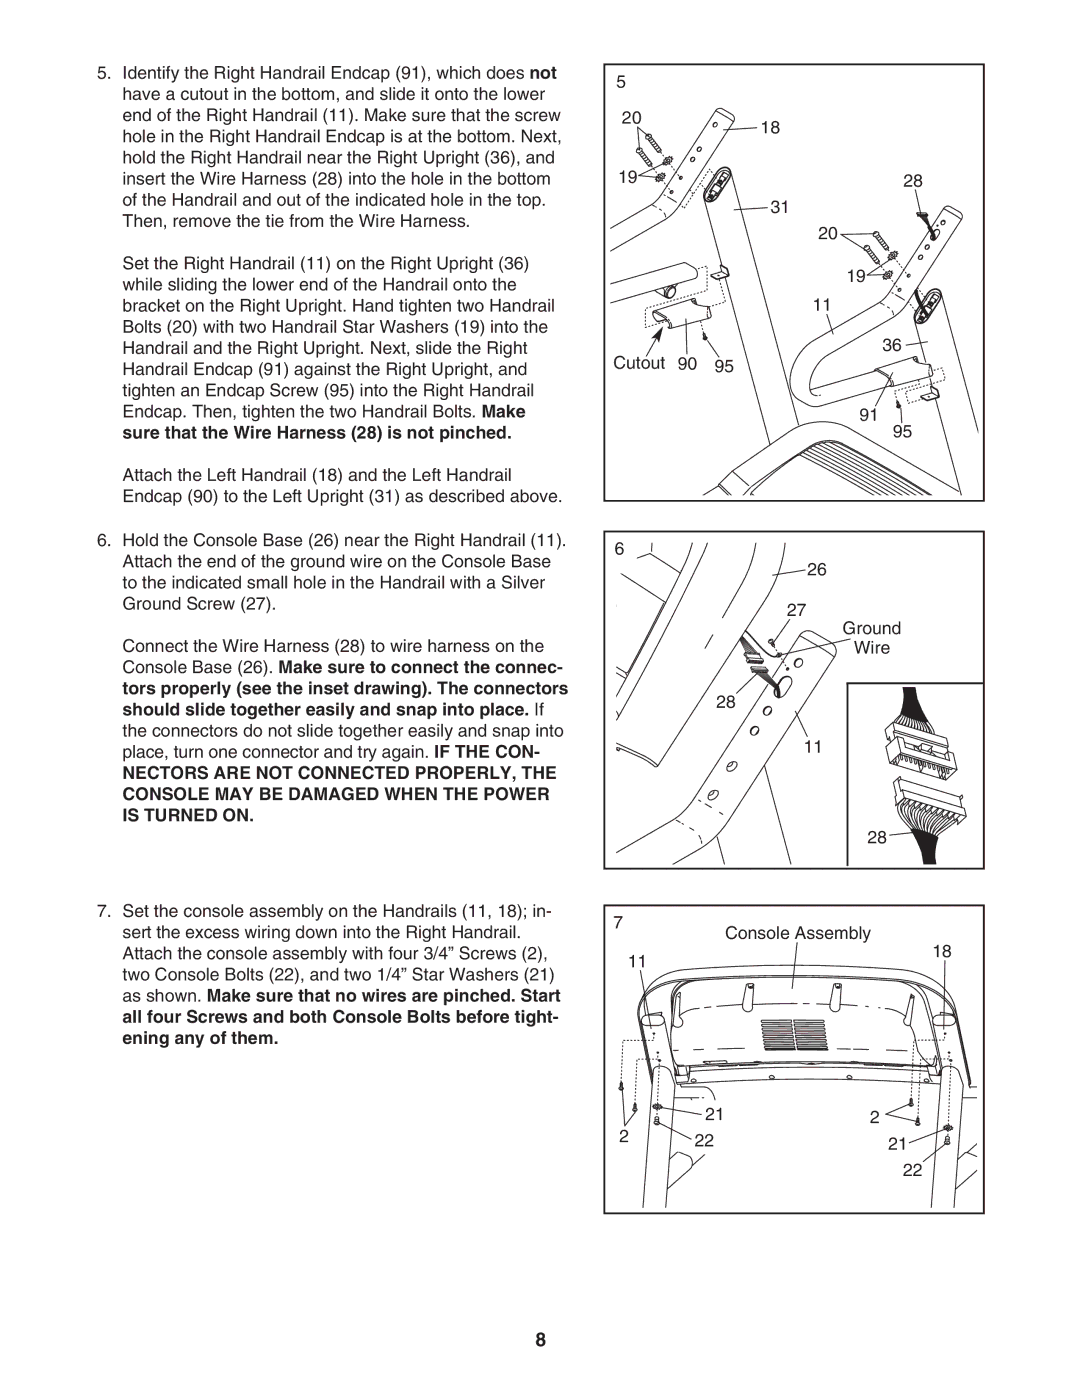
5. Identify the Right Handrail Endcap (91), which does not | 5 |
|
|
|
have a cutout in the bottom, and slide it onto the lower |
|
|
| |
|
|
|
| |
end of the Right Handrail (11). Make sure that the screw | 20 |
|
| 18 |
hole in the Right Handrail Endcap is at the bottom. Next, |
|
|
| |
|
|
|
| |
hold the Right Handrail near the Right Upright (36), and | 19 |
|
|
|
insert the Wire Harness (28) into the hole in the bottom |
|
| 28 | |
of the Handrail and out of the indicated hole in the top. |
|
|
| 31 |
Then, remove the tie from the Wire Harness. |
|
|
| |
|
|
| 20 | |
|
|
|
| |
Set the Right Handrail (11) on the Right Upright (36) |
|
|
| 19 |
while sliding the lower end of the Handrail onto the |
|
|
| |
|
|
| 11 | |
bracket on the Right Upright. Hand tighten two Handrail |
|
|
| |
Bolts (20) with two Handrail Star Washers (19) into the |
|
|
| 36 |
Handrail and the Right Upright. Next, slide the Right | Cutout | 90 | 95 | |
Handrail Endcap (91) against the Right Upright, and |
| |||
tighten an Endcap Screw (95) into the Right Handrail |
|
|
|
|
Endcap. Then, tighten the two Handrail Bolts. Make |
|
|
| 91 |
sure that the Wire Harness (28) is not pinched. |
|
|
| 95 |
Attach the Left Handrail (18) and the Left Handrail |
|
|
|
|
Endcap (90) to the Left Upright (31) as described above. |
|
|
|
|
6. Hold the Console Base (26) near the Right Handrail (11). | 6 |
|
|
|
Attach the end of the ground wire on the Console Base |
|
|
| |
|
|
| 26 | |
to the indicated small hole in the Handrail with a Silver |
|
|
| |
|
|
|
| |
Ground Screw (27). |
|
|
| 27 |
|
|
|
| |
Connect the Wire Harness (28) to wire harness on the |
|
|
| Ground |
|
|
| Wire | |
Console Base (26). Make sure to connect the connec- |
|
|
|
|
tors properly (see the inset drawing). The connectors |
|
| 28 |
|
should slide together easily and snap into place. If |
|
|
| |
|
|
|
| |
the connectors do not slide together easily and snap into |
|
|
| 11 |
place, turn one connector and try again. IF THE CON- |
|
|
| |
NECTORS ARE NOT CONNECTED PROPERLY, THE |
|
|
|
|
CONSOLE MAY BE DAMAGED WHEN THE POWER |
|
|
|
|
IS TURNED ON. |
|
|
|
|
|
|
|
| 28 |
7. Set the console assembly on the Handrails (11, 18); in- | 7 |
|
|
|
sert the excess wiring down into the Right Handrail. |
| Console Assembly | ||
|
| |||
Attach the console assembly with four 3/4” Screws (2), | 11 |
|
| 18 |
two Console Bolts (22), and two 1/4” Star Washers (21) |
|
|
| |
|
|
|
| |
as shown. Make sure that no wires are pinched. Start |
|
|
|
|
all four Screws and both Console Bolts before tight- |
|
|
|
|
ening any of them. |
|
|
|
|
| 2 |
| 21 | 2 |
| 22 | 21 | ||
|
|
|
| 22 |
8