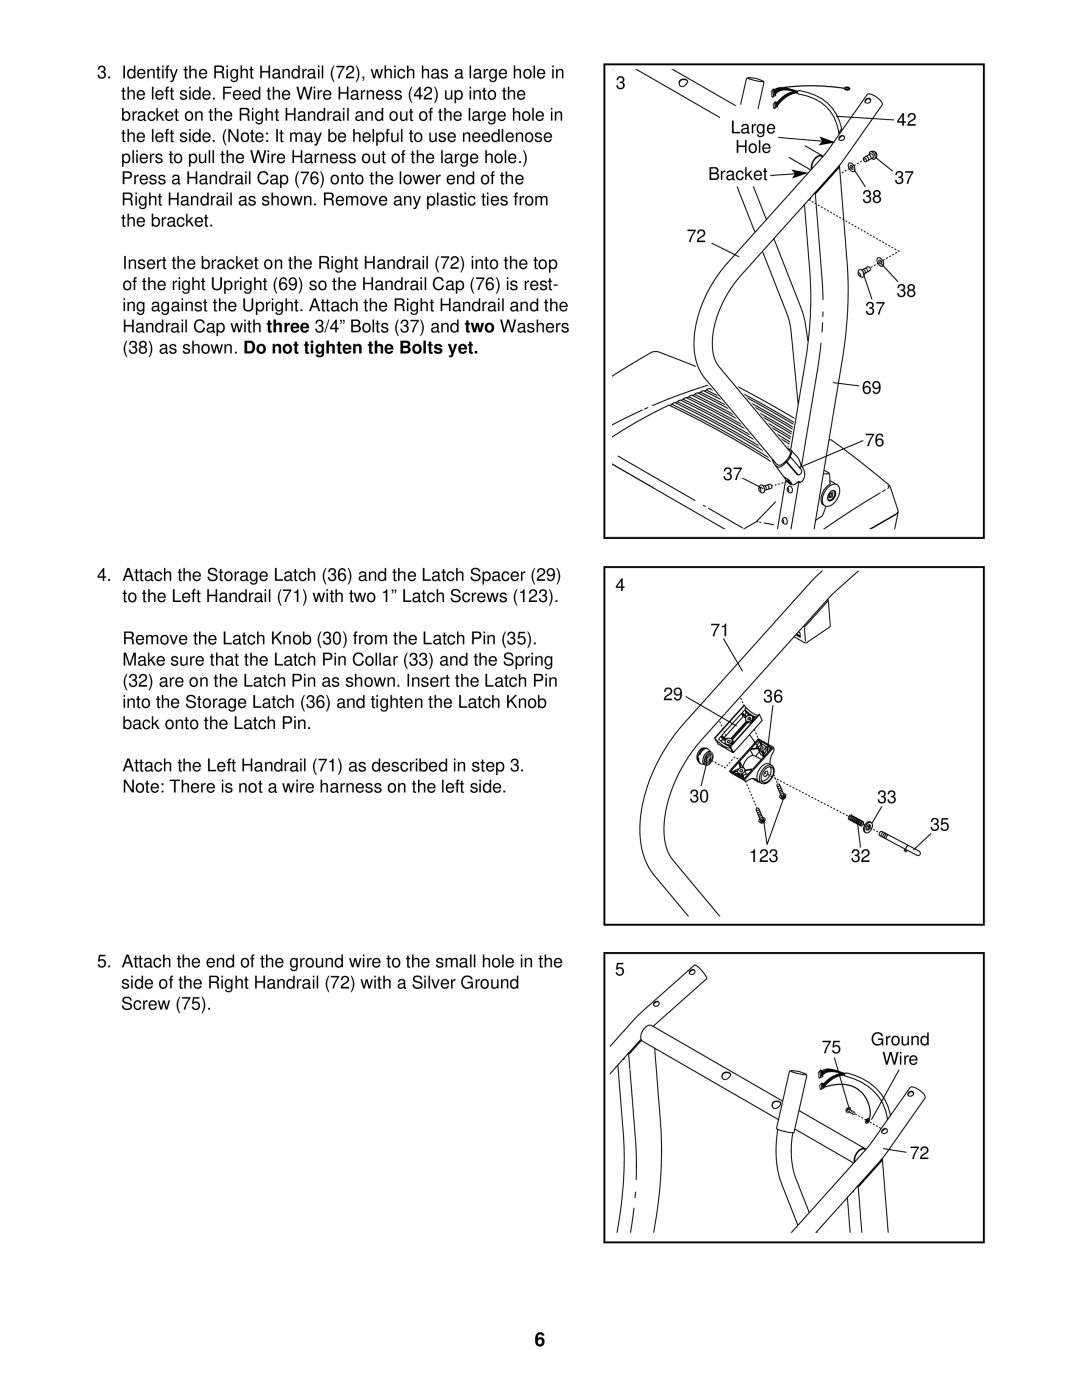
3. Identify the Right Handrail (72), which has a large hole in | 3 |
|
|
|
the left side. Feed the Wire Harness (42) up into the |
|
|
| |
|
|
|
| |
bracket on the Right Handrail and out of the large hole in |
| Large |
| 42 |
the left side. (Note: It may be helpful to use needlenose |
|
| ||
|
|
| ||
| Hole |
|
| |
pliers to pull the Wire Harness out of the large hole.) |
|
|
| |
| Bracket |
|
| |
Press a Handrail Cap (76) onto the lower end of the |
|
| 37 | |
Right Handrail as shown. Remove any plastic ties from |
|
|
| 38 |
the bracket. |
| 72 |
|
|
|
|
|
| |
Insert the bracket on the Right Handrail (72) into the top |
|
|
|
|
of the right Upright (69) so the Handrail Cap (76) is rest- |
|
|
| 38 |
ing against the Upright. Attach the Right Handrail and the |
|
|
| |
|
|
| 37 | |
Handrail Cap with three 3/4” Bolts (37) and two Washers |
|
|
|
|
(38) as shown. Do not tighten the Bolts yet. |
|
|
|
|
|
|
|
| 69 |
|
|
|
| 76 |
|
| 37 |
|
|
4. Attach the Storage Latch (36) and the Latch Spacer (29) | 4 |
|
|
|
to the Left Handrail (71) with two 1” Latch Screws (123). |
|
|
| |
|
|
|
| |
Remove the Latch Knob (30) from the Latch Pin (35). |
| 71 |
|
|
|
|
|
| |
Make sure that the Latch Pin Collar (33) and the Spring |
|
|
|
|
(32) are on the Latch Pin as shown. Insert the Latch Pin | 29 | 36 |
|
|
into the Storage Latch (36) and tighten the Latch Knob |
|
| ||
|
|
|
| |
back onto the Latch Pin. |
|
|
|
|
Attach the Left Handrail (71) as described in step 3. |
|
|
|
|
Note: There is not a wire harness on the left side. |
| 30 |
| 33 |
|
|
| ||
|
|
|
| 35 |
|
| 123 |
| 32 |
5. Attach the end of the ground wire to the small hole in the | 5 |
|
|
|
side of the Right Handrail (72) with a Silver Ground |
|
|
| |
|
|
|
| |
Screw (75). |
|
|
|
|
|
|
| 75 | Ground |
|
|
| Wire | |
|
|
|
| |
|
|
|
| 72 |
6
