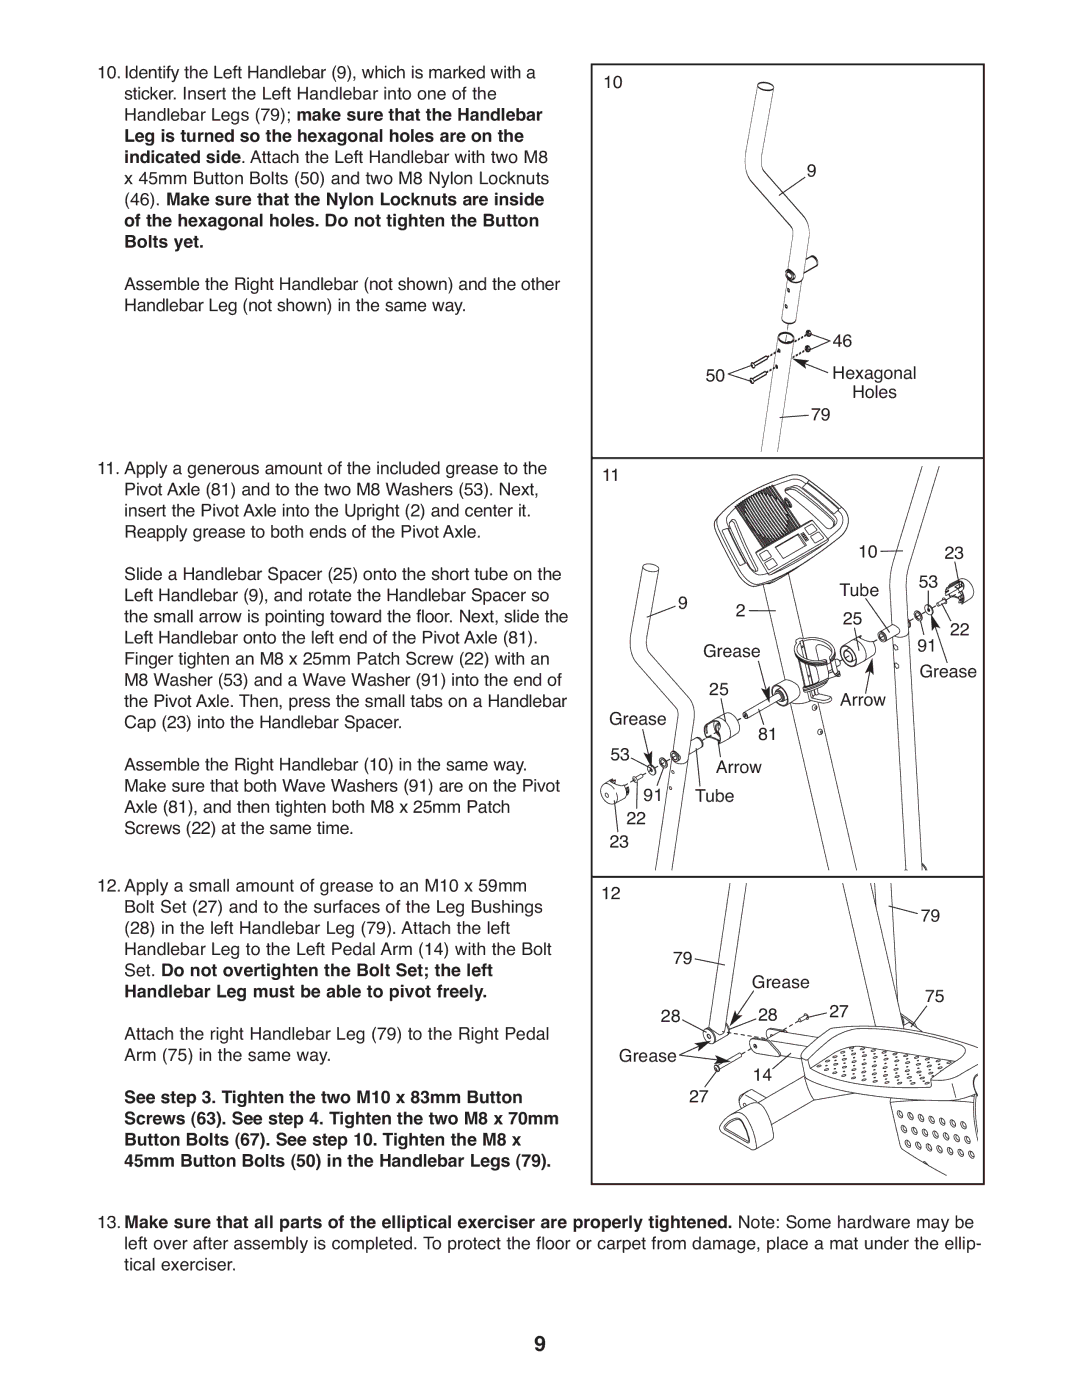
10.Identify the Left Handlebar (9), which is marked with a sticker. Insert the Left Handlebar into one of the Handlebar Legs (79); make sure that the Handlebar

Leg is turned so the hexagonal holes are on the indicated side. Attach the Left Handlebar with two M8 x 45mm Button Bolts (50) and two M8 Nylon Locknuts (46). Make sure that the Nylon Locknuts are inside of the hexagonal holes. Do not tighten the Button Bolts yet.

Assemble the Right Handlebar (not shown) and the other Handlebar Leg (not shown) in the same way.

11.Apply a generous amount of the included grease to the Pivot Axle (81) and to the two M8 Washers (53). Next, insert the Pivot Axle into the Upright (2) and center it.

Reapply grease to both ends of the Pivot Axle.

Slide a Handlebar Spacer (25) onto the short tube on the Left Handlebar (9), and rotate the Handlebar Spacer so the small arrow is pointing toward the floor. Next, slide the Left Handlebar onto the left end of the Pivot Axle (81). Finger tighten an M8 x 25mm Patch Screw (22) with an M8 Washer (53) and a Wave Washer (91) into the end of the Pivot Axle. Then, press the small tabs on a Handlebar Cap (23) into the Handlebar Spacer.

Assemble the Right Handlebar (10) in the same way. Make sure that both Wave Washers (91) are on the Pivot Axle (81), and then tighten both M8 x 25mm Patch Screws (22) at the same time.

12.Apply a small amount of grease to an M10 x 59mm Bolt Set (27) and to the surfaces of the Leg Bushings

(28)in the left Handlebar Leg (79). Attach the left Handlebar Leg to the Left Pedal Arm (14) with the Bolt Set. Do not overtighten the Bolt Set; the left

Handlebar Leg must be able to pivot freely.

Attach the right Handlebar Leg (79) to the Right Pedal Arm (75) in the same way.

See step 3. Tighten the two M10 x 83mm Button Screws (63). See step 4. Tighten the two M8 x 70mm Button Bolts (67). See step 10. Tighten the M8 x 45mm Button Bolts (50) in the Handlebar Legs (79).

10


9


50


46


Hexagonal


79

Holes


11


10

53

23

9


2


Tube


25

91

22


Grease


Grease


25


Arrow

Grease


Arrow81


53


2291


Tube


23


12


79


79


Grease


75


27


28


28


Grease

27

14


13.Make sure that all parts of the elliptical exerciser are properly tightened. Note: Some hardware may be left over after assembly is completed. To protect the floor or carpet from damage, place a mat under the ellip- tical exerciser.

9

Page 9
Image 9
ProForm PFCCEL3906.2 user manual Handlebar Leg must be able to pivot freely

PFCCEL3906.2 specifications

The ProForm PFCCEL3906.2 is an innovative piece of fitness equipment that has gained attention for its advanced features and technology. Specifically designed for cardio workouts, this elliptical machine combines functionality, comfort, and durability to enhance the user's exercise experience.

One of the standout features of the ProForm PFCCEL3906.2 is its ergonomic design. The unit has adjustable pedals that allow users to find their ideal foot positioning for maximum comfort during workouts. This is especially beneficial for individuals who may struggle with joint fatigue or discomfort, as the low-impact nature of an elliptical machine reduces the strain on knees and hips while still delivering an excellent cardio workout.

The PFCCEL3906.2 also boasts a robust array of resistance levels. With multiple settings, users can easily modify the intensity of their workouts. This versatility makes it suitable for beginners as well as seasoned fitness enthusiasts looking to challenge themselves. Moreover, the resistance is digitally controlled, ensuring smooth transitions between different levels, which helps maintain workout flow without interruptions.

In terms of technology, the ProForm PFCCEL3906.2 utilizes a high-quality display console. This console provides essential workout data, including time, distance, calories burned, and heart rate, allowing users to track their progress effectively. Additionally, the built-in heart rate monitor ensures that users can maintain their desired exercise intensity, making it easier to achieve fitness goals.

To enhance the workout experience further, the PFCCEL3906.2 features integrated speakers, allowing users to plug in their devices and enjoy their favorite music or podcasts during workouts. This feature keeps motivation high and makes exercising more enjoyable.

The ProForm PFCCEL3906.2 is constructed with durable materials, ensuring longevity and stability during intense workouts. Its compact design also makes it an excellent choice for home users with limited space, as it can be easily stored when not in use.

Overall, the ProForm PFCCEL3906.2 is a versatile and feature-rich elliptical machine that caters to a wide range of fitness levels. Its combination of comfort, technology, and robust design makes it an appealing option for anyone looking to elevate their cardiovascular training regimen. Whether you're a casual exerciser or a dedicated athlete, this elliptical is built to support your fitness journey effectively.