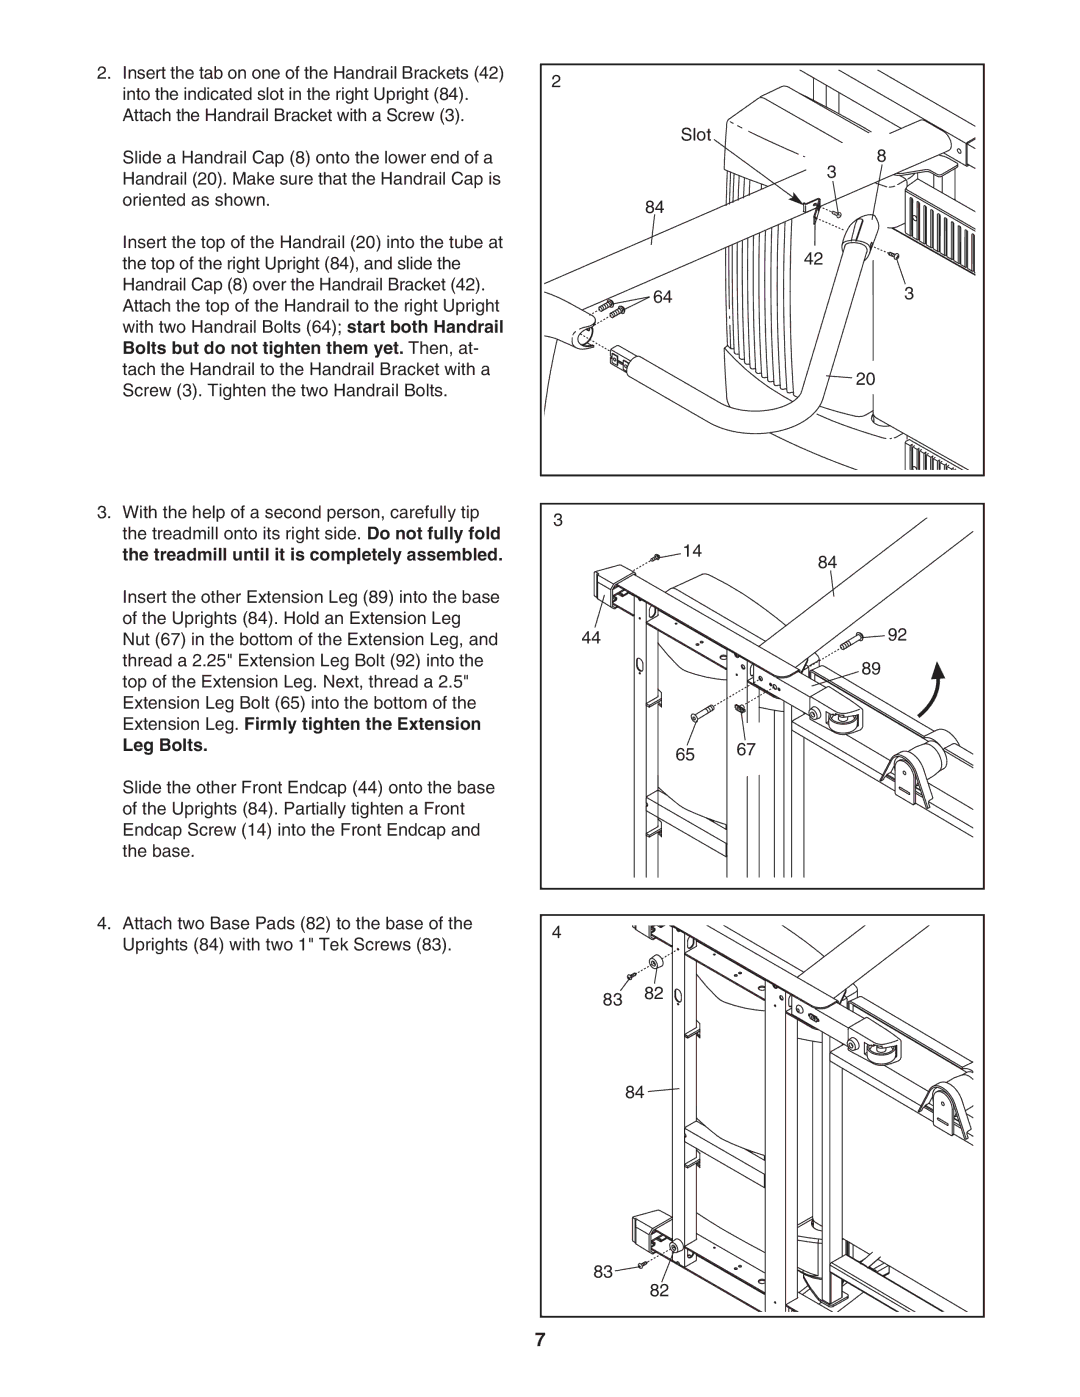
2. Insert the tab on one of the Handrail Brackets (42) | 2 |
|
|
|
into the indicated slot in the right Upright (84). |
|
|
| |
|
|
|
| |
Attach the Handrail Bracket with a Screw (3). |
|
| Slot |
|
|
|
|
| |
Slide a Handrail Cap (8) onto the lower end of a |
|
|
| 8 |
Handrail (20). Make sure that the Handrail Cap is |
|
|
| 3 |
|
|
|
| |
oriented as shown. |
| 84 |
|
|
|
|
|
| |
Insert the top of the Handrail (20) into the tube at |
|
|
| 42 |
the top of the right Upright (84), and slide the |
|
|
| |
Handrail Cap (8) over the Handrail Bracket (42). |
| 64 |
| 3 |
Attach the top of the Handrail to the right Upright |
|
| ||
|
|
|
| |
with two Handrail Bolts (64); start both Handrail |
|
|
|
|
Bolts but do not tighten them yet. Then, at- |
|
|
|
|
tach the Handrail to the Handrail Bracket with a |
|
|
| 20 |
Screw (3). Tighten the two Handrail Bolts. |
|
|
| |
|
|
|
| |
3. With the help of a second person, carefully tip | 3 |
|
|
|
the treadmill onto its right side. Do not fully fold |
|
|
| |
|
| 14 |
| |
the treadmill until it is completely assembled. |
|
| 84 | |
|
|
|
| |
Insert the other Extension Leg (89) into the base |
|
|
|
|
of the Uprights (84). Hold an Extension Leg | 44 |
|
| 92 |
Nut (67) in the bottom of the Extension Leg, and |
|
| ||
thread a 2.25" Extension Leg Bolt (92) into the |
|
|
| 89 |
top of the Extension Leg. Next, thread a 2.5" |
|
|
| |
|
|
|
| |
Extension Leg Bolt (65) into the bottom of the |
|
|
|
|
Extension Leg. Firmly tighten the Extension |
|
|
|
|
Leg Bolts. |
|
| 65 | 67 |
|
|
|
| |
Slide the other Front Endcap (44) onto the base |
|
|
|
|
of the Uprights (84). Partially tighten a Front |
|
|
|
|
Endcap Screw (14) into the Front Endcap and |
|
|
|
|
the base. |
|
|
|
|
4. Attach two Base Pads (82) to the base of the | 4 |
|
|
|
Uprights (84) with two 1" Tek Screws (83). |
|
|
| |
|
|
|
| |
| 83 | 82 |
|
|
|
|
|
| |
|
| 84 |
|
|
| 83 | 82 |
|
|
|
|
|
| |
| 7 |
|
|
|
