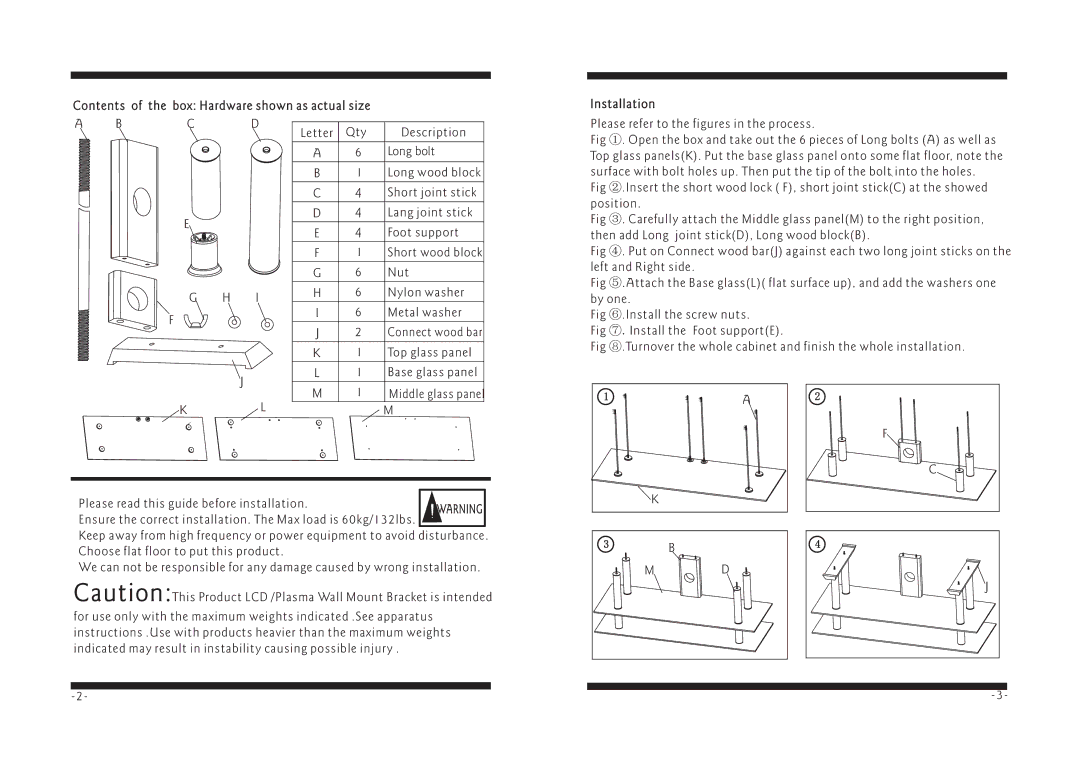
Contents of the box: Hardware shown as actual size
Installation
A BCD
E
G H I
F
J
KL
Letter | Qty | Description |
|
|
|
A | 6 | Long bolt |
B1 Long wood block
C4 Short joint stick
D4 Lang joint stick
E4 Foot support
F1 Short wood block
G | 6 | Nut |
H | 6 | Nylon washer |
I6 Metal washer
J2 Connect wood bar
K1 Top glass panel
L1 Base glass panel
M | 1 Middle glass panel |
| M |
Please refer to the figures in the process.
Fig ①. Open the box and take out the 6 pieces of Long bolts (A) as well as Top glass panels(K). Put the base glass panel onto some flat floor, note the surface with bolt holes up. Then put the tip of the bolt into the holes.
Fig ②.Insert the short wood lock ( F), short joint stick(C) at the showed position.
Fig ③. Carefully attach the Middle glass panel(M) to the right position, then add Long joint stick(D), Long wood block(B).
Fig ④. Put on Connect wood bar(J) against each two long joint sticks on the left and Right side.
Fig ⑤.Attach the Base glass(L)( flat surface up), and add the washers one by one.
Fig ⑥.Install the screw nuts.
Fig ⑦.Install the Foot support(E).
Fig ⑧.Turnover the whole cabinet and finish the whole installation.
1 | A | 2 |
|
| |
|
| F |
|
| C |
Please read this guide before installation. | WARNING | |
Ensure the correct installation. The Max load is 60kg/132lbs. | ||
|
Keep away from high frequency or power equipment to avoid disturbance. Choose flat floor to put this product.
We can not be responsible for any damage caused by wrong installation.
Caution:This Product LCD /Plasma Wall Mount Bracket is intended
for use only with the maximum weights indicated .See apparatus instructions .Use with products heavier than the maximum weights indicated may result in instability causing possible injury .
K |
|
|
3 | B | 4 |
|
| |
M |
| D |
J
|
|
|
|