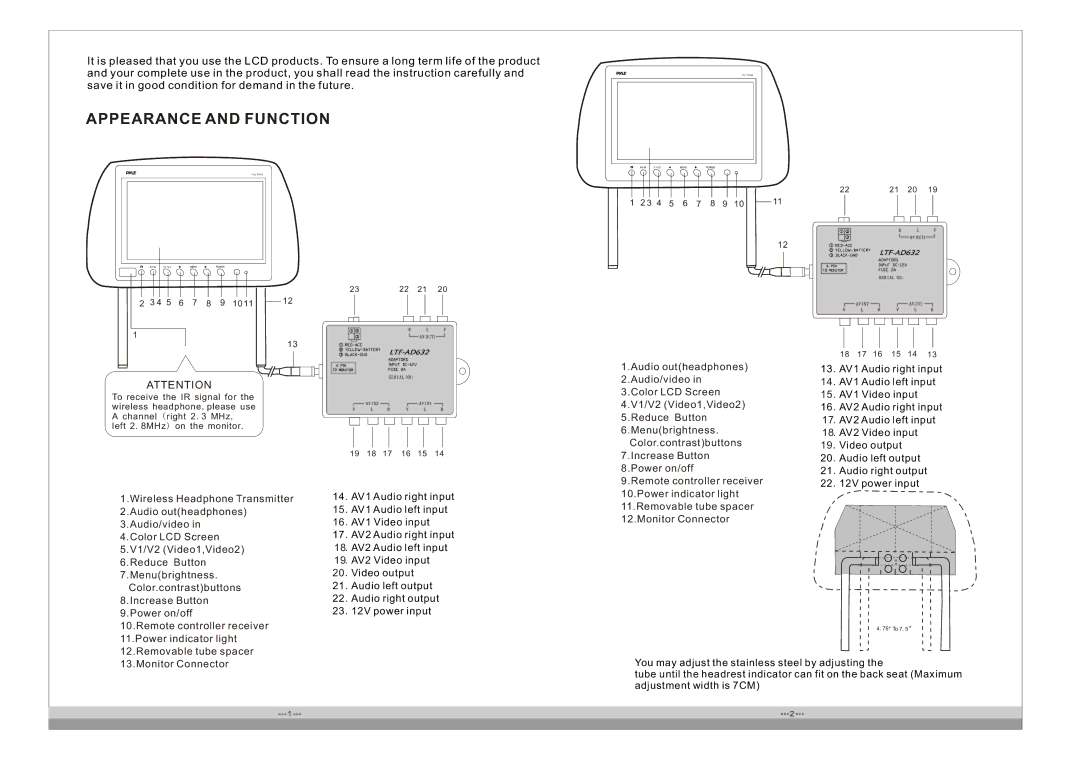
It is pleased that you use the LCD products. To ensure a long term life of the product and your complete use in the product, you shall read the instruction carefully and save it in good condition for demand in the future.
APPEARANCE AND FUNCTION
PL71PHB
V1/V2
|
|
|
|
|
|
|
|
|
|
|
|
|
|
|
| 23 | 22 | 21 | 20 | |||
|
|
|
|
|
|
|
|
|
|
|
|
|
|
|
| |||||||
|
|
|
|
|
|
|
|
|
|
|
|
|
|
|
|
| 12 |
|
|
|
|
|
2 | 3 4 5 | 6 | 7 | 8 | 9 | 10 11 |
|
|
|
|
|
| ||||||||||
|
|
|
|
| ||||||||||||||||||
|
|
|
|
|
|
|
|
|
|
|
|
|
|
|
|
|
|
|
|
|
|
|
1
13
ATTENTION
To receive the IR signal for the wireless headphone,please use
Achannel (right 2. 3 MHz,
left 2.8MHz) on the monitor.
19 18 17 16 15 14
1.Wireless Headphone Transmitter | 14 | . AV1 Audio right input |
2.Audio out(headphones) | 15 | . AV1 Audio left input |
3.Audio/video in | 16 | . AV1 Video input |
4.Color LCD Screen | 17. AV2 Audio right input | |
5.V1/V2 (Video1,Video2) | 18. AV2 Audio left input | |
6.Reduce Button | 19. AV2 Video input | |
7.Menu(brightness. | 20 | . Video output |
Color.contrast)buttons | 21 | . Audio left output |
8.Increase Button | 22 | . Audio right output |
9.Power on/off | 23.12V power input | |
10.Remote controller receiver 11.Power indicator light 12.Removable tube spacer 13.Monitor Connector
PL71PHB
V1/V2
|
|
|
|
|
|
|
| 22 | 21 | 20 | 19 |
1 | 2 3 4 | 5 | 6 | 7 | 8 | 9 | 10 | 11 |
|
|
|
|
|
|
|
|
|
|
| 12 |
|
|
|
1.Audio out(headphones) |
| 18 | 17 | 16 | 15 | 14 | 13 |
13 | . AV1 Audio right input | ||||||
2.Audio/video in | 14 | . AV1 Audio left input | |||||
3.Color LCD Screen | 15 | . AV1 Video input |
| ||||
4.V1/V2 (Video1,Video2) | 16 | . AV2 Audio right input | |||||
5.Reduce Button | 17. AV2 Audio left input | ||||||
6.Menu(brightness. | 18. AV2 Video input |
| |||||
Color.contrast)buttons | 19 | . Video output |
|
| |||
7.Increase Button | 20 | . Audio left output |
| ||||
8.Power on/off | 21 | .Audio right output |
| ||||
9.Remote controller receiver | 22 | .12V power input |
| ||||
10.Power indicator light |
|
|
|
|
|
|
|
11.Removable tube spacer |
|
|
|
|
|
|
|
12.Monitor Connector |
|
|
|
|
|
|
|
4.75![]() To 7.5
To 7.5
You may adjust the stainless steel by adjusting the
tube until the headrest indicator can fit on the back seat (Maximum adjustment width is 7CM)
1 | 2 |
