03 GENERAL OPERATIONS
01 INSTALLATION
SELECT MODE
Press SEL button (3) to change audio mode through volume, bass, treble, balance mode. Use VOL Up (4) and VOL Down (5) button to adjust the selected mode. When mode has not been adjusted for several seconds, display returns to normal radio or CD display.
VOL ![]() BAS
BAS ![]() TRE
TRE ![]() BAL
BAL
(Volume) (Bass) (Treble) (Balance)
OPTIONAL:
VOL ![]() BAS
BAS ![]() TRE
TRE ![]() BAL
BAL ![]() FAD
FAD
(Volume) (Bass) (Treble) (Balance) (Fader)
VOLUME
Adjust volume level by using VOL Up (4) and VOL Down (5) buttons.
BASS
Press SEL button (3) one time. Adjust bass level by using VOL Up (4) and VOL Down
(5) buttons.
TREBLE
Press SEL button (3) two times. Adjust treble level by using VOL Up (4) and VOL Down (5) buttons.
BALANCE
Press SEL button (3) three times. Adjust sound balance between left and right speakers by using VOL Up (4) and VOL Down (5) buttons.
FADER (optional)
Press SEL button (3) four times. Adjust sound balance between front and rear speakers by using VOL Up (4) and VOL Down (5) buttons.
MUTE
Press MUTE button (6) to mute down sound. Press it again to release this mode and recover previous volume level.
CD MODE/RADIO MODE
During CD operation, Press BND button (10) to switch to radio mode. During radio operation, when a compact disc is inserted in the Disc Slot (16), Press Play/Pause button (14) to switch to CD mode and start playing.
EQUALIZATION
Press EQ button (7) to turn to equalization function and to select desired audio mode. There are four kinds of modes as below:
![]() POP
POP ![]() CLASSIC
CLASSIC ![]() ROCK
ROCK ![]() EQ/OFF
EQ/OFF
LIQUID CRYSTAL DISPLAY
The LCD (19) can show the current state of the unit.
FLASHING LED
If the front panel is not on the main unit, LED
(20)will be flashing.
RESET BUTTON FUNCTION
RESET button (21) is placed on the housing and must be activated with either a ballpoint pen or thin metal object. The RESET button
(21)is to be activated for the following reasons:
·Initial installation of the unit when all wring is completed.
·All the function buttons do not operate.
·Error symbol on the display.
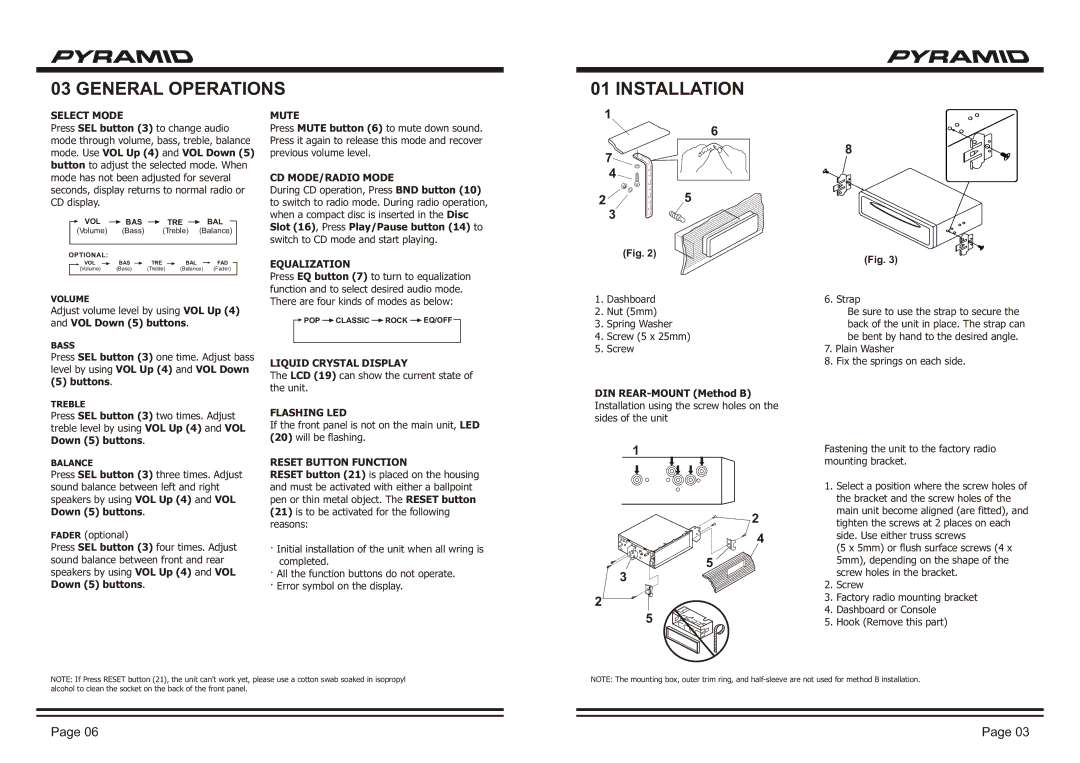
1
6
7![]()
4
2 ![]() 5
5
3
(Fig. 2)
1.Dashboard
2.Nut (5mm)
3.Spring Washer
4.Screw (5 x 25mm)
5.Screw
DIN REAR-MOUNT (Method B)
Installation using the screw holes on the sides of the unit
1
2
4
5
3
2
5
8
(Fig. 3)
6. Strap
Be sure to use the strap to secure the back of the unit in place. The strap can be bent by hand to the desired angle.
7.Plain Washer
8.Fix the springs on each side.
Fastening the unit to the factory radio mounting bracket.
1.Select a position where the screw holes of the bracket and the screw holes of the main unit become aligned (are fitted), and tighten the screws at 2 places on each side. Use either truss screws
(5 x 5mm) or flush surface screws (4 x 5mm), depending on the shape of the screw holes in the bracket.
2.Screw
3.Factory radio mounting bracket
4.Dashboard or Console
5.Hook (Remove this part)
NOTE: If Press RESET button (21), the unit can't work yet, please use a cotton swab soaked in isopropyl alcohol to clean the socket on the back of the front panel.
NOTE: The mounting box, outer trim ring, and
Page 06 | Page 03 |