E
®
TM
Model 75029
For 1 to 4 players / Ages 8 and up
INSTRUCTION MANUAL
P/N 82398900 Rev.A
Get off of the couch and into the game!
Whether you are playing defense, shooting a 3 pointer, or dunking a 360 on top of your opponent’s head, Play TV Basketball brings the fun and excitement of one on one basketball into your living room!
SETTING UP
• BATTERY INSTALLATION
Battery Compartment
On the back of the main unit, loosen the screw on the battery compart- ment and insert four (4) “AA” batteries as indicated inside the compart- ment (alkaline batteries recommended). Replace the battery compart- ment door.
NOTE: Batteries in the Main Unit should give you about 10 hours of game play (if alkaline batteries are used). The game will not operate nor- mally when the batteries begin to run low. The screen may be blurred and resetting the game may not work. Be sure to install fresh batteries. There is also no memory function. All game data will be erased when the power is turned off or batteries are replaced.
ADULT SUPERVISION IS RECOMMENDED WHEN INSTALLING BATTERIES.
• TV CONNECTION
NOTE: To connect Play TV Basketball directly to a TV, the TV must be equipped with audio and video input jacks. They are commonly found on the front of the TV near the contrast, color and picture adjustment con- trols or on the rear of the TV near the antenna and cable/satellite jacks.
If your TV does not have audio and video input jacks, you may connect Play TV Basketball through a VCR connected to your TV.
Please note: If your TV does not have AV Input Jacks, you can connect your game through your VCR or use an RF Modulator. RF Modulators can be purchased at most electronic stores.
• CONNECTING TO A VCR
To connect Play TV Basketball to your VCR, insert the yellow video plug from the Main Unit into the
ADULT SUPERVISION IS RECOMMENDED WHEN CONNECTING CABLES TO A TV AND VCR.
BUTTON FUNCTIONS ON THE MAIN UNIT
POWER
LEFT
RIGHT
ENTER
POWER – Used to turn the game On/Off
RIGHT – Used to scroll right through the MENU
LEFT – Used to scroll left through the MENU
ENTER – Used to enter selections in the MENU
GETTING STARTED
Place the console on the floor in front of the TV. Press the power button to turn the camera on. Keep the ball 5 to 6 feet from the console. Adjust the angle of the camera by moving the main housing up and down so it points up towards your waist. The camera will track the movements of the basketball (included) when playing offense and defense.
Please note: You may need to reposition yourself or the camera to comfortably and safely reach anywhere within the required range of motion with the ball. If the cursor in the game jumps abruptly on screen, try moving a foot or two further from the camera, turn off unneeded room lights, and make sure sunlight is not shining on the console.
PLAYING PLAY TV BASKETBALL
Turn on the power to your Play TV Basketball by pressing the Power Button on the Main Unit console. Press the Enter button or move the basketball cursor to Highlight to Start on the screen. On the Main Menu screen you will be able to scroll through the menu options (Ballin’ Mode, Quick Start, Playground Mode, and Options). The currently selected option will be highlighted. Use the ENTER button (see button functions section of this manual) or using the basketball place the cursor over your choice to make your selection.
OPTIONS – allows you to change Background Music, Taunting levels, Winning Score, Ball Possession and Calibration by using the RIGHT and LEFT scroll buttons and the ENTER button or using the basketball place the cursor over your choice to make your selection.
•Background Music – Select On/Off
•Taunting – Select On/Off
•Winning Score – Select 11 points or 21 points
•Ball Possession – Select Winners or Losers
•Calibration – Standing 5 to 6 feet from the camera move the cursor to the 4 quadrants easily and accurately to calibrate.
You can choose from 3 modes of
•Character Select – Choose one (1) out of four (4) characters
•Court Style Select – Choose one (1) out of three (3) courts.
•The Boardwalk – rough asphalt with faded lines on a beach boule- vard with palm trees, sand and surf.
•The Urban Playground – rough asphalt with faded lines in an urban setting with chain link fence.
•The Gym – standard parquet wood floor with nice painted lines in a recreation center.
BALLIN’ MODE – allows you to play a game of 1 on 1 basketball. You will have a 30 second shot clock limit on offense and defense, and differ- ent courts and players to choose from. The player to score 11 or 21 points first wins! Remember you must win by 2 points.
An on screen cursor will track the balls movement. Moving the ball to different sectors on the screen will move the player and ball.
•Sector A: Moves the player towards the hoop and to the left
•Sector B: Moves the player to the left
•Sector C: Moves the player away from the hoop and to the left
•Sector D: Moves the player towards the hoop and to the right
•Sector E: Moves the player to the right
•Sector F: Moves the player away from the hoop and to the right
•Sector G: Juke move left
•Sector H: Juke move right
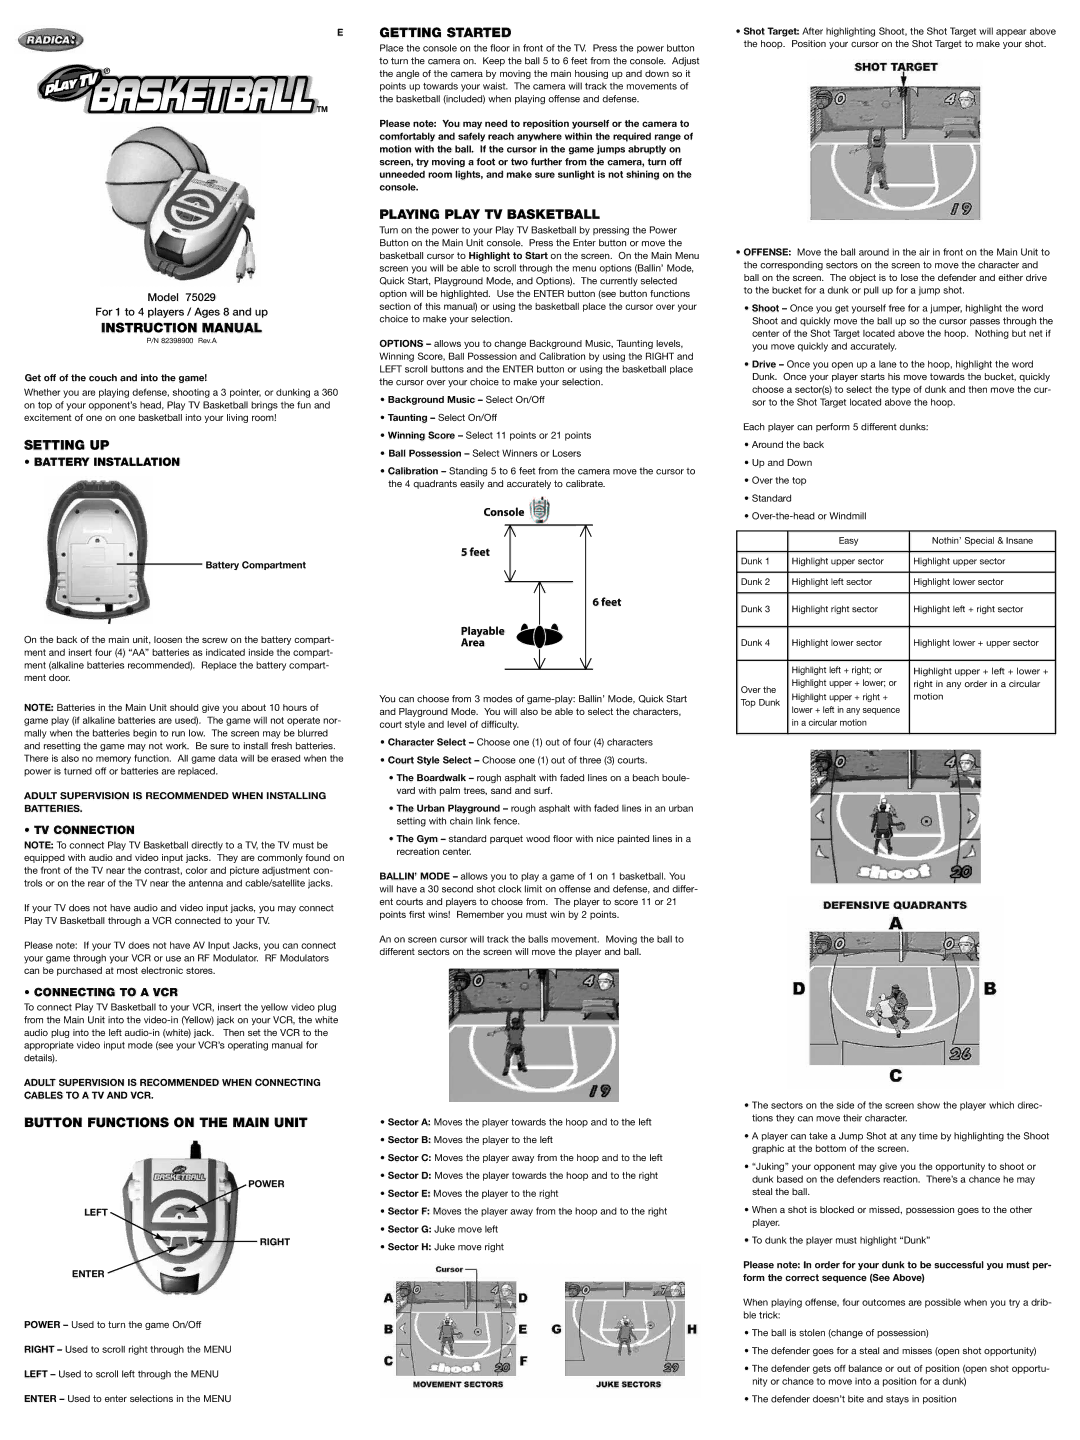
•Shot Target: After highlighting Shoot, the Shot Target will appear above the hoop. Position your cursor on the Shot Target to make your shot.
•OFFENSE: Move the ball around in the air in front on the Main Unit to the corresponding sectors on the screen to move the character and ball on the screen. The object is to lose the defender and either drive to the bucket for a dunk or pull up for a jump shot.
•Shoot – Once you get yourself free for a jumper, highlight the word Shoot and quickly move the ball up so the cursor passes through the center of the Shot Target located above the hoop. Nothing but net if you move quickly and accurately.
•Drive – Once you open up a lane to the hoop, highlight the word Dunk. Once your player starts his move towards the bucket, quickly choose a sector(s) to select the type of dunk and then move the cur- sor to the Shot Target located above the hoop.
Each player can perform 5 different dunks:
•Around the back
•Up and Down
•Over the top
•Standard
•
| Easy | Nothin’ Special & Insane | |
|
|
| |
Dunk 1 | Highlight upper sector | Highlight upper sector | |
|
|
| |
Dunk 2 | Highlight left sector | Highlight lower sector | |
|
|
| |
Dunk 3 | Highlight right sector | Highlight left + right sector | |
|
|
| |
Dunk 4 | Highlight lower sector | Highlight lower + upper sector | |
|
|
| |
| Highlight left + right; or | Highlight upper + left + lower + | |
Over the | Highlight upper + lower; or | right in any order in a circular | |
Highlight upper + right + | motion | ||
Top Dunk | |||
lower + left in any sequence |
| ||
|
| ||
| in a circular motion |
| |
|
|
|
•The sectors on the side of the screen show the player which direc- tions they can move their character.
•A player can take a Jump Shot at any time by highlighting the Shoot graphic at the bottom of the screen.
•“Juking” your opponent may give you the opportunity to shoot or dunk based on the defenders reaction. There’s a chance he may steal the ball.
•When a shot is blocked or missed, possession goes to the other player.
•To dunk the player must highlight “Dunk”
Please note: In order for your dunk to be successful you must per- form the correct sequence (See Above)
When playing offense, four outcomes are possible when you try a drib- ble trick:
•The ball is stolen (change of possession)
•The defender goes for a steal and misses (open shot opportunity)
•The defender gets off balance or out of position (open shot opportu- nity or chance to move into a position for a dunk)
•The defender doesn’t bite and stays in position