SETTING UP THE CALLER ID BOX
1. With the time displayed, hold down
REVIEW and simultaneously until ENTER LANGUAGE and then ENG ESP FRA appear. ENG
flashes.

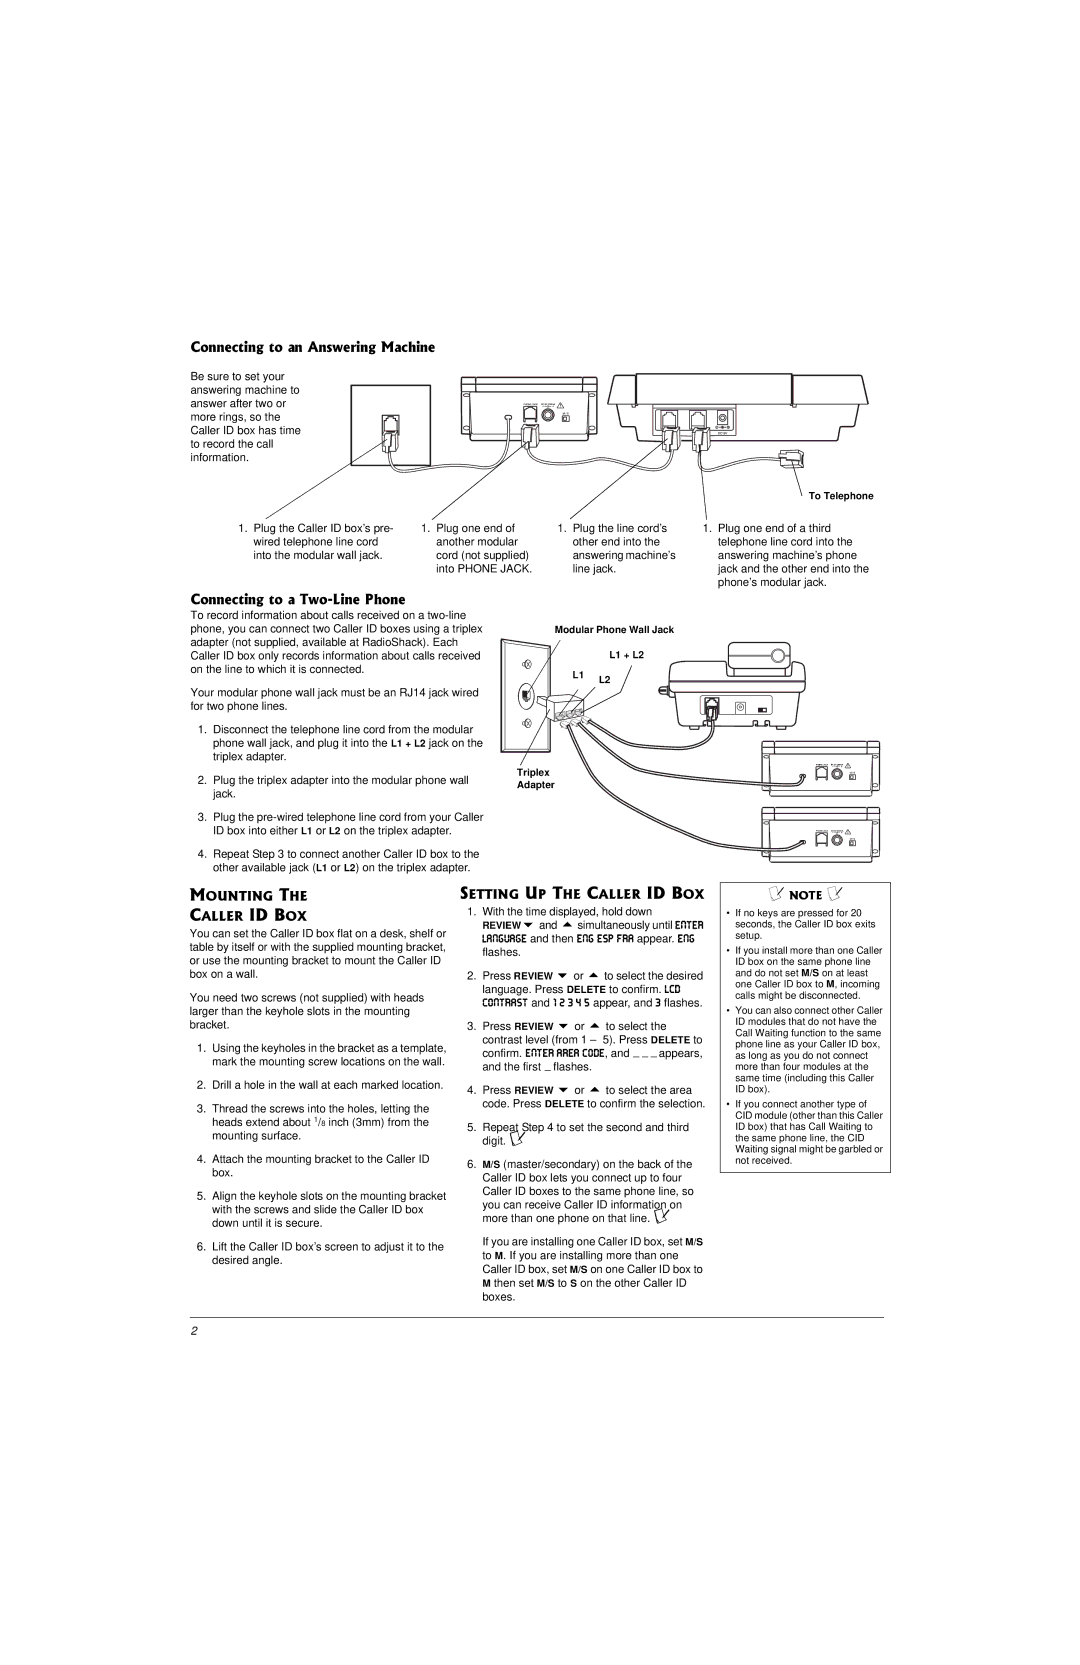
Connecting to an Answering Machine

Be sure to set your answering machine to answer after two or more rings, so the Caller ID box has time to record the call information.

To Telephone

1. Plug the Caller ID box’s pre-

1. Plug one end of

wired telephone line cord

another modular

into the modular wall jack.

cord (not supplied)


into PHONE JACK.

1.Plug the line cord’s other end into the answering machine’s line jack.

1.Plug one end of a third telephone line cord into the answering machine’s phone jack and the other end into the phone’s modular jack.

Connecting to a Two-Line Phone

To record information about calls received on a two-line phone, you can connect two Caller ID boxes using a triplex adapter (not supplied, available at RadioShack). Each Caller ID box only records information about calls received on the line to which it is connected.

Your modular phone wall jack must be an RJ14 jack wired for two phone lines.

1.Disconnect the telephone line cord from the modular phone wall jack, and plug it into the L1 + L2 jack on the triplex adapter.

Modular Phone Wall Jack

L1 + L2

L1 L2

Triplex

2. Plug the triplex adapter into the modular phone wall

Adapter

jack.


3.Plug the pre-wired telephone line cord from your Caller ID box into either L1 or L2 on the triplex adapter.

4.Repeat Step 3 to connect another Caller ID box to the other available jack (L1 or L2) on the triplex adapter.

MOUNTING THE

CALLER ID BOX

You can set the Caller ID box flat on a desk, shelf or table by itself or with the supplied mounting bracket, or use the mounting bracket to mount the Caller ID box on a wall.

You need two screws (not supplied) with heads larger than the keyhole slots in the mounting bracket.

1.Using the keyholes in the bracket as a template, mark the mounting screw locations on the wall.

2.Drill a hole in the wall at each marked location.

3.Thread the screws into the holes, letting the heads extend about 1/8 inch (3mm) from the mounting surface.

4.Attach the mounting bracket to the Caller ID box.

5.Align the keyhole slots on the mounting bracket with the screws and slide the Caller ID box down until it is secure.

6.Lift the Caller ID box’s screen to adjust it to the desired angle.

2.

Press REVIEW

or

to select the desired


language. Press DELETE to confirm. LCD


CONTRAST and 1 2 3 4 5 appear, and 3 flashes.

3.

Press REVIEW

or

to select the


contrast level (from 1 –

5). Press DELETE to


confirm. ENTER AREA CODE, and _ _ _ appears,


and the first _ flashes.


4.

Press REVIEW

or

to select the area


code. Press DELETE to confirm the selection.

5.Repeat Step 4 to set the second and third digit. Ô

6.M/S (master/secondary) on the back of the Caller ID box lets you connect up to four Caller ID boxes to the same phone line, so

you can receive Caller ID information on more than one phone on that line. Ô

If you are installing one Caller ID box, set M/S to M. If you are installing more than one Caller ID box, set M/S on one Caller ID box to M then set M/S to S on the other Caller ID boxes.

Ô NOTE Ô

If no keys are pressed for 20 seconds, the Caller ID box exits setup.

If you install more than one Caller ID box on the same phone line and do not set M/S on at least one Caller ID box to M, incoming calls might be disconnected.

You can also connect other Caller ID modules that do not have the Call Waiting function to the same phone line as your Caller ID box, as long as you do not connect more than four modules at the same time (including this Caller ID box).

If you connect another type of CID module (other than this Caller ID box) that has Call Waiting to the same phone line, the CID Waiting signal might be garbled or not received.

2

Page 2
Image 2
Radio Shack 43-3903 owner manual Connecting to an Answering Machine, Connecting to a Two-Line Phone, Mounting Caller ID BOX

43-3903 specifications

The Radio Shack 43-3903 is a versatile and compact frequency counter that serves a range of applications in electronics, radio communications, and hobbyist projects. As an entry-level frequency counter, it is designed to measure frequencies up to 2.4 GHz, making it suitable for various electronic testing and hobbyist activities. The device is particularly appreciated for its ease of use and reliability, making it a favorite among enthusiasts and professionals alike.

One of the standout features of the Radio Shack 43-3903 is its broad frequency measurement range. It can effectively count frequencies in different modes, including RF, audio, and digital signals. This flexibility allows users to test and troubleshoot various devices, from amateur radio setups to RF broadcasting equipment.

The 43-3903 is equipped with a clear LCD display, which provides a readout of the measured frequency. This display makes it easy for users to view real-time data at a glance, enhancing the experience of monitoring signals. Additionally, it features a peak hold function that captures and displays the highest frequency measured during a test period, which is particularly useful for identifying transient signals.

Another notable technology incorporated into the Radio Shack 43-3903 is its automatic time base calibration. This ensures accuracy in frequency measurement, which is crucial for tasks that require precise tuning and testing. Furthermore, the device is designed with a convenient input for connecting antennas or direct signal sources, enhancing its utility in various applications.

The compact design of the 43-3903 ensures portability, allowing enthusiasts to carry it to different locations effortlessly. Its durability and build quality contribute to its longevity, making it a worthwhile investment for anyone involved in radio-related activities or electronics.

In summary, the Radio Shack 43-3903 is a reliable frequency counter that combines functionality with user-friendly features. Its extensive frequency range, clear LCD display, automatic calibration, and portability make it an essential tool for hobbyists and professionals in the field of electronics and communication. For anyone looking to explore the world of frequency measurement, the 43-3903 stands out as a practical choice that offers both performance and value.