•When you are not going to use the unit for a long period of time, disconnect the AC power cord.
Condensation Information
• When left in a heated room where it is warm and
to radio communications. However, there is no guarantee that interference will not occur in a particular installation. If this equipment does cause harmful interference to radio or television
GETTING STARTED
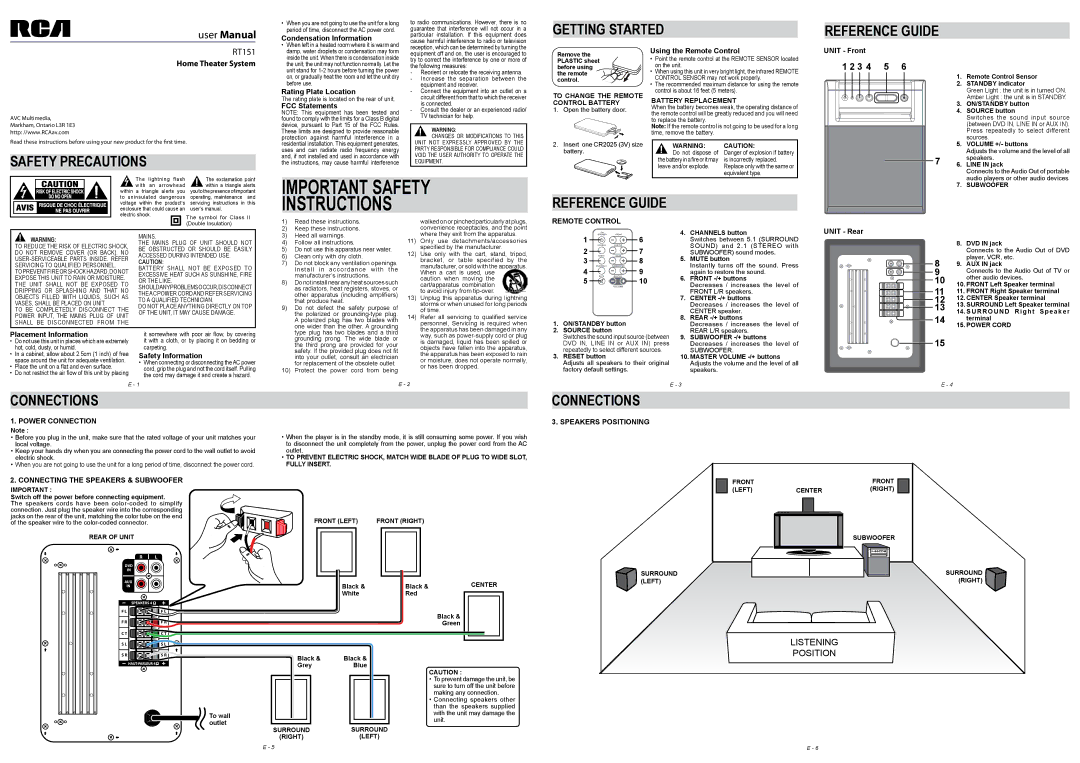
REFERENCE GUIDE
Home Theater System
AVC Multimedia, Markham, Ontario L3R 1E3 http: //www.RCAav.com
Read these instructions before using your new product for the first time.
Safety Precautions
inside the unit. When there is condensation inside the unit, the unit may not function normally. Let the unit stand for 1-2 hours before turning the power on, or gradually heat the room and let the unit dry before use.
Rating Plate Location
The rating plate is located on the rear of unit.
FCC Statements
NOTE: This equipment has been tested and found to comply with the limits for a Class B digital device, pursuant to Part 15 of the FCC Rules. These limits are designed to provide reasonable protection against harmful interference in a residential installation. This equipment generates, uses and can radiate radio frequency energy and, if not installed and used in accordance with the instructions, may cause harmful interference
try to correct the interference by one or more of the following measures:
- Reorient or relocate the receiving antenna. - Increase the separation between the
equipment and receiver.
- Connect the equipment into an outlet on a circuit different from that to which the receiver is connected.
- Consult the dealer or an experienced radio/ TV technician for help.
WARNING:
 CHANGES OR MODIFICATIONS TO THIS UNIT NOT EXPRESSLY APPROVED BY THE PARTY RESPONSIBLE FOR COMPLIANCE COULD VOID THE USER AUTHORITY TO OPERATE THE EQUIPMENT.
PLASTIC sheet before using the remote control.
TO CHANGE THE REMOTE CONTROL BATTERY
1.Open the battery door.
2.Insert one CR2025 (3V) size battery.
•Point the remote control at the REMOTE SENSOR located on the unit.
•When using this unit in very bright light, the infrared REMOTE CONTROL SENSOR may not work properly.
•The recommended maximum distance for using the remote control is about 16 feet (5 meters).
BATTERY REPLACEMENT
When the battery becomes weak, the operating distance of the remote control will be greatly reduced and you will need to replace the battery.
Note: If the remote control is not going to be used for a long time, remove the battery.
WARNING: | CAUTION: |
Do not dispose of | Danger of explosion if battery |
thebatteryinafireoritmay | is incorrectly replaced. |
leave and/or explode. | Replace only with the same or |
1. | Remote Control Sensor |
2. | STANDBY indicator |
| Green Light : the unit is in turned ON. |
3. | Amber Light : the unit is in STANDBY. |
ON/STANDBY button |
4. | SOURCE button |
| Switches the sound input source |
| (between DVD IN, LINE IN or AUX IN). |
| Press repeatedly to select different |
5. | sources. |
VOLUME +/- buttons |
| Adjusts the volume and the level of all |
6. | speakers. |
LINE IN jack |
| Connects to the Audio Out of portable |
WARNING:
TO REDUCE THE RISK OF ELECTRIC SHOCK, DO NOT REMOVE COVER (OR BACK). NO USER-SERVICEABLE PARTS INSIDE. REFER SERVICING TO QUALIFIED PERSONNEL.
TOPREVENTFIREORSHOCKHAZARD,DONOT EXPOSE THIS UNIT TO RAIN OR MOISTURE. THE UNIT SHALL NOT BE EXPOSED TO DRIPPING OR SPLASHING AND THAT NO OBJECTS FILLED WITH LIQUIDS, SUCH AS VASES, SHALL BE PLACED ON UNIT.
TO BE COMPLETEDLY DISCONNECT THE POWER INPUT, THE MAINS PLUG OF UNIT SHALL BE DISCONNECTED FROM THE
MAINS.
THE MAINS PLUG OF UNIT SHOULD NOT BE OBSTRUCTED OR SHOULD BE EASILY ACCESSED DURING INTENDED USE.
CAUTION:
BATTERY SHALL NOT BE EXPOSED TO EXCESSIVE HEAT SUCH AS SUNSHINE, FIRE OR THE LIKE.
Shouldanyproblemsoccur,disconnect theAC power cordand refer servicing to a qualified technician.
Do not place anything directly on top of the unit, it may cause damage.
2) | Keep these instructions. |
3) | Heed all warnings. |
4) | Follow all instructions. |
5) Do not use this apparatus near water. |
6) | Clean only with dry cloth. |
7) | Do not block any ventilation openings. |
| Install in accordance with the |
| manufacturer’s instructions. |
8) | Do not install near any heat sources such |
| as radiators, heat registers, stoves, or |
| other apparatus (including amplifiers) |
9) | that produce heat. |
Do not defect the safety purpose of |
| the polarized or grounding-type plug. |
| A polarized plug has two blades with |
| one wider than the other. A grounding |
convenience receptacles, and the point where they exit from the apparatus.
11) | Only use detachments/accessories |
12) | specified by the manufacturer. |
Use only with the cart, stand, tripod, |
| bracket, or table specified by the |
| manufacturer, or sold with the apparatus. |
| When a cart is used, use |
| caution when moving the |
| cart/apparatus combination |
| to avoid injury from tip-over. |
13) | Unplug this apparatus during lightning |
| storms or when unused for long periods |
| of time. |
14) | Refer all servicing to qualified service |
| personnel, Servicing is required when |
| the apparatus has been damaged in any |
1. | ON/STANDBY button |
2. | SOURCE button |
4. | CHANNELS button |
| Switches between 5.1 (SURROUND |
| SOUND) and 2.1 (STEREO with |
5. | SUBWOOFER) sound modes. |
MUTE button |
| Instantly turns off the sound. Press |
6. | again to restore the sound. |
FRONT -/+ buttons |
| Decreases / increases the level of |
7. | FRONT L/R speakers. |
CENTER -/+ buttons |
| Decreases / increases the level of |
8. | CENTER speaker. |
REAR -/+ buttons |
| Decreases / increases the level of |
UNIT - Rear
| 8. | DVD IN jack |
| | Connects to the Audio Out of DVD |
8 | 9. | player, VCR, etc. |
AUX IN jack |
9 | | Connects to the Audio Out of TV or |
10 | | other audio devices. |
10. FRONT Left Speaker terminal |
11 | 11. FRONT Right Speaker terminal |
12 | 12. CENTER Speaker terminal |
13 | 13. SURROUND Left Speaker terminal |
14. SURROUND Right Speaker |
14 | | terminal |
| 15. POWER CORD |
•Before you plug in the unit, make sure that the rated voltage of your unit matches your local voltage.
•Keep your hands dry when you are connecting the power cord to the wall outlet to avoid electric shock.
•When you are not going to use the unit for a long period of time, disconnect the power cord.
2. CONNECTING THE SPEAKERS & SUBWOOFER
IMPORTANT :
Switch off the power before connecting equipment.
The speakers cords have been color-coded to simplify connection. Just plug the speaker wire into the corresponding jacks on the rear of the unit, matching the color tube on the end of the speaker wire to the color-coded connector.
REAR OF UNIT
R L
DVD
IN
AUX
IN
SPEAKERS 4
F L | F L |
F R | F R |
C T | C T |
S L | S L |
S R | S R |
HAUT-PARLEUR 4
To wall outlet
• When the player is in the standby mode, it is still consuming some power. If you wish |
to disconnect the unit completely from the power, unplug the power cord from the AC |
outlet. |
• TO PREVENT ELECTRIC SHOCK, MATCH WIDE BLADE OF PLUG TO WIDE SLOT, |
FULLY INSERT. |
FRONT (LEFT) | FRONT (RIGHT) |
| | | | | | | | | |
| | | | | | | | | |
| | | | | | | | | |
| | | | | | | | | |
Black & | Black & | CENTER |
White | Red | |
|
Black &
Green
CAUTION :
• To prevent damage the unit, be sure to turn off the unit before making any connection.
• Connecting speakers other than the speakers supplied with the unit may damage the unit.
SURROUNDSURROUND
(RIGHT)(LEFT)
FRONT | | FRONT |
(LEFT) | CENTER | (RIGHT) |
| | SUBWOOFER |
SURROUND | SURROUND |
(LEFT) | (RIGHT) |
LISTENING
POSITION