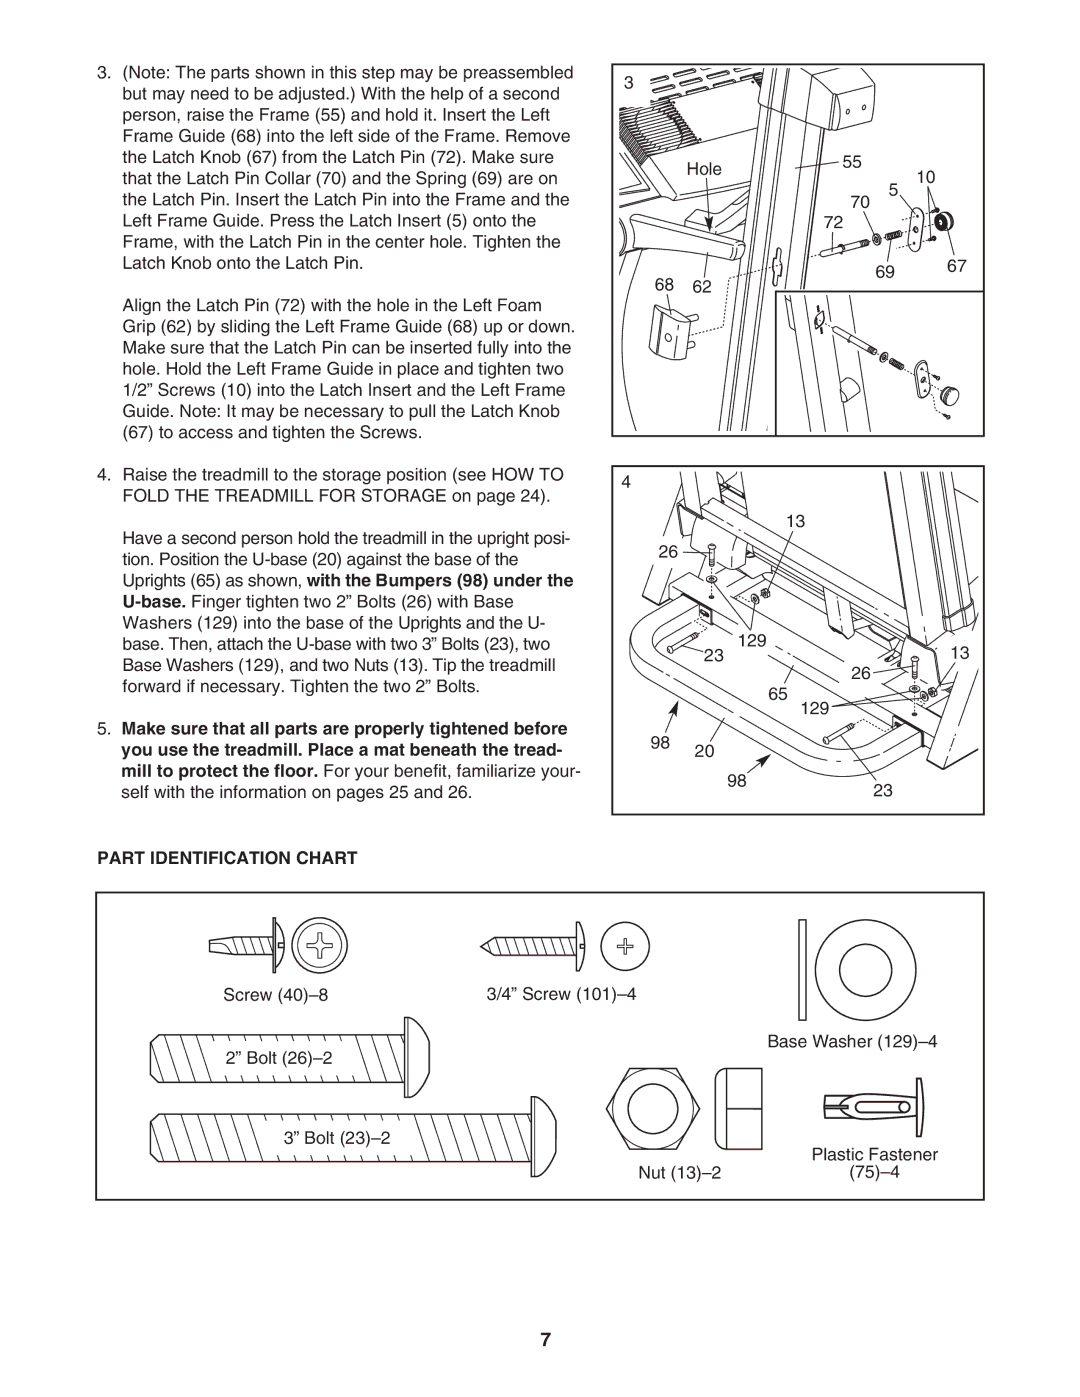
3. (Note: The parts shown in this step may be preassembled | 3 |
|
|
|
|
but may need to be adjusted.) With the help of a second |
|
|
|
| |
|
|
|
|
| |
person, raise the Frame (55) and hold it. Insert the Left |
|
|
|
|
|
Frame Guide (68) into the left side of the Frame. Remove |
|
|
|
|
|
the Latch Knob (67) from the Latch Pin (72). Make sure |
| Hole | 55 |
| 10 |
that the Latch Pin Collar (70) and the Spring (69) are on |
|
|
| ||
|
|
| 5 | ||
the Latch Pin. Insert the Latch Pin into the Frame and the |
|
| 70 |
| |
Left Frame Guide. Press the Latch Insert (5) onto the |
|
| 72 |
|
|
Frame, with the Latch Pin in the center hole. Tighten the |
|
|
|
|
|
Latch Knob onto the Latch Pin. | 68 |
|
| 69 | 67 |
| 62 |
|
| ||
Align the Latch Pin (72) with the hole in the Left Foam |
|
|
| ||
|
|
|
|
| |
Grip (62) by sliding the Left Frame Guide (68) up or down. |
|
|
|
|
|
Make sure that the Latch Pin can be inserted fully into the |
|
|
|
|
|
hole. Hold the Left Frame Guide in place and tighten two |
|
|
|
|
|
1/2” Screws (10) into the Latch Insert and the Left Frame |
|
|
|
|
|
Guide. Note: It may be necessary to pull the Latch Knob |
|
|
|
|
|
(67) to access and tighten the Screws. |
|
|
|
|
|
4. Raise the treadmill to the storage position (see HOW TO | 4 |
|
|
|
|
FOLD THE TREADMILL FOR STORAGE on page 24). |
|
|
|
| |
|
|
|
|
| |
Have a second person hold the treadmill in the upright posi- |
|
| 13 |
|
|
26 |
|
|
|
| |
tion. Position the |
|
|
|
| |
|
|
|
|
| |
Uprights (65) as shown, with the Bumpers (98) under the |
|
|
|
|
|
|
|
|
|
| |
Washers (129) into the base of the Uprights and the U- |
|
| 129 |
|
|
base. Then, attach the |
| 23 |
| 13 | |
Base Washers (129), and two Nuts (13). Tip the treadmill |
| 26 |
| ||
|
|
|
| ||
forward if necessary. Tighten the two 2” Bolts. |
|
|
|
| |
|
| 65 |
|
| |
|
|
|
|
| |
5. Make sure that all parts are properly tightened before |
|
| 129 |
|
|
98 |
|
|
|
| |
you use the treadmill. Place a mat beneath the tread- | 20 |
|
|
| |
|
|
|
| ||
mill to protect the floor. For your benefit, familiarize your- |
|
| 98 | 23 |
|
self with the information on pages 25 and 26. |
|
|
| ||
|
|
|
|
PART IDENTIFICATION CHART
Screw | 3/4” Screw |
2” Bolt |
|
3” Bolt |
|
| Nut |
Base Washer
Plastic Fastener
7