OWNER’S MANUAL
POLE SAW NAMES AND TERMS
Coupling Nut Threaded collar (loosen to slide inner pole, tighten to hold pole in position).
Guide Bar Metal bar that extends from saw body. The guide bar supports and guides chain.
Inner Pole The moveable section of tub- ing to which the saw is attached.
Kickback Quick backward and upward motion of guide bar. Kickback may occur when tip of guide bar touches an object while chain is moving. The guide bar will kick up and back towards operator.
Oiler Control System for oiling guide bar and chain.
Outer Pole Retains the moveable inner pole.
Saw Chain (Chain) Loop of chain having cutting teeth for cutting wood. The motor drives chain. The guide bar supports chain.
Sprocket Toothed wheel that drives chain.
Switch Device that completes or interrupts electrical circuit to motor of saw.
Switch Lockout Device that reduces accidental starting of saw.
Trigger Device that turns saw on and off. Squeezing trigger turns saw on.
Releasing trigger turns saw off.
Trimming (Pruning) Process of cutting limb(s) from a living tree.
Undercut An upward cut from underside of log or limb. This is done while in normal cutting position and cutting with top of guide bar.
UNPACKING
1.Remove all items from carton.
2.Check all items for any shipping dam- age. If you find any damage or if any parts are missing, promptly inform dealer where you bought the Pole Saw.
ASSEMBLY
The plastic hardware bag for the Pole Saw should include the following:
CHAIN SAW HARDWARE
•(2) Guidebar bolts
•(2) Guidebar nuts
•(1) Phillips self tapping screw
•(1) Saw chain
•(1) Guide bar
•(1) Hand guard
•(1) Scabbard
POLE SAW HARDWARE
•(1) Handle bracket
•(4) #10 x 24 Phillips screws
•(4) #10 lockwashers
ASSEMBLY OF CHAIN SAW
Assemble the chain saw before assembling the pole. Refer to chain saw manual for assembly instructions.
![]() CAUTION: Do not place chain on saw backwards. If chain is backwards, saw will vibrate badly and will not cut.
CAUTION: Do not place chain on saw backwards. If chain is backwards, saw will vibrate badly and will not cut.
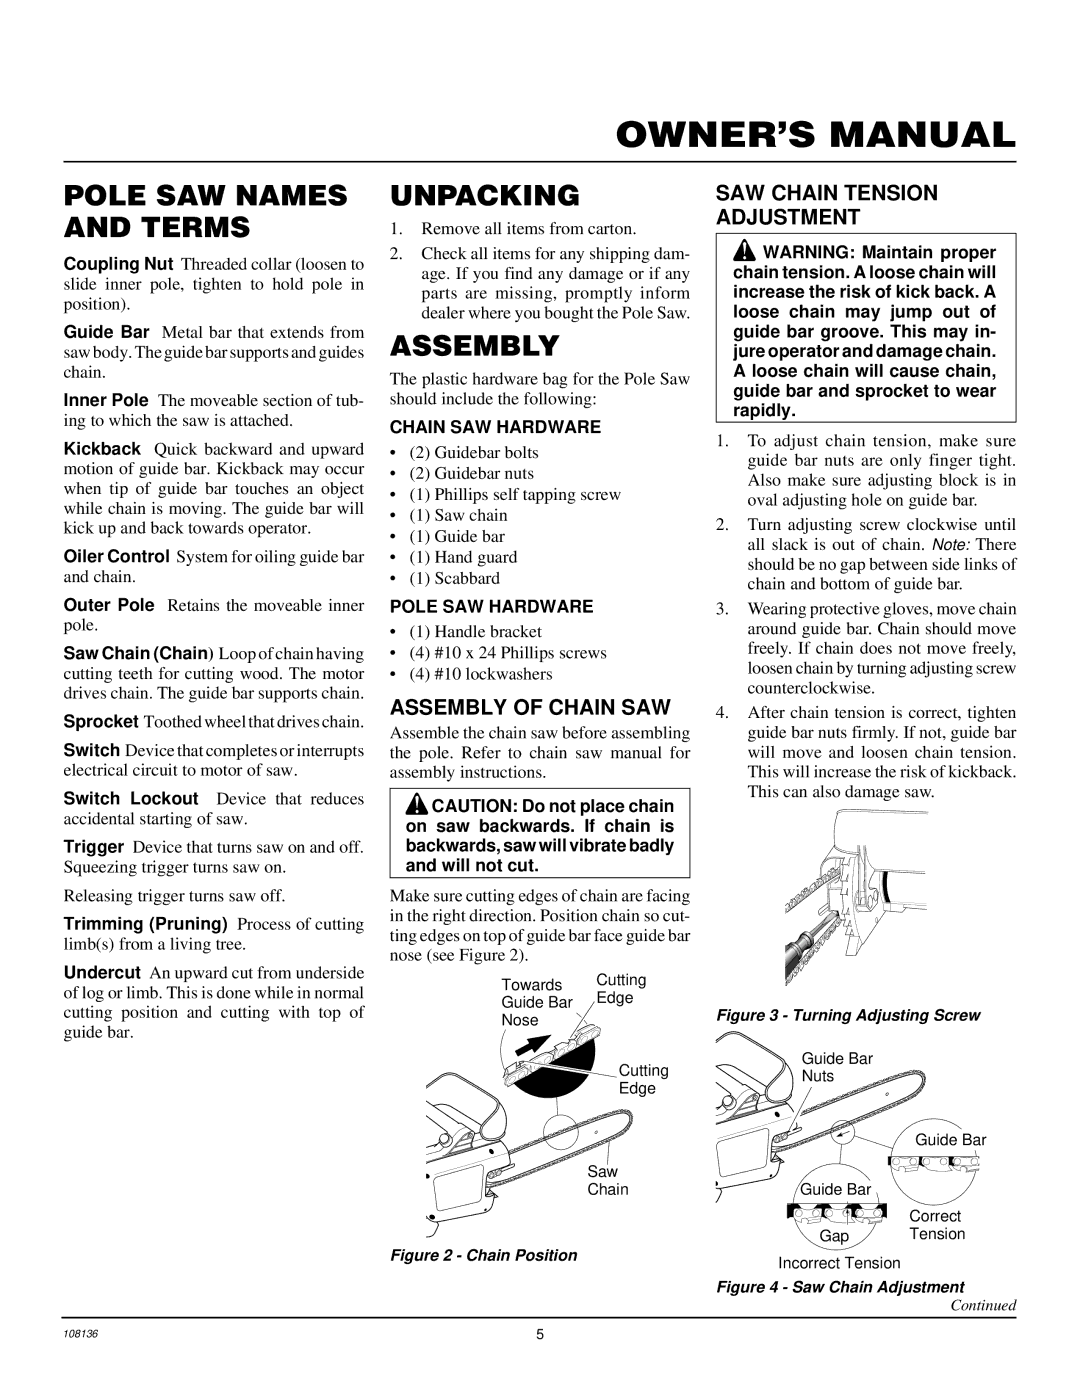
Make sure cutting edges of chain are facing in the right direction. Position chain so cut- ting edges on top of guide bar face guide bar nose (see Figure 2).
Towards Cutting
Guide Bar Edge
Nose
![]()
![]() Cutting
Cutting
Edge
Saw
Chain
Figure 2 - Chain Position
SAW CHAIN TENSION
ADJUSTMENT
![]() WARNING: Maintain proper chain tension. A loose chain will increase the risk of kick back. A loose chain may jump out of guide bar groove. This may in- jure operator and damage chain. A loose chain will cause chain, guide bar and sprocket to wear rapidly.
WARNING: Maintain proper chain tension. A loose chain will increase the risk of kick back. A loose chain may jump out of guide bar groove. This may in- jure operator and damage chain. A loose chain will cause chain, guide bar and sprocket to wear rapidly.
1.To adjust chain tension, make sure guide bar nuts are only finger tight. Also make sure adjusting block is in oval adjusting hole on guide bar.
2.Turn adjusting screw clockwise until all slack is out of chain. Note: There should be no gap between side links of chain and bottom of guide bar.
3.Wearing protective gloves, move chain around guide bar. Chain should move freely. If chain does not move freely, loosen chain by turning adjusting screw counterclockwise.
4.After chain tension is correct, tighten guide bar nuts firmly. If not, guide bar will move and loosen chain tension. This will increase the risk of kickback. This can also damage saw.
Figure 3 - Turning Adjusting Screw
Guide Bar
Nuts ![]()
Guide Bar
Guide Bar
Correct
Gap Tension
Incorrect Tension
Figure 4 - Saw Chain Adjustment
Continued
108136 | 5 |