How to Use
Usage Tips
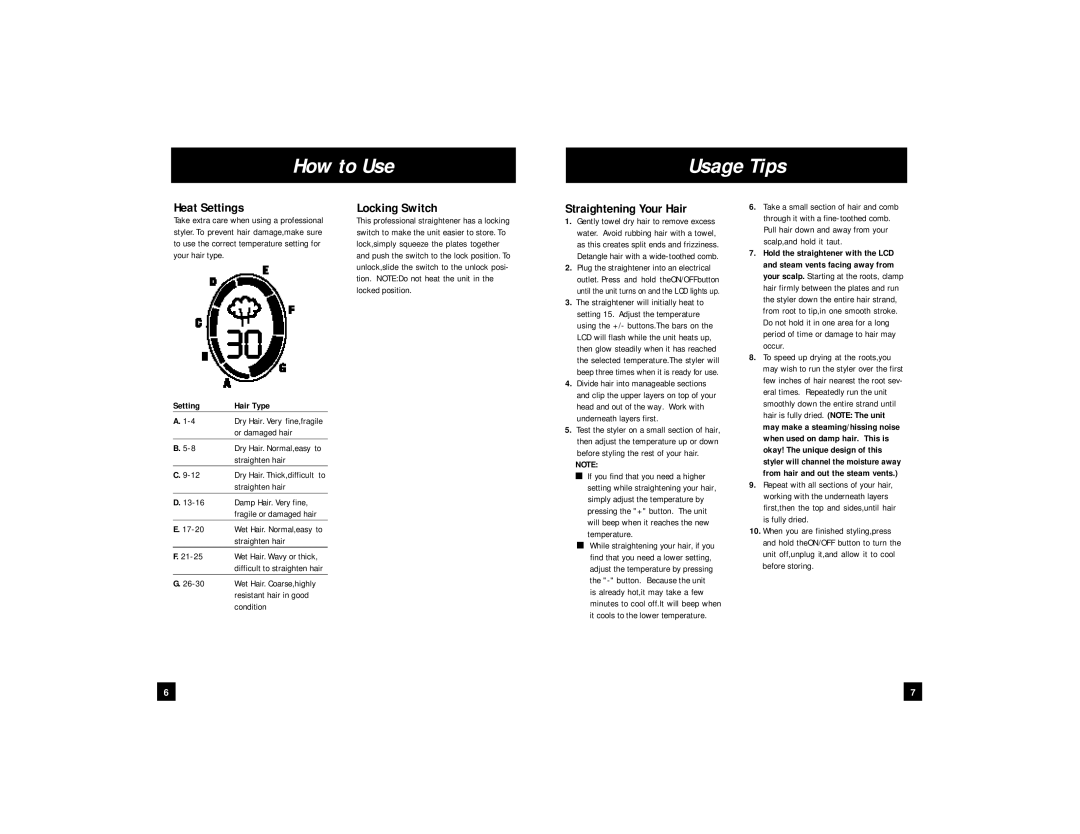
Heat Settings
Take extra care when using a professional styler. To prevent hair damage,make sure to use the correct temperature setting for your hair type.
Locking Switch
This professional straightener has a locking switch to make the unit easier to store. To lock,simply squeeze the plates together and push the switch to the lock position. To unlock,slide the switch to the unlock posi- tion. NOTE:Do not heat the unit in the locked position.
Straightening Your Hair
1. Gently towel dry hair to remove excess |
water. Avoid rubbing hair with a towel, |
as this creates split ends and frizziness. |
Detangle hair with a |
2. Plug the straightener into an electrical |
outlet. Press and hold theON/OFFbutton |
until the unit turns on and the LCD lights up. |
3. The straightener will initially heat to |
setting 15. Adjust the temperature |
using the +/- buttons.The bars on the |
LCD will flash while the unit heats up, |
then glow steadily when it has reached |
the selected temperature.The styler will |
beep three times when it is ready for use. |
4. Divide hair into manageable sections |
and clip the upper layers on top of your |
6. Take a small section of hair and comb |
through it with a |
Pull hair down and away from your |
scalp,and hold it taut. |
7. Hold the straightener with the LCD |
and steam vents facing away from |
your scalp. Starting at the roots, clamp |
hair firmly between the plates and run |
the styler down the entire hair strand, |
from root to tip,in one smooth stroke. |
Do not hold it in one area for a long |
period of time or damage to hair may |
occur. |
8. To speed up drying at the roots,you |
may wish to run the styler over the first |
few inches of hair nearest the root sev- |
eral times. Repeatedly run the unit |
smoothly down the entire strand until |
Setting | Hair Type |
A. | Dry Hair. Very fine,fragile |
| or damaged hair |
B. | Dry Hair. Normal,easy to |
| straighten hair |
C. | Dry Hair. Thick,difficult to |
| straighten hair |
D. | Damp Hair. Very fine, |
| fragile or damaged hair |
E. | Wet Hair. Normal,easy to |
| straighten hair |
F. | Wet Hair. Wavy or thick, |
| difficult to straighten hair |
G. | Wet Hair. Coarse,highly |
| resistant hair in good |
| condition |
head and out of the way. Work with |
underneath layers first. |
5. Test the styler on a small section of hair, |
then adjust the temperature up or down |
before styling the rest of your hair. |
NOTE: |
■ If you find that you need a higher |
setting while straightening your hair, |
simply adjust the temperature by |
pressing the "+" button. The unit |
will beep when it reaches the new |
temperature. |
■ While straightening your hair, if you |
find that you need a lower setting, |
adjust the temperature by pressing |
the |
is already hot,it may take a few |
minutes to cool off.It will beep when |
it cools to the lower temperature. |
hair is fully dried. (NOTE: The unit |
may make a steaming/hissing noise |
when used on damp hair. This is |
okay! The unique design of this |
styler will channel the moisture away |
from hair and out the steam vents.) |
9. Repeat with all sections of your hair, |
working with the underneath layers |
first,then the top and sides,until hair |
is fully dried. |
10. When you are finished styling,press |
and hold theON/OFF button to turn the |
unit off,unplug it,and allow it to cool |
before storing. |
6 |
| 7 |
|
|
|
