GAIN Control

GAIN

MIN MAX

The GAIN control matches the line output of your car stereo's RCA jacks, to the line inputs of the amplifier. When you have completed installing the amplifier, the gain control must be set at no more than half way to prevent damage to the amplifier. Play a CD or cassette on the car stereo, set the BASS and TREBLE at 50%, and set the equalizer, if you have one, to flat across all frequencies, also set the left & right balance and front & rear fader settings are set in the middle. If you have any distortion at these setting, then turn the gain down until the distortion disappears.

Frequency Adjustment Screw

FREQ

50Hz 250Hz

The frequency adjustment screw (FREQ.) only has an effect if the crossover switch is set to "BASS" or "TREBLE", when the crossover is set to FLAT it has no effect.

To set the FREQ. turn FREQ. all the way to the right, this allows a range of sound from 50 Hz - 250 Hz to the subwoofer. As you turn the FREQ. to the left (counterclockwise), you will be cutting off the high frequencies coming from the subwoofer.

BASS BOOST

OFF ON

BASS BOOST

(optional)

The BASS BOOST switch adds an additional 6dB at 50Hz. It normally is set to OFF. Turning ON BASS BOOST, will not make the bass sound better, it only adds volume to the lowest frequency. Bass Boost should not be turned on if you have Bass Control or Loudness on your stereo head unit.

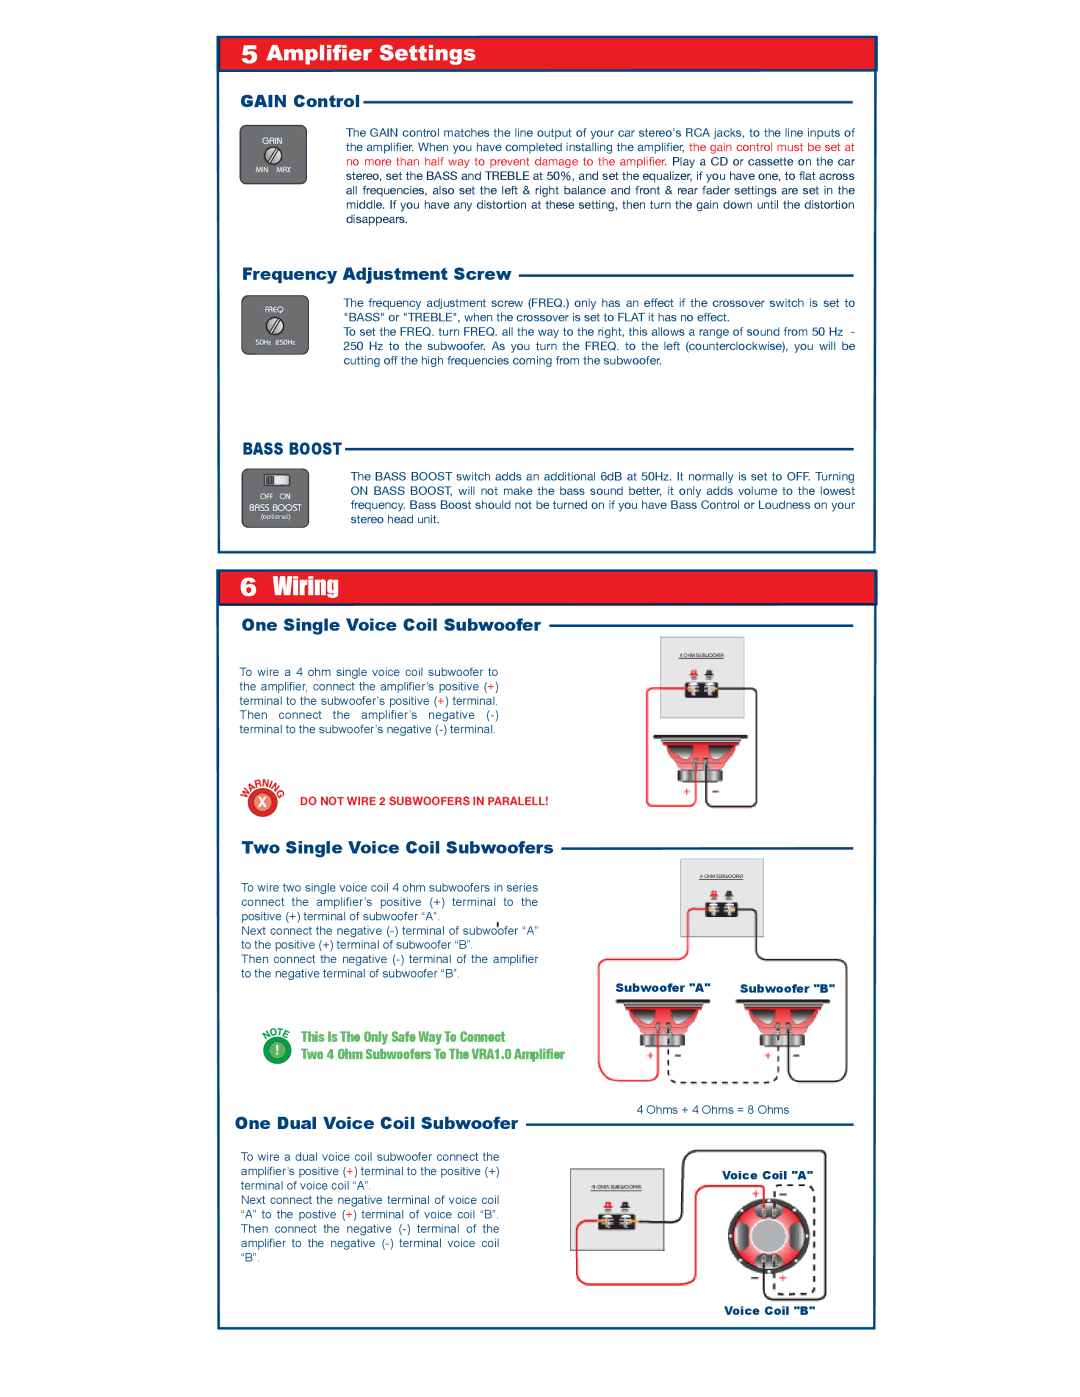
One Single Voice Coil Subwoofer

4 OHM SUBWOOFER

To wire a 4 ohm single voice coil subwoofer to the amplifier, connect the amplifier’s positive (+) terminal to the subwoofer’s positive (+) terminal. Then connect the amplifier’s negative (-) terminal to the subwoofer’s negative (-) terminal.

DO NOT WIRE 2 SUBWOOFERS IN PARALELL!

Two Single Voice Coil Subwoofers

4 OHM SUBWOOFER

To wire two single voice coil 4 ohm subwoofers in series connect the amplifier’s positive (+) terminal to the positive (+) terminal of subwoofer “A”.

Next connect the negative (-) terminal of subwoofer “A” to the positive (+) terminal of subwoofer “B”.

Then connect the negative (-) terminal of the amplifier to the negative terminal of subwoofer “B”.

Subwoofer "A"

Subwoofer "B"

This Is The Only Safe Way To Connect

Two 4 Ohm Subwoofers To The VRA1.0 Amplifier

One Dual Voice Coil Subwoofer

To wire a dual voice coil subwoofer connect the amplifier’s positive (+) terminal to the positive (+) terminal of voice coil “A”.

Next connect the negative terminal of voice coil “A” to the postive (+) terminal of voice coil “B”. Then connect the negative (-) terminal of the amplifier to the negative (-) terminal voice coil “B”.

4 Ohms + 4 Ohms = 8 Ohms

Voice Coil "A"

Voice Coil "B"

Page 5
Image 5
Roadmaster VRA1.0 Gain Control, Frequency Adjustment Screw, One Single Voice Coil Subwoofer, One Dual Voice Coil Subwoofer

VRA1.0 specifications

The Roadmaster VRA1.0 is a cutting-edge vehicle routing and navigation assistant designed to enhance the efficiency and safety of driving experiences. Combining innovative technologies with user-friendly features, this device stands out as an essential tool for both professional drivers and everyday commuters.

One of the main features of the Roadmaster VRA1.0 is its advanced GPS navigation system, which offers real-time traffic updates and provides alternative routes to avoid congestion. This capability not only saves time but also reduces fuel consumption, making it an eco-friendly option for those who spend considerable hours on the road. The device seamlessly integrates with satellite systems, ensuring accurate positioning and directions at all times.

The Roadmaster VRA1.0 is equipped with an intuitive touchscreen interface that allows users to easily input destinations and access various navigation settings. The interface is designed with usability in mind, ensuring that drivers can quickly and safely interact with the device while on the move. Voice command functionality further enhances the user experience, allowing drivers to keep their hands on the wheel and eyes on the road.

Another significant characteristic of the Roadmaster VRA1.0 is its compatibility with smartphone applications. By connecting via Bluetooth, users can access their favorite apps for music, messages, and more. This integration promotes a more connected driving experience while maintaining the focus on safety and convenience.

In addition to its navigation features, the Roadmaster VRA1.0 also prioritizes driver safety. It includes built-in alerts for speed limits, road hazards, and potential collisions, helping drivers make informed decisions and ensuring they stay within legal parameters. Furthermore, it provides emergency response functions that can be activated with a simple command, connecting users to emergency services if needed.

The device is designed to be rugged and weather-resistant, making it suitable for various driving conditions. Whether navigating city streets or rural backroads, the Roadmaster VRA1.0 is built to withstand the elements while delivering reliable performance.

In conclusion, the Roadmaster VRA1.0 is a versatile vehicle routing and navigation assistant that combines cutting-edge technology with practical features. Its advanced GPS capabilities, user-friendly interface, smartphone integration, and safety features make it an indispensable companion for drivers seeking to enhance their travel experience. Whether commuting for work or embarking on an adventurous road trip, the Roadmaster VRA1.0 stands ready to guide you every mile of the way.