DELIVERY
RoadPro
- | - 1 | HQ |
- Control box incl. power supply | - 1 | |
- 1 HQ | - 12 screws (3 in dome cover, 9 in bag) | |
cables are supplied with | - Installation and usage instructions | |
INSTALLATION
We strongly recommend getting the
a professional installer!
Preparation:
1.Ensure that the roof of your vehicle is able to carry the
2.Check that you have all the parts that are listed above.
3.Find a suitable place on the roof of your vehicle to mount the
4.Ensure that the underside of the mounting feet and the area of the roof where they will sit is clean and dry. If necessary, clean with a suitable cleaning agent. Methylated spirits works well on most surfaces and with many adhesive / sealants. If in doubt, test the surface first and consult the manufacturer of the sealant / adhesive.
5.It may be necessary to roughen the underside of the feet and the fixing area on the roof: follow the instructions that came with the adhesive / sealant and then apply it evenly to the underside of the mounting feet. The minimum thickness of the adhesive layer must be at least 2mm. Within 5 minutes of applying the adhesive, replace the
6.It is essential that you give the adhesive enough time to harden completely. The time this takes will vary according to the adhesive used and the ambient temperature and humidity. Always follow the instructions that come with the adhesive / sealant and, if you are in any doubt as to how it should be applied, seek professional advice.
7.We strongly advise screwing the mounting feet to the roof after the adhesive has been applied.
8.At this point you should remove the cover of the dome, cut the cable tie and remove all packaging. Replace the cover with the screws supplied.
9.Use the
10.Install the controller in a convenient position inside the vehicle and, using the power cable supplied, connect to a reliable 12V or 24V power source.
11.Connect the cable from the
12.The installation is now complete and you can connect a TV to the receiver, turn everything on and use your
Very important. Please read this!!
It is essential that your
BASIC OPERATION
The RoadPro
other satellites can be chosen as required. Astra 2 is the satellite which carries all TV and radio channels intended for viewing and listening in the U.K.
Before attempting to operate the system, make sure that the controller is connected to a 12V / 24V power supply and that a suitable receiver is also connected. Make sure that the receiver is set to work with the same satellite that you want the
To switch the system on:
Press the red button on the left of the controller.
The system will immediately begin searching for the selected satellite - the one with a corresponding red LED illuminated. It may find a different satellite first and then after calculating its position, move to the chosen satellite and lock on. This can take between 10 - 60 seconds depending on how far the system is from where it was when it was last used. Fine tuning will then be carried out and, shortly afterwards, a picture will appear on the TV or monitor.
When the satellite has been found, and you can see a picture on the screen, you can turn the controller off using the red button. The dish will remain in position until the next time you turn the controller on.
To select a different satellite:
The controller enables you to select a number of satellites: Astra 2, Astra 1, Hotbird, Sirius 4.8 (Astra 4), Hispasat and Atlantic Bird 3.
To select a different satellite* from the one currently selected, tap the white button on the controller. This will cause the illuminated LED to move along the row of marked satellites. When the satellite you want is illuminated, stop tapping. The system will now search for that satellite and will return to the same satellite the next time you turn the system on after you have turned it off.
*Make sure you’ve selected the same satellite on your receiver.
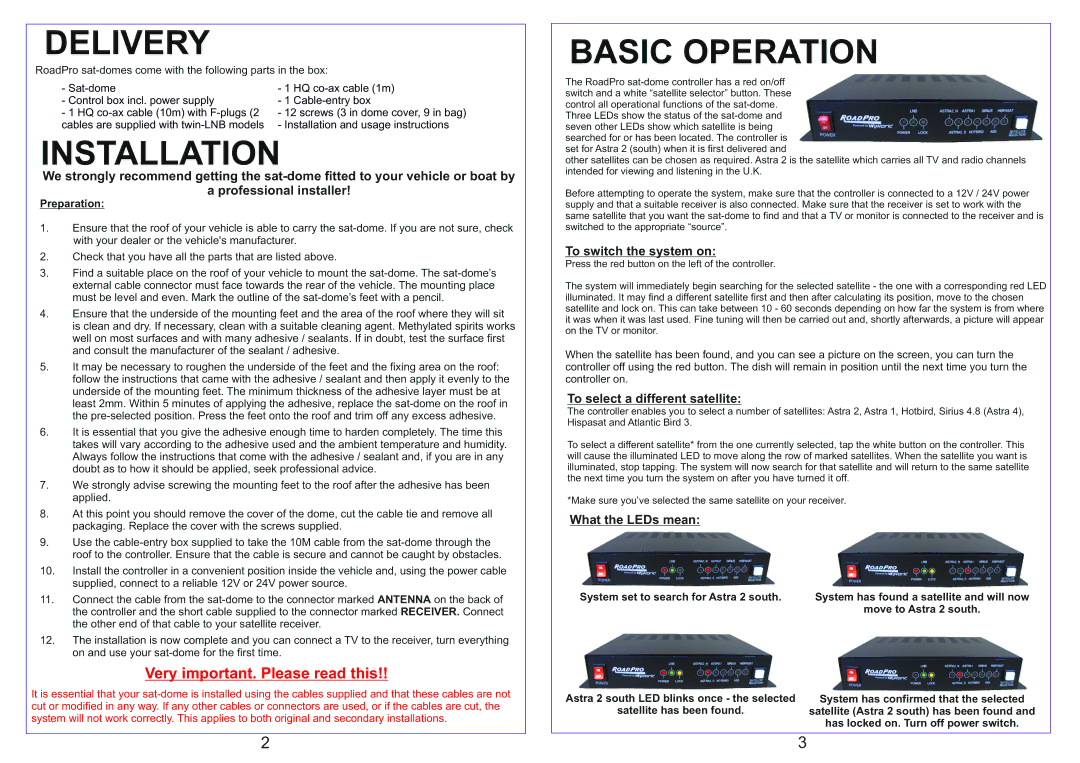
What the LEDs mean:
System set to search for Astra 2 south. | System has found a satellite and will now |
| move to Astra 2 south. |
Astra 2 south LED blinks once - the selected | System has confirmed that the selected |
satellite has been found. | satellite (Astra 2 south) has been found and |
| has locked on. Turn off power switch. |
2 | 3 |