QUICK SETUP GUIDE
1 Install the TV bracket
Option 1: Installing for a flat mounting surface
1Align the TV bracket (A) with the screw holes on the back of the TV.
2Place the M4/M5 washers (H) or M6/M8 washers (O) over the holes in the TV bracket, then insert the M4 screws (F), M5 screws (J), or M6 screws (L or M) through the washers.
3Tighten the screws until they are snug against the TV bracket. Do not over tighten.
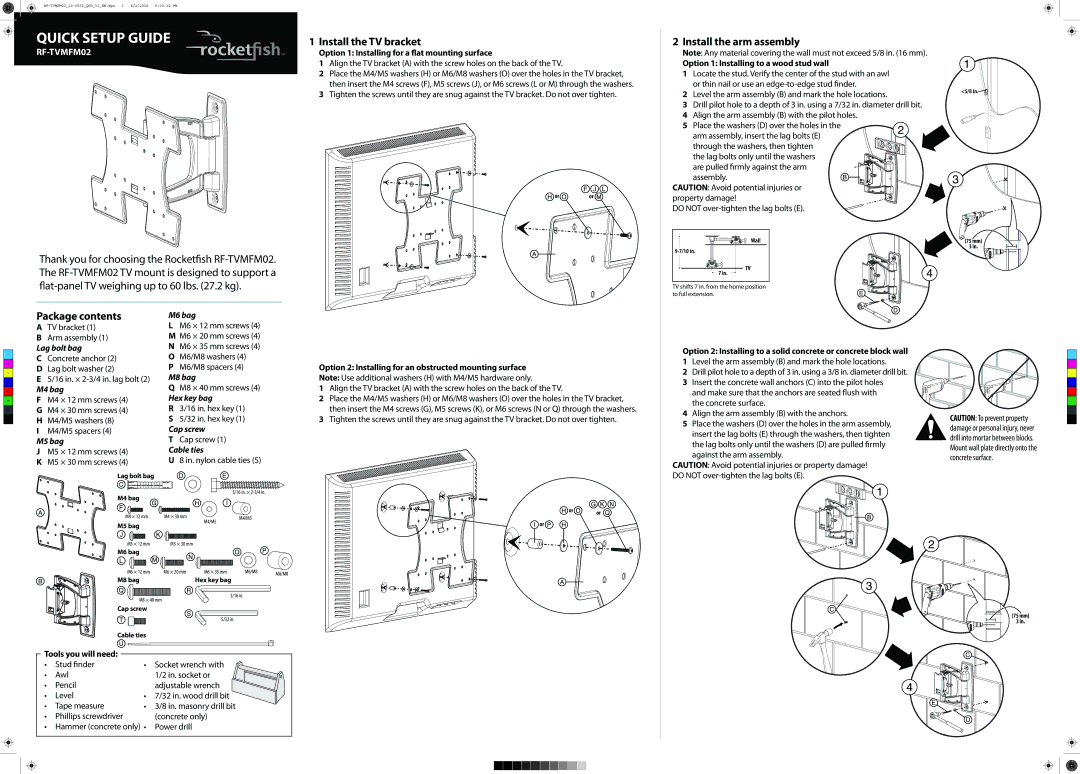
2 Install the arm assembly
Note: Any material covering the wall must not exceed 5/8 in. (16 mm).
Option 1: Installing to a wood stud wall
1Locate the stud. Verify the center of the stud with an awl
2 | or thin nail or use an | <5/8 in. | |
Level the arm assembly (B) and mark the hole locations. | |||
|
3Drill pilot hole to a depth of 3 in. using a 7/32 in. diameter drill bit.
4 Align the arm assembly (B) with the pilot holes. 5 Place the washers (D) over the holes in the
arm assembly, insert the lag bolts (E) through the washers, then tighten the lag bolts only until the washers are pulled firmly against the arm assembly.
Thank you for choosing the Rocketfish
![]() or
or![]() or
or ![]()
CAUTION: Avoid potential injuries or property damage!
DO NOT
Wall | (75 mm) |
3 in. | |
| |
TV |
|
7 in. |
|
TV shifts 7 in. from the home position to full extension.
C |
M |
Y |
CM |
MY |
CY |
CMY |
K |
Package contents
ATV bracket (1)
BArm assembly (1)
Lag bolt bag
C Concrete anchor (2) D Lag bolt washer (2)
E5/16 in. ×
M4 bag
F M4 × 12 mm screws (4) G M4 × 30 mm screws (4) H M4/M5 washers (8)
IM4/M5 spacers (4)
M5 bag
J M5 × 12 mm screws (4) K M5 × 30 mm screws (4)
M6 bag
LM6 × 12 mm screws (4) M M6 × 20 mm screws (4) N M6 × 35 mm screws (4) O M6/M8 washers (4)
PM6/M8 spacers (4)
M8 bag
QM8 × 40 mm screws (4)
Hex key bag
R 3/16 in. hex key (1)
S5/32 in. hex key (1)
Cap screw
TCap screw (1)
Cable ties
U 8 in. nylon cable ties (5)
Option 2: Installing for an obstructed mounting surface
Note: Use additional washers (H) with M4/M5 hardware only.
1Align the TV bracket (A) with the screw holes on the back of the TV.
2Place the M4/M5 washers (H) or M6/M8 washers (O) over the holes in the TV bracket, then insert the M4 screws (G), M5 screws (K), or M6 screws (N or Q) through the washers.
3Tighten the screws until they are snug against the TV bracket. Do not over tighten.
Option 2: Installing to a solid concrete or concrete block wall
1Level the arm assembly (B) and mark the hole locations.
2Drill pilot hole to a depth of 3 in. using a 3/8 in. diameter drill bit.
3 Insert the concrete wall anchors (C) into the pilot holes
and make sure that the anchors are seated flush with the concrete surface.
4Align the arm assembly (B) with the anchors.
5Place the washers (D) over the holes in the arm assembly, insert the lag bolts (E) through the washers, then tighten
the lag bolts only until the washers (D) are pulled firmly against the arm assembly.
CAUTION: Avoid potential injuries or property damage!
CAUTION: To prevent property damage or personal injury, never drill into mortar between blocks. Mount wall plate directly onto the concrete surface.
Lag bolt bag
|
|
|
|
| M4 bag |
|
| 5/16 in. × |
|
|
| ||
|
|
|
|
|
|
|
|
|
|
|
| ||
|
|
|
|
|
| M4 × 12 mm | M4 × 30 mm |
|
| M4/M5 |
|
|
|
|
|
|
|
|
| M4/M5 |
|
|
| ||||
|
|
|
|
| M5 bag |
|
|
|
|
| |||
|
|
|
|
|
|
|
|
|
|
|
| ||
|
|
|
|
|
| M5 × 12 mm | M5 × 30 mm |
|
|
|
|
|
|
|
|
|
|
| M6 bag |
|
|
|
|
|
|
| |
|
|
|
|
|
| M6 × 12 mm | M6 × 20 mm | M6 × 35 mm | M6/M8 | M6/M8 |
|
| |
|
|
|
|
| M8 bag |
| Hex key bag |
|
|
| |||
|
|
|
|
|
|
|
|
|
| ||||
|
|
|
|
|
| M8 × 40 mm |
| 3/16 in. |
|
|
| ||
|
|
|
|
|
|
|
|
|
|
|
| ||
|
|
|
|
| Cap screw |
|
|
|
|
|
|
| |
|
|
|
|
|
|
|
| 5/32 in. |
|
|
|
| |
|
|
|
|
| Cable ties |
|
|
|
|
|
|
| |
|
|
| Tools you will need: |
|
|
|
|
|
|
|
| ||
|
|
|
|
|
|
|
|
|
|
| |||
|
|
| • | Stud finder |
| • | Socket wrench with |
|
|
|
| ||
|
|
| • | Awl |
|
| 1/2 in. socket or |
|
|
|
| ||
|
|
| • | Pencil |
|
| adjustable wrench |
|
|
|
| ||
|
|
| • | Level |
| • | 7/32 in. wood drill bit |
|
|
|
| ||
|
|
| • | Tape measure |
| • | 3/8 in. masonry drill bit |
|
|
|
| ||
|
|
| • | Phillips screwdriver | (concrete only) |
|
|
|
| ||||
|
|
| • | Hammer (concrete only) • | Power drill |
|
|
|
|
|
| ||
|
|
|
|
|
|
|
|
|
|
|
|
|
|
|
|
|
|
|
|
|
|
|
|
|
|
|
|
|
|
|
|
|
|
|
|
|
|
|
|
|
|
|
|
|
|
|
|
|
|
|
|
|
|
|
|
|
|
|
|
|
|
|
|
|
|
|
|
|
|
![]() or
or![]() or
or ![]()
![]() or
or ![]()
DO NOT
![]() (75 mm) 3 in.
(75 mm) 3 in.