6To close the Editor window at any time, click its Close button in the upper left-hand corner. To re-open it, double-click the I/O slot— which now says “SonicCell”—in the Inspector pane.

Naming a Track

To make it easier to get to the Editor, we recommend naming the track something like “SonicCell Editor.” To display and change a track name:

1Control-click on the track’s currenty displayed name and select Configure Track Header....

2Set the Names popup to Track Name, and click Done.

This sheet provides lots of interesting track-header options, which are explained in the Logic Pro documentation.

3Command-double-click a track’s current name, type in the desired name, and press return on your keyboard.

Using the SonicCell Editor

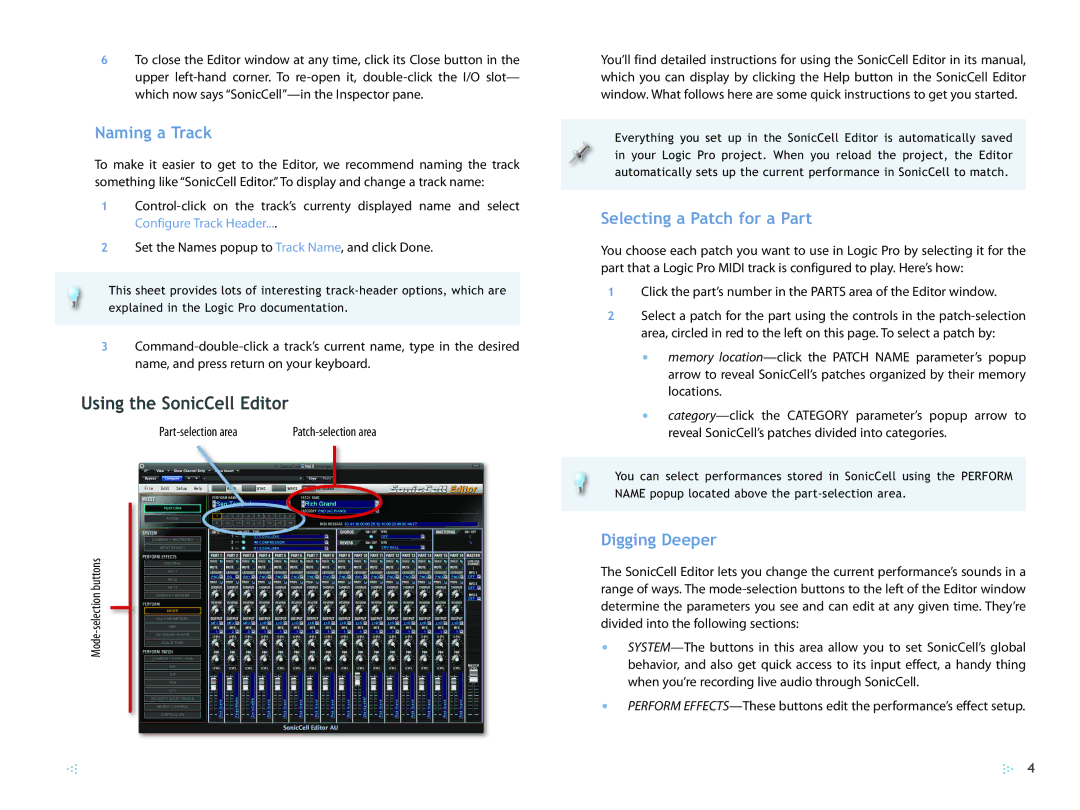
Part-selection area

Patch-selection area


Mode-selection buttons

You’ll find detailed instructions for using the SonicCell Editor in its manual, which you can display by clicking the Help button in the SonicCell Editor window. What follows here are some quick instructions to get you started.

Everything you set up in the SonicCell Editor is automatically saved in your Logic Pro project. When you reload the project, the Editor automatically sets up the current performance in SonicCell to match.

Selecting a Patch for a Part

You choose each patch you want to use in Logic Pro by selecting it for the part that a Logic Pro MIDI track is configured to play. Here’s how:

1Click the part’s number in the PARTS area of the Editor window.

2Select a patch for the part using the controls in the patch-selection area, circled in red to the left on this page. To select a patch by:

memory location—click the PATCH NAME parameter’s popup arrow to reveal SonicCell’s patches organized by their memory locations.

category—click the CATEGORY parameter’s popup arrow to reveal SonicCell’s patches divided into categories.

You can select performances stored in SonicCell using the PERFORM NAME popup located above the part-selection area.

Digging Deeper

The SonicCell Editor lets you change the current performance’s sounds in a range of ways. The mode-selection buttons to the left of the Editor window determine the parameters you see and can edit at any given time. They’re divided into the following sections:

SYSTEM—The buttons in this area allow you to set SonicCell’s global behavior, and also get quick access to its input effect, a handy thing when you’re recording live audio through SonicCell.

PERFORM EFFECTS—These buttons edit the performance’s effect setup.

4

Page 4
Image 4
Roland SCWS05 manual Using the SonicCell Editor, Naming a Track, Selecting a Patch for a Part, Digging Deeper

SCWS05 specifications

The Roland SCWS05 is a versatile, high-performance device designed to meet the needs of modern graphics professionals. This print-and-cut solution stands out in the competitive market of digital printing technology, providing users with unparalleled quality and efficiency.

At the heart of the SCWS05 lies its advanced printing technology, featuring Roland's state-of-the-art inkjet system. This system utilizes eco-solvent inks that produce vibrant colors, deep blacks, and stunning images with exceptional detail. The inks are not only environmentally friendly but also offer impressive durability, making them ideal for both indoor and outdoor applications. The SCWS05 is capable of producing a wide range of materials, from banners and vehicle wraps to labels and decals, ensuring maximum versatility for any project.

One of the key characteristics of the SCWS05 is its precision cut technology. This device employs advanced contour cutting, allowing users to easily create intricate designs with perfect edges. The integrated optical sensor accurately detects registration marks, ensuring a seamless print-and-cut workflow and minimizing material waste. This level of accuracy is crucial for businesses looking to achieve professional results efficiently.

The SCWS05 also features a user-friendly interface that streamlines operation. The intuitive control panel simplifies navigation through various settings and options, making it accessible to operators of all skill levels. Additionally, its compatibility with popular design software enhances the user experience, enabling seamless integration into existing workflows.

Another highlight of the SCWS05 is its productivity-enhancing features. The device boasts high-speed printing capabilities, significantly reducing turnaround times for large orders. Coupled with its large media capacity, users can handle extensive projects without the need for constant reloading, further optimizing workflow efficiency.

Furthermore, the SCWS05 is designed with robust construction, ensuring reliable performance and longevity in busy production environments. Its compact design allows for easy placement in limited spaces while still delivering formidable output capabilities.

In conclusion, the Roland SCWS05 is a powerful and versatile print-and-cut solution that combines advanced technology with user-friendly features. Its eco-solvent inks, precision cutting capabilities, and productivity-boosting functions make it an essential tool for graphics professionals looking to elevate their work and expand their service offerings. Whether for small businesses or larger printing operations, the SCWS05 stands ready to meet the demands of the modern market.