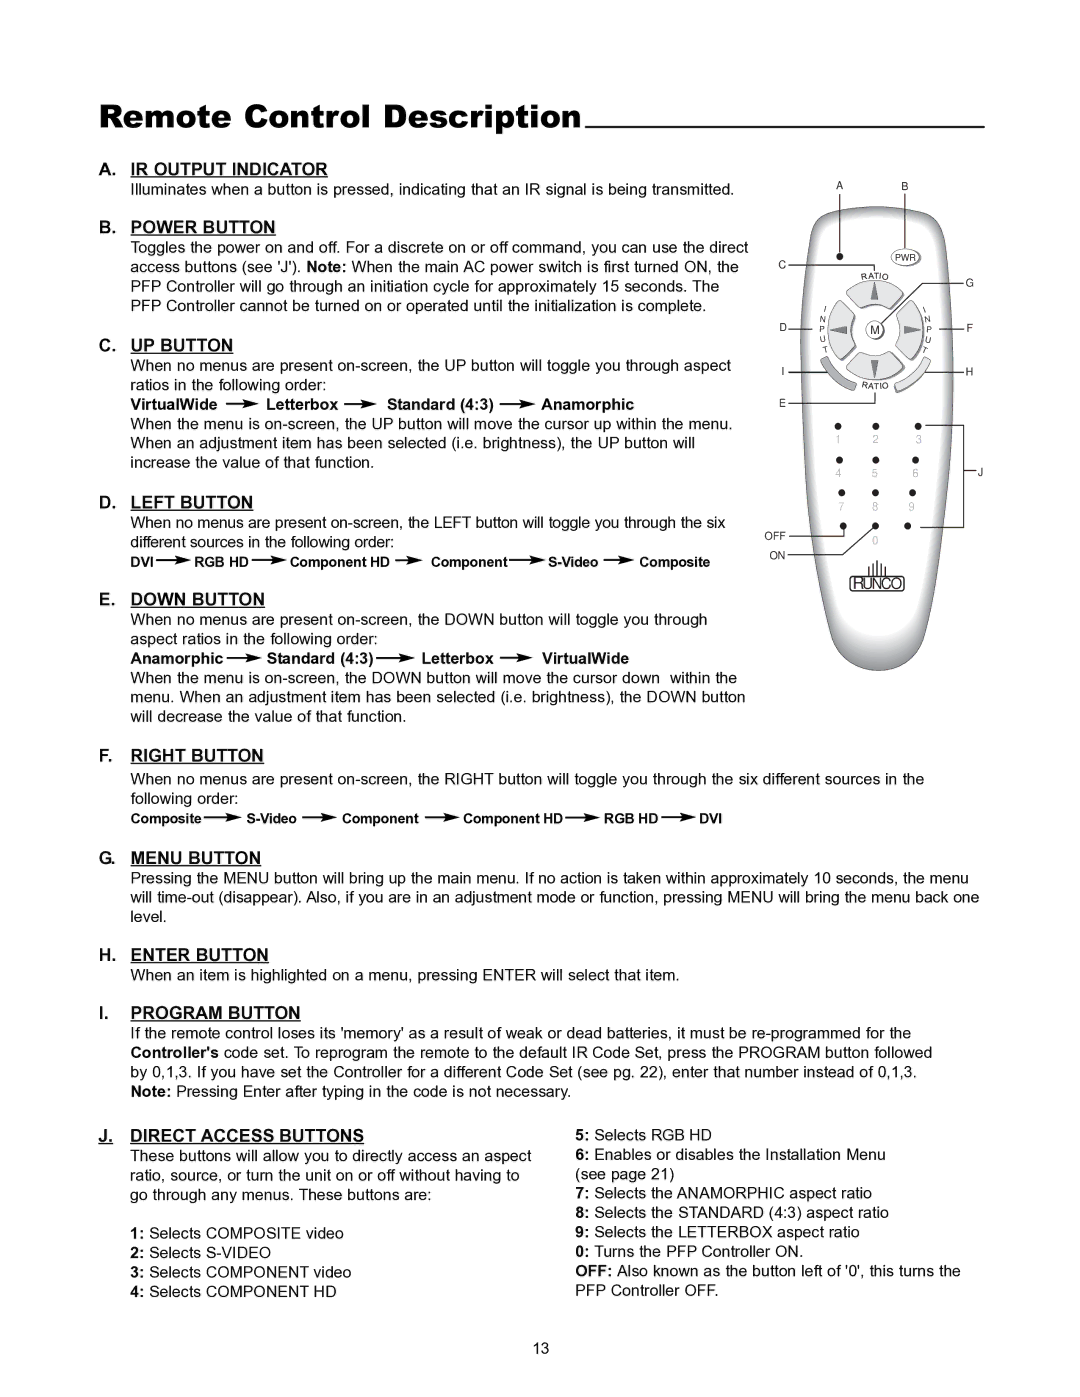
Remote Control Description

A.IR OUTPUT INDICATOR

Illuminates when a button is pressed, indicating that an IR signal is being transmitted.

B.POWER BUTTON

Toggles the power on and off. For a discrete on or off command, you can use the direct access buttons (see 'J'). Note: When the main AC power switch is first turned ON, the PFP Controller will go through an initiation cycle for approximately 15 seconds. The PFP Controller cannot be turned on or operated until the initialization is complete.

C.UP BUTTON

When no menus are present on-screen, the UP button will toggle you through aspect

ratios in the following order:

VirtualWide Letterbox Standard (4:3) Anamorphic

When the menu is on-screen, the UP button will move the cursor up within the menu. When an adjustment item has been selected (i.e. brightness), the UP button will increase the value of that function.

D.LEFT BUTTON

When no menus are present on-screen, the LEFT button will toggle you through the six different sources in the following order:

DVI


RGB HD


Component HD


Component


S-Video


Composite


C

D

I

E

OFF

ON

A


B


PWR

I


I

N


N

P

M

P


U

U


T


T

1 2 3

4 5 6

7 8 9

0

G

F

H

J

RUNCO

E.DOWN BUTTON

When no menus are present on-screen, the DOWN button will toggle you through aspect ratios in the following order:

Anamorphic Standard (4:3) Letterbox VirtualWide

When the menu is on-screen, the DOWN button will move the cursor down within the menu. When an adjustment item has been selected (i.e. brightness), the DOWN button will decrease the value of that function.

F.RIGHT BUTTON

When no menus are present on-screen, the RIGHT button will toggle you through the six different sources in the following order:

Composite


S-Video


Component


Component HD


RGB HD


DVI


G.MENU BUTTON

Pressing the MENU button will bring up the main menu. If no action is taken within approximately 10 seconds, the menu will time-out (disappear). Also, if you are in an adjustment mode or function, pressing MENU will bring the menu back one level.

H.ENTER BUTTON

When an item is highlighted on a menu, pressing ENTER will select that item.

I.PROGRAM BUTTON

If the remote control loses its 'memory' as a result of weak or dead batteries, it must be re-programmed for the Controller's code set. To reprogram the remote to the default IR Code Set, press the PROGRAM button followed by 0,1,3. If you have set the Controller for a different Code Set (see pg. 22), enter that number instead of 0,1,3. Note: Pressing Enter after typing in the code is not necessary.

J.DIRECT ACCESS BUTTONS

These buttons will allow you to directly access an aspect ratio, source, or turn the unit on or off without having to go through any menus. These buttons are:

1:Selects COMPOSITE video

2:Selects S-VIDEO

3:Selects COMPONENT video

4:Selects COMPONENT HD

5:Selects RGB HD

6:Enables or disables the Installation Menu (see page 21)

7:Selects the ANAMORPHIC aspect ratio

8:Selects the STANDARD (4:3) aspect ratio

9:Selects the LETTERBOX aspect ratio

0:Turns the PFP Controller ON.

OFF: Also known as the button left of '0', this turns the PFP Controller OFF.

13

Page 15
Image 15
Runco VX-1000CI manual Remote Control Description, Power Button

VX-1000CI specifications

The Runco VX-1000CI is a premium projection system designed to deliver an unparalleled viewing experience for home theaters, cinemas, and professional environments. Known for its advanced technologies and exceptional image quality, the VX-1000CI stands as a benchmark among high-end projectors.

One of the main features of the Runco VX-1000CI is its DLP (Digital Light Processing) technology, which utilizes a combination of micro-mirrors and color wheels to produce vivid images with seamless motion. DLP technology is renowned for its reliability and image consistency, ensuring that viewers enjoy stunning visuals regardless of the content being displayed. Additionally, the VX-1000CI boasts an impressive native resolution of 1920x1080, providing crystal-clear images that enhance the details of any film or presentation.

Color accuracy is another hallmark of the VX-1000CI. The projector is equipped with Runco's unique Color Palette technology, enabling it to achieve a wide color gamut that surpasses standard display systems. This feature ensures that colors appear more vibrant and lifelike, offering an immersive viewing experience that captures the essence of the content.

For optimal performance in various viewing environments, the VX-1000CI includes advanced calibration tools. These tools allow users to fine-tune the projector's settings, improving brightness, contrast, and color balance. The motorized lens options further enhance flexibility, allowing for precise adjustments to accommodate different screen sizes and distances, thus making installation effortless.

The Runco VX-1000CI also supports 3D content, bringing an added layer of depth to movies and games. With compatibility for various 3D formats, users can experience their favorite titles in an engaging three-dimensional format that enhances storytelling and visuals.

Connectivity is a crucial aspect of modern projectors, and the VX-1000CI does not disappoint. It features multiple input options, including HDMI, Component Video, and composite video, ensuring compatibility with a wide range of devices. This versatility makes it easy to connect gaming consoles, Blu-ray players, and streaming devices.

In conclusion, the Runco VX-1000CI is a sophisticated projector that combines cutting-edge technology with remarkable image quality. With its DLP technology, wide color gamut, advanced calibration tools, and 3D capabilities, it is well-equipped to deliver a captivating viewing experience that meets the demands of film enthusiasts and professionals alike. Whether for personal use or commercial application, the Runco VX-1000CI is a choice that reflects a commitment to excellence in home entertainment.