INSTALLATION

Wall speakers

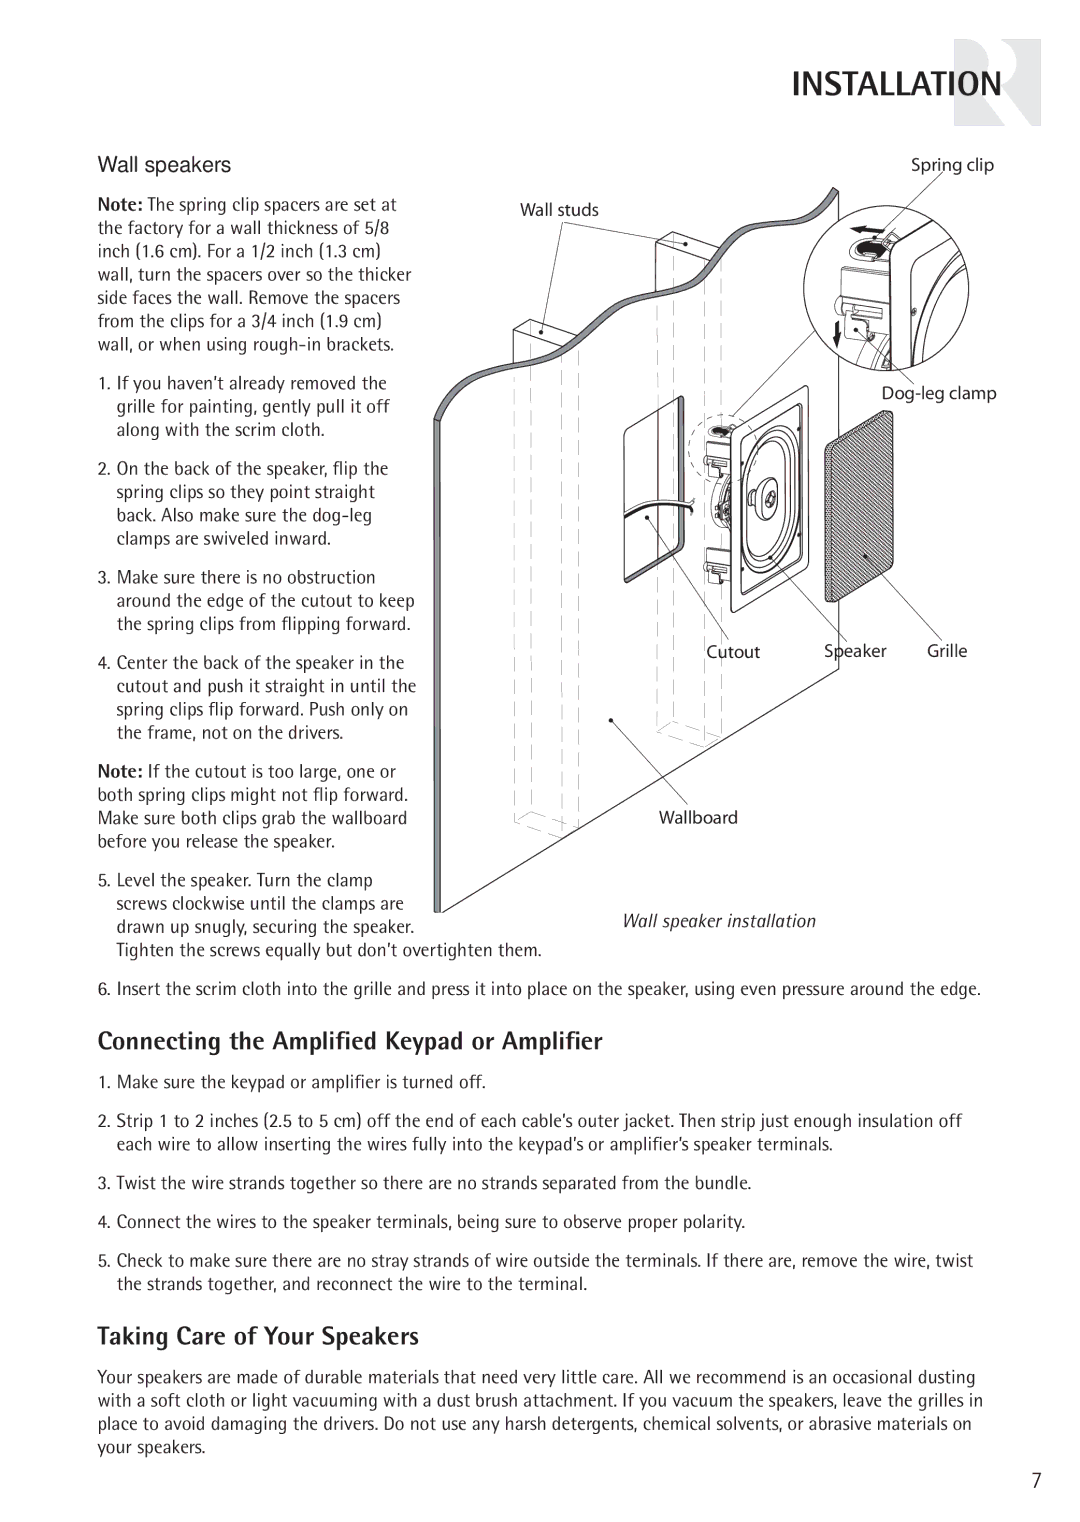
Note: The spring clip spacers are set at

Wall studs

the factory for a wall thickness of 5/8


inch (1.6 cm). For a 1/2 inch (1.3 cm)


wall, turn the spacers over so the thicker


side faces the wall. Remove the spacers


from the clips for a 3/4 inch (1.9 cm)


wall, or when using rough-in brackets.


1.If you haven’t already removed the grille for painting, gently pull it off along with the scrim cloth.

2.On the back of the speaker, flip the spring clips so they point straight back. Also make sure the dog-leg clamps are swiveled inward.

3.Make sure there is no obstruction around the edge of the cutout to keep the spring clips from flipping forward.

4.Center the back of the speaker in the cutout and push it straight in until the spring clips flip forward. Push only on the frame, not on the drivers.

Note: If the cutout is too large, one or both spring clips might not flip forward. Make sure both clips grab the wallboard before you release the speaker.

5.Level the speaker. Turn the clamp screws clockwise until the clamps are drawn up snugly, securing the speaker.

Tighten the screws equally but don’t overtighten them.

Spring clip

Dog-leg clamp

Cutout

Speaker

Grille

Wallboard

Wall speaker installation

6. Insert the scrim cloth into the grille and press it into place on the speaker, using even pressure around the edge.

Connecting the Amplified Keypad or Amplifier

1.Make sure the keypad or amplifier is turned off.

2.Strip 1 to 2 inches (2.5 to 5 cm) off the end of each cable’s outer jacket. Then strip just enough insulation off each wire to allow inserting the wires fully into the keypad’s or amplifier’s speaker terminals.

3.Twist the wire strands together so there are no strands separated from the bundle.

4.Connect the wires to the speaker terminals, being sure to observe proper polarity.

5.Check to make sure there are no stray strands of wire outside the terminals. If there are, remove the wire, twist the strands together, and reconnect the wire to the terminal.

Taking Care of Your Speakers

Your speakers are made of durable materials that need very little care. All we recommend is an occasional dusting with a soft cloth or light vacuuming with a dust brush attachment. If you vacuum the speakers, leave the grilles in place to avoid damaging the drivers. Do not use any harsh detergents, chemical solvents, or abrasive materials on your speakers.

7

Page 7
Image 7
Russound RC61S Connecting the Amplified Keypad or Amplifier, Taking Care of Your Speakers, Wall speakers

RC61, RC61S specifications

The Russound RC61 and RC61S are sleek and sophisticated multi-room audio control systems ideal for both residential and commercial applications. Designed to enhance the audio experience, these products reflect Russound's commitment to innovation and quality in the realm of home theater and distributed audio systems.

One of the main features of the RC61 is its advanced control capabilities, allowing users to manage audio in six different zones. This flexibility means that users can play multiple audio sources in various rooms simultaneously, each with independent volume control. The system can seamlessly integrate with an extensive range of audio components, providing endless options for sound distribution.

The RC61S variant comes with added functionalities such as an on-screen display for intuitive navigation. This is particularly beneficial for those who prefer a visual interface to manage their audio setups. Both models support a wide variety of audio sources, including streaming services, satellite radio, or local media libraries, making them versatile choices for modern audio environments.

In terms of technology, the RC61 and RC61S utilize high-quality digital signal processing to ensure crystal-clear sound reproduction. The systems employ robust amplification capabilities, giving users the power to drive multiple speakers without sacrificing audio quality. Furthermore, both models are designed to be expandable, allowing users to easily integrate additional zones or audio components as their needs grow.

Another significant characteristic of the Russound RC61 and RC61S is their user-friendly interface. The systems can be controlled via a simple yet effective keypad, remote control, or even through smartphone applications, making it convenient for users to manage their audio experiences effortlessly. Additionally, compatibility with various home automation systems allows for even greater control and flexibility.

In summary, the Russound RC61 and RC61S are exemplary examples of modern audio control solutions, offering extensive features, advanced technologies, and user-centric designs. Whether for personal use in a home or for commercial applications, these systems provide a seamless and enjoyable audio experience that meets the demands of today's tech-savvy consumers.