MAINTENANCE AND REPAIR INSTRUCTIONS

CHECKING THE OIL LEVEL

CAUTION: To prevent extensive engine wear and damage to the unit, always maintain the proper oil level in the crankcase. Never operate the unit with the oil level below the bottom of the dipstick.

The importance of checking and maintaining the proper oil level in the crankcase cannot be overemphasized. Check oil before each use:

1.Stop engine and allow oil to drain into the crankcase.

2.Place the unit on a flat, level surface to get a proper oil level reading.

3.Keep dirt, grass clippings, etc., out of the engine. Clean the area around the oil fill plug/dipstick before removing it.

4.Remove the oil fill plug/dipstick and wipe off oil. Reinsert it all the way back in.

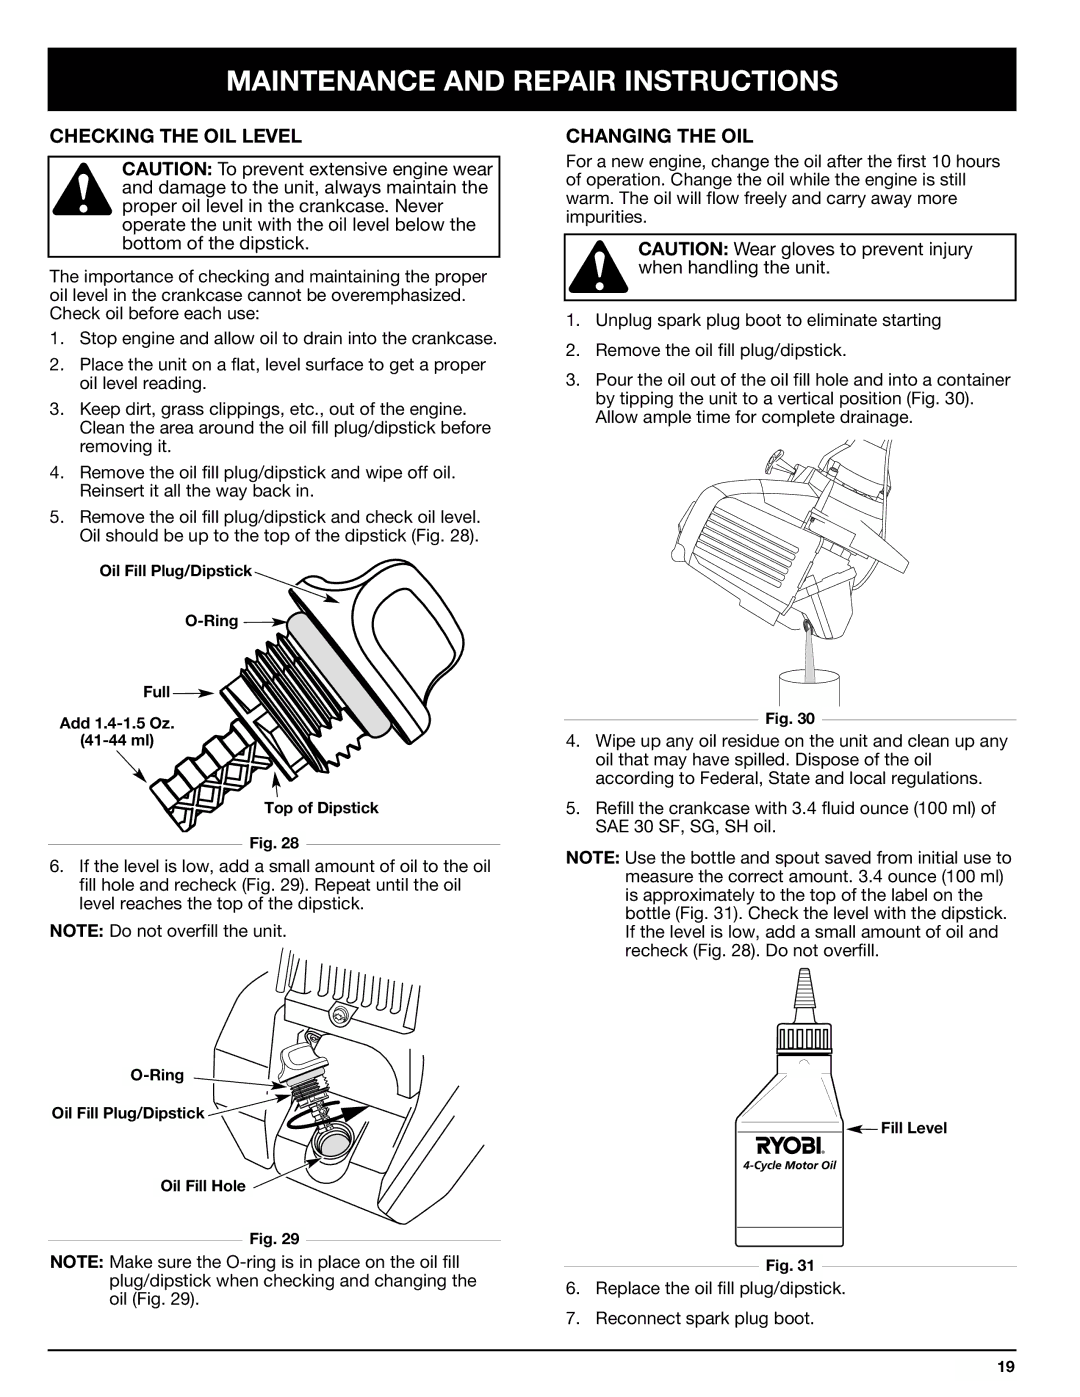
5.Remove the oil fill plug/dipstick and check oil level. Oil should be up to the top of the dipstick (Fig. 28).

Oil Fill Plug/Dipstick

O-Ring

Full

Add 1.4-1.5 Oz.

(41-44 ml)

Top of Dipstick

Fig. 28

6.If the level is low, add a small amount of oil to the oil fill hole and recheck (Fig. 29). Repeat until the oil level reaches the top of the dipstick.

NOTE: Do not overfill the unit.

O-Ring

Oil Fill Plug/Dipstick

Oil Fill Hole

Fig. 29

NOTE: Make sure the O-ring is in place on the oil fill plug/dipstick when checking and changing the oil (Fig. 29).

CHANGING THE OIL

For a new engine, change the oil after the first 10 hours of operation. Change the oil while the engine is still warm. The oil will flow freely and carry away more impurities.

CAUTION: Wear gloves to prevent injury when handling the unit.

1.Unplug spark plug boot to eliminate starting

2.Remove the oil fill plug/dipstick.

3.Pour the oil out of the oil fill hole and into a container by tipping the unit to a vertical position (Fig. 30). Allow ample time for complete drainage.

Fig. 30

4.Wipe up any oil residue on the unit and clean up any oil that may have spilled. Dispose of the oil according to Federal, State and local regulations.

5.Refill the crankcase with 3.4 fluid ounce (100 ml) of SAE 30 SF, SG, SH oil.

NOTE: Use the bottle and spout saved from initial use to measure the correct amount. 3.4 ounce (100 ml) is approximately to the top of the label on the bottle (Fig. 31). Check the level with the dipstick. If the level is low, add a small amount of oil and recheck (Fig. 28). Do not overfill.

Fill Level

Fig. 31

6.Replace the oil fill plug/dipstick.

7.Reconnect spark plug boot.

19

Page 19
Image 19
Ryobi 875r manual Checking the OIL Level, Changing the OIL

875r specifications

The Ryobi 875R is a robust and efficient string trimmer that has garnered attention for its reliability and performance. Designed for homeowners and landscaping professionals alike, this trimmer offers a powerful solution for maintaining lawns and gardens with ease.

One of the standout features of the Ryobi 875R is its powerful gas engine, which provides ample power for cutting through thick grass and weeds without bogging down. This gasoline-powered trimmer operates efficiently, making it suitable for larger areas where electric trimmers might struggle. The engine is designed for easy starting, ensuring that users can get to work quickly without the frustration of repeated pulls on the starter cord.

The Ryobi 875R also boasts a lightweight, ergonomic design that enhances maneuverability. Its balance and reduced weight allow for longer use without causing undue strain on the user’s arms and back. The adjustable handle is another ergonomic feature, enabling users to find the perfect grip and position for their comfort during extended trimming sessions.

A significant technological highlight of the 875R is its dual-string head. This feature allows for a wider cutting swath, making it possible to trim more grass in less time. The trimmer excels in tackling difficult areas of the yard, from edges along sidewalks to dense patches in flower beds. This dual-string system is also compatible with various types of trimmer lines, providing versatility based on user preference and job requirements.

Another key characteristic of the Ryobi 875R is its durable construction. The materials used in its design are intended to withstand the rigors of regular use, protecting it against wear and tear. Additionally, the trimmer is equipped with features such as a protective shield that safeguards the user from flying debris while enhancing safety during operation.

Maintenance is simplified with the Ryobi 875R, as it features an easy-access air filter and fuel cap that facilitate routine checks and refills. This ensures that users can dedicate their time to trimming rather than struggling with upkeep.

In summary, the Ryobi 875R stands out in the market for its powerful engine, ergonomic design, dual-string head technology, and durability. Whether tackling overgrown lawns or maintaining garden borders, this string trimmer delivers the performance and ease of use that both novices and seasoned landscapers appreciate.