WARNING:
To reduce the risk of injury, user must read and understand the operator’s manual for their string trimmer and this instruction sheet. Always wear eye protection marked to comply with Z87.1 Ensure compatibility and fit before using this accessory. Do not use this accessory if a part is damaged or missing.
When using Ryobi and Homelite string trimmers, no adap- tors are needed. For other brands, see the Adaptor Chart for the proper hardware configuration needed to use the Universal Bump Feed String Head with your trimmer.
 WARNING:
Failure to use the correct adaptor, nut, and spool retainer combination for your trimmer could cause the string head to detach from your trimmer and result in serious personal injury and/or property damage.
installing bump feed string head
See Figures 1 - 2.
If replacing line only, refer to Installing Line in Bump Feed String Head later in this manual.
Use only .095 in. diameter trimmer line.
Following the instructions in the operator’s manual for your string trimmer, remove the old string head.
Make sure the two lines are captured in the slots opposite each other on the new spool. Make sure the end of each line is extended approximately 6 in. beyond each slot.
Align the slot(s) on the spool to the eyelet(s) on the string head housing. Push down and turn the spool in the neces- sary direction to align the slot(s).
Make sure the string head and the spool retainer are installed on the drive shaft. Tighten the spool retainer securely.
Slide lines into the housing eyelets and pull outward to rotate the spool into the cutting position.
Push the spool retainer down while pulling on line(s) to manually advance the line and to check for proper assembly
of the string head.
Installing Line in Bump Feed String Head
See Figures 3 - 5.
Stop the engine and disconnect the spark plug wire. Hold the string head and rotate the spool retainer to remove.
Remove the spool from the string head.
NOTE: Keep the spring attached to the spool. Remove any old line remaining on the spool.
Cut one piece of trimmer line 18 ft. long.
Find the middle of the line section. Loop the line around the hook in the center of the spool. Carefully wind the line in the direction indicated on the top of the spool. Nearing the end of the line, slide one end of the line into each slot of the spool. Do not overfill.
Replace the spool and the spool retainer. Refer to Install- ing Bump Feed String Head earlier in this manual.
installing dual spool™ fixed line string head insert
See Figures 6 - 7.
Stop the engine and disconnect the spark plug wire.
Remove spool retainer.
Remove the spool and spring from the string head.
Find the word LOAD on top of the Dual Spool™ Fixed Line String Head Insert, then locate the openings on the sides of the insert beneath LOAD. Place the insert inside the string head so that the openings on the sides of the insert align with the slots on the sides of the string head. Make sure the spool is completely seated.
Reinstall the spool retainer on the string head and tighten securely.
Install line as described in the next section of this
manual .
installing line in dual spool™ fixed line string head insert
See Figure 7
Use monofilament line between .095 in. and .105 in.
diameter .
Stop the engine and disconnect the spark plug wire.
Gather two of the pre-cut lengths of trimmer line provided or cut two pieces of trimmer line in 11 in. lengths.
Insert the lines into the slots located on the sides of the string head. Line should be pushed in until approximately 1 in. protrudes from the holes on the top of the string head.
Remove old line by pulling it from the holes located on the top of the string head.
A - Spool retainer (retenue de bobine, retén del carrete)
A - Insert line into string head (insérer dans l’extrémité de la chaîne, inserte en el cabezal del hilo)
B - Push down and twist to align (pousser vers le bas et tordre pour aligner, empuje hacia abajo y gire para alinear)
Fig. 3
b
A
using the adaptors
Along with the Bump Feed String Head Assembly, Dual Spool Fixed Line Insert, and pre-cut trimmer line, this pack- age includes the items at right, which may be used to adapt the string head for use on the trimmers listed in the Adaptor Chart.
Universal | Washer | Thread | Spacer | Tightening | Nut | Spool Retainer |
Adaptor | (Used With Nuts | Adaptor | | Tool | (6 Sizes) | (Black & Red) |
| A, C & D Only) | | | | | |
Find your trimmer model in the Adaptor Chart below, then use the adaptor configuration listed to install the Bump Feed String Head Assembly on your trimmer. For units that require the universal adaptor, insert the specified nut into the universal adap- tor as shown.
NOTE: This string head is not recommended for use on Troy-Bilt Speed Spool-equipped, Honda, Stihl, or Husqvarna string trimmers.
Refer to the diagrams at right to see how the pieces fit together.
A - Spool (bobine, carrete)
B - Slots (fentes, ranuras)
Fig. 4
A
Diagrams above represent order of parts installation, however, all parts may not be needed for your trimmer. Consult the Adaptor Chart and use only the Adaptor Con- figuration specified for your trimmer.
Craftsman® is a registered trademark of Sears, Roebuck and Co. Yard Machine®, Yard-Man®, Bolens®, MTD®, Troy-Bilt®, and Cub Cadet® are registered trademarks of MTD Products, Inc. Weed Eater®, Poulan®, and Poulan Pro® are registered trademarks of Aktiebolaget Electrolux Corporation. Echo® is a registered trademark of Echo, Incorporated.
 WARNING:
Failure to use the correct adaptor, nut, and spool retainer combination for your trimmer could cause the string head to detach from your trimmer and result in serious personal injury and/or property damage.
Adaptor Chart
| Model | Type | Adaptor Configuration |
| | | |
| MTD* | Curved Shaft | Thread Adaptor (tightened with Tightening Tool) + Spacer + Black Spool Retainer |
| | | |
| MTD* | Straight Shaft | Direct Fit + Black Spool Retainer |
| | | |
* | MTD brands include Bolens, Cub Cadet, Troy-Bilt, Yard-Man, Yard Machines, and select Craftsman |
| | | |
| Poulan** | Curved Shaft | Washer + Universal Adaptor + Nut A + Red Spool Retainer |
| | | |
| Poulan** | Straight Shaft | Universal Adaptor + Nut E + Red Spool Retainer |
| | | |
** | Poulan brands include Poulan, Poulan Pro, Weed Eater, and select Craftsman |
| | | |
| Craftsman | Straight Shaft | Universal Adaptor + Nut F + Red Spool Retainer |
| | | |
| Craftsman | Curved Shaft | Washer + Universal Adaptor + Nut A + Red Spool Retainer |
| | | |
| Echo | Curved Shaft | Universal Adaptor + Nut B + Red Spool Retainer |
| | | |
Other models and brands not listed may fit with the use of the universal adaptor, a nut, and the red spool retainer. For these

 units, test the adaptor with each nut to find one that tightens securely. Test the string head to ensure that the string will contact


 the cutter on the grass shield before operating. If the string head does not fit with any of the adaptors or nuts supplied, contact


 Customer Service at 1-800-860-4050 for assistance.


b
A - Hole (trou, agujero)
B - Slot (fente, ranura)
b
A - Slots (fentes, ranuras)
B - Pull line to secure (tirer vers l’extérieur, tire para asegurar)
Fig. 6
A
b
 avertissement :
Pour réduire les risques de blessures, l’utilisateur doit lire et veiller à bien comprendre le manuel d’utilisation du taille- bordures ainsi que cette feuille d’instruction. Toujours porter une protection oculaire certifiée conforme à la norme ANSI Z87.1. S’assurer que l’accessoire est compatible et qu’il est bien installé avant de l’utiliser. Ne pas utiliser cet accessoire si des pièces sont endommagées ou manquantes.
Les taille-bordures de marque Ryobi ou Homelite ne requièrent aucun adaptateur. Pour les autres marques, consulter le tableau « Adaptateurs » afin de connaître la configuration matérielle adéquate pour utiliser la tête de coupe universelle à avance de fil par choc avec le taille- bordures.
lignes soient sortie d’au moins 152 mm (6 po) au-delà de chaque fente.
Aligner les encoch(es) sur le tiroir cylindrique à celles sur le montant de la chaîne. Pousser vers le bas et retourner le tiroir cylindrique vers la direction nécessaire pour aligner les encoch(es).
S’assurer que la tête de coupe et la retenue de bobine sont engagées sur l’arbre moteur. Serrer solidement la retenue de bobine.
Glisser les deux chaînes dans les oeillets et tirer vers l’extérieur pour tourner le tiroir cylindrique dans la position de coupe.
Appuyer sur la retenue de bobine tout en tirant sur la ou les ligne(s) pour les avancer manuellement et vérifier le montage de la tête de coupe.
Installation de la bobine à fil fixe DUAL SPOOL™
Voir les figures 6 et 7.
Arrêter le moteur et débrancher le fil de la bougie.
Retirer la retenue de bobine.
Retirer la bobine et le ressort de la tête de coupe.
Repérer l’indication « LOAD » (CHARGE) sur le dessus |
de la bobine à fil fixe DUAL SPOOL(TM), puis repérer les |
ouvertures situées de chaque côté de la bobine, en dessous |
de l’indication « LOAD ». Placer la bobine à l’intérieur de la |
tête de coupe de manière à ce que les ouvertures situées |
de chaque côté de la bobine soient alignées avec les fentes |
se trouvant sur les côtés de la tête de coupe. S’assurer |
que la bobine est appuyée complètement. |
Réinstaller la retenue de bobine sur la tête de coupe et |
A - Gear head (carter d’engrenages, cabezal de engranajes) B - String head (tête de coupe, cabezal del hilo)
C - Spool retainer (retenue de bobine, retén del carrete)
Fig. 7
A
b
c
 avertissement :
Si un ensemble inapproprié d’adaptateur, d’écrou et de retenue de bobine pour taille-bordures est utilisé, la tête de coupe risque de se détacher du taille-bordures, ce qui peut causer des blessures graves ou des dommages.
INSTALLATION DE LA TÊTE DE COUPE À AVANCE DE FIL PAR CHOC
Voir les figures 1 et 2.
Si seule la ligne est remplacée, voir Installation du fil dans la tête de coupe à alimentation par choc, plus loin dans ce manuel.
Utiliser exclusivement une ligne monofilament de 2,4 mm (0,095 po) de diamètre.
Suivre les instructions décrites dans le manuel d’utilisation du taille-bordures afin de retirer la tête de coupe usée.
S’assurer que les deux lignes sont engagées dans les deux fentes diamétralement opposées. Veiller à ce que les deux
Installation du fil dans la tête de coupe à alimentation par choc
Voir les figures 3 à 5.
Arrêter le moteur et débrancher le fil de la bougie. Maintenir la tête de coupe et tourner la retenue de bobine pour retirer.
Retirer la bobine de la tête de coupe.
NOTE : Laisser le ressort fixé sur la bobine. Retirer la ligne restant éventuellement sur la bobine.
Couper un morceau d’une longueur de 5,4 mm (18 pieds) de chaîne monofilament.
Trouver le centre du morceau de la chaîne. Boucler la chaîne autour de l’agrafe dans le centre du tiroir cylindrique. Bien embobiner dans la direction indiquée sur le dessus du tiroir cylindrique. Près du bout de la chaîne, glisser un bout de la chaîne dans chaque encoche du tiroir cylindrique. Ne pas trop remplir.
Remettre la bobine et sa retenue en place. Voir Installation de la tête de coupe à avance de fil par choc plus haut dans ce manuel.
serrer solidement. |
Installer le fil tel que décrit à la prochaine section de ce |
manuel. |
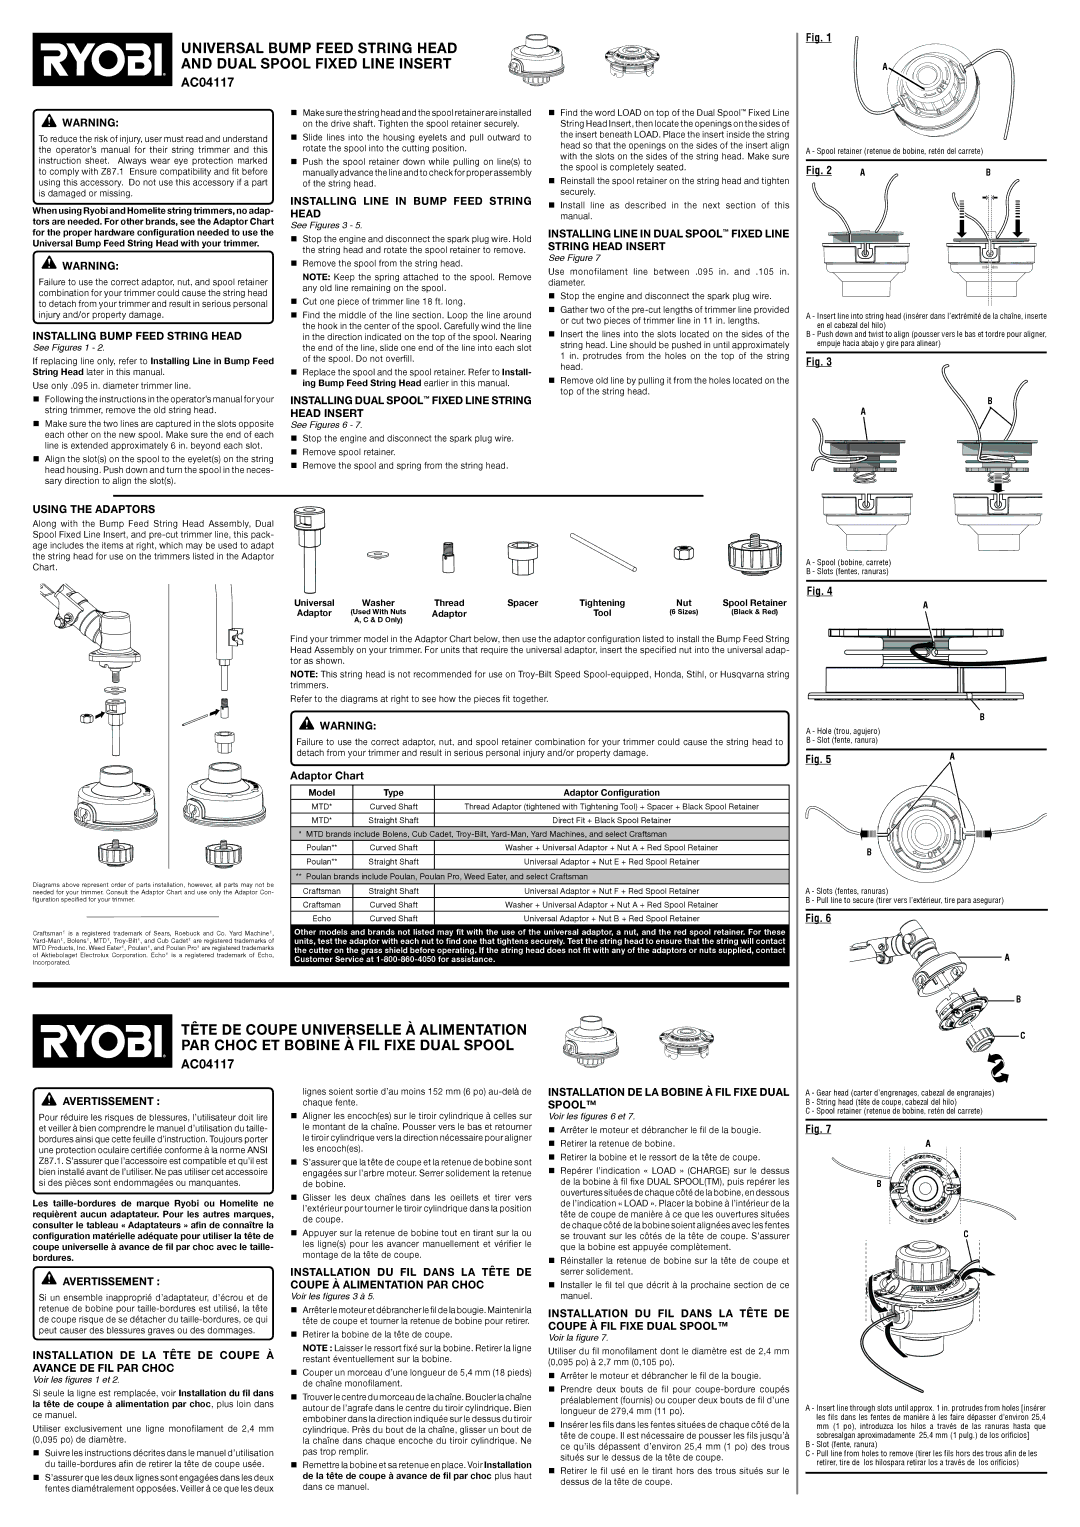
INSTALLATION DU FIL DANS LA TÊTE DE COUPE À FIL FIXE DUAL SPOOL™
Voir la figure 7.
Utiliser du fil monofilament dont le diamètre est de 2,4 mm (0,095 po) à 2,7 mm (0,105 po).
Arrêter le moteur et débrancher le fil de la bougie.
Prendre deux bouts de fil pour coupe-bordure coupés préalablement (fournis) ou couper deux bouts de fil d’une longueur de 279,4 mm (11 po).
Insérer les fils dans les fentes situées de chaque côté de la tête de coupe. Il est nécessaire de pousser les fils jusqu’à ce qu’ils dépassent d’environ 25,4 mm (1 po) des trous situés sur le dessus de la tête de coupe.
Retirer le fil usé en le tirant hors des trous situés sur le dessus de la tête de coupe.
A - Insert line through slots until approx. 1 in. protrudes from holes [insérer les fils dans les fentes de manière à les faire dépasser d’environ 25,4
mm(1 po), introduzca los hilos a través de las ranuras hasta que sobresalgan aproximadamente 25,4 mm (1 pulg.) de los orificios]
B - Slot (fente, ranura)
C - Pull line from holes to remove (tirer les fils hors des trous afin de les retirer, tire de los hilospara retirar los a través de los orificios)