Ryobi RT100 LEG Assembly, Lower Guard Assembly, Switch BOX Assembly, Attach Router to Table

Models: RT100

1 14
Download 14 pages 27.41 Kb
Page 8
Image 8

ASSEMBLY

WARNING:

Your router or router table should never be connected to power supply when you are assembling parts, making adjustments, installing or removing cutters, cleaning, or when not in use. Disconnecting your router and router table will prevent accidental starting that could cause serious personal injury.

LEG ASSEMBLY

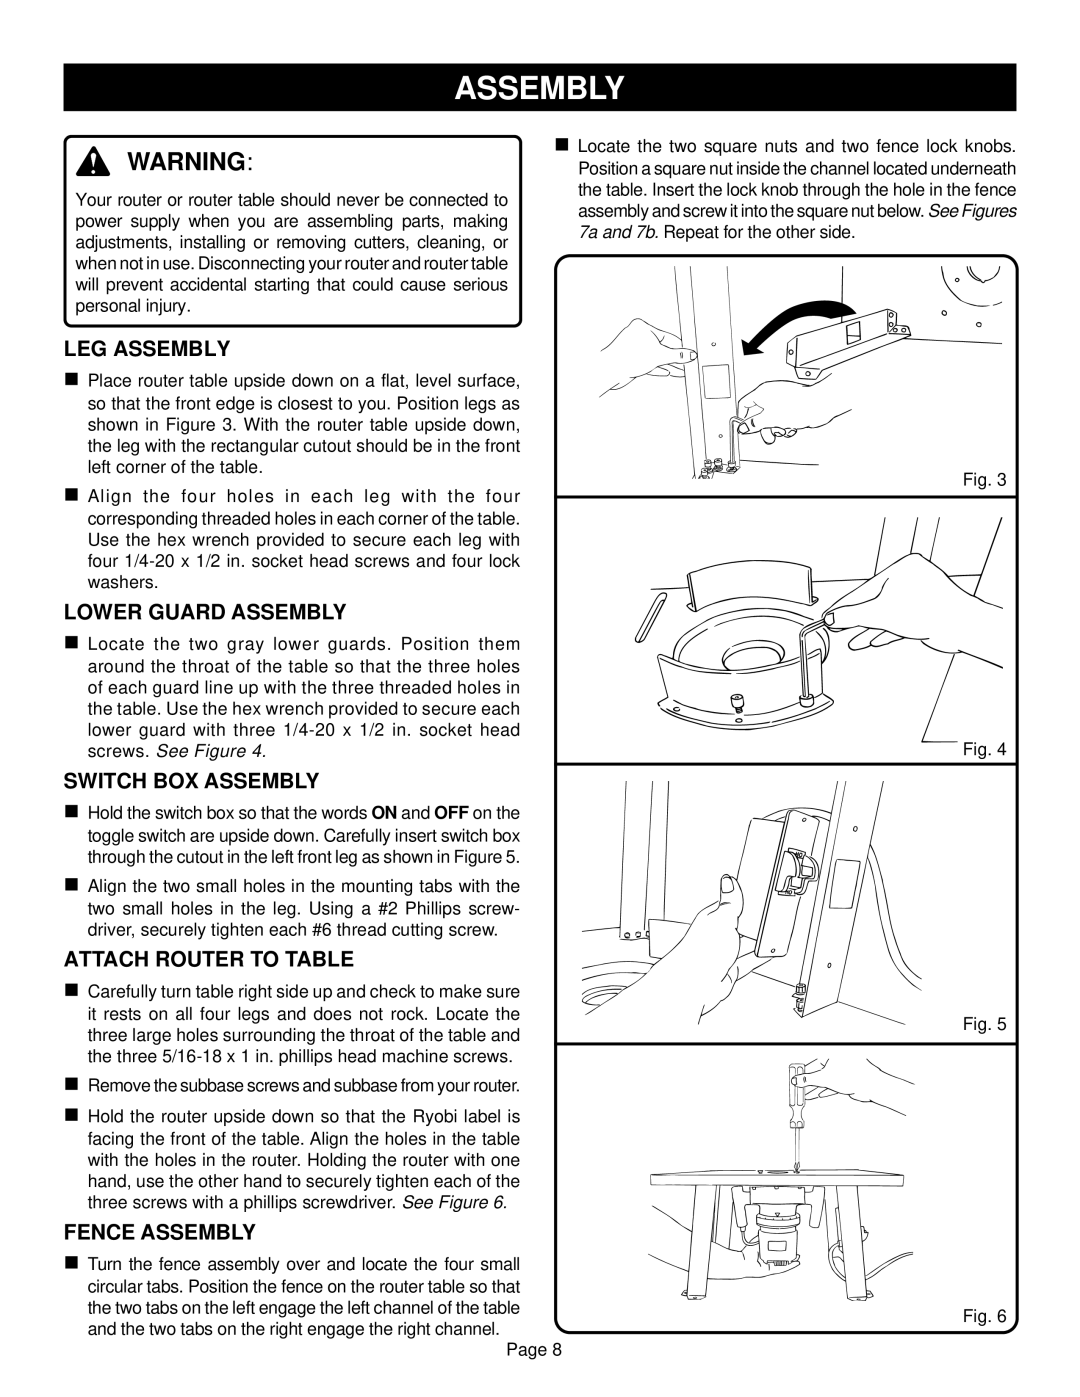
￿Place router table upside down on a flat, level surface, so that the front edge is closest to you. Position legs as shown in Figure 3. With the router table upside down, the leg with the rectangular cutout should be in the front left corner of the table.

￿Align the four holes in each leg with the four corresponding threaded holes in each corner of the table. Use the hex wrench provided to secure each leg with four 1/4-20 x 1/2 in. socket head screws and four lock washers.

LOWER GUARD ASSEMBLY

￿Locate the two gray lower guards. Position them around the throat of the table so that the three holes of each guard line up with the three threaded holes in the table. Use the hex wrench provided to secure each lower guard with three 1/4-20 x 1/2 in. socket head screws. See Figure 4.

￿Locate the two square nuts and two fence lock knobs. Position a square nut inside the channel located underneath the table. Insert the lock knob through the hole in the fence assembly and screw it into the square nut below. See Figures 7a and 7b. Repeat for the other side.

Fig. 3

Fig. 4

SWITCH BOX ASSEMBLY

￿Hold the switch box so that the words ON and OFF on the toggle switch are upside down. Carefully insert switch box through the cutout in the left front leg as shown in Figure 5.

￿Align the two small holes in the mounting tabs with the two small holes in the leg. Using a #2 Phillips screw- driver, securely tighten each #6 thread cutting screw.

ATTACH ROUTER TO TABLE

￿Carefully turn table right side up and check to make sure it rests on all four legs and does not rock. Locate the three large holes surrounding the throat of the table and the three 5/16-18 x 1 in. phillips head machine screws.

￿Remove the subbase screws and subbase from your router.

￿Hold the router upside down so that the Ryobi label is facing the front of the table. Align the holes in the table with the holes in the router. Holding the router with one hand, use the other hand to securely tighten each of the three screws with a phillips screwdriver. See Figure 6.

FENCE ASSEMBLY

￿Turn the fence assembly over and locate the four small circular tabs. Position the fence on the router table so that the two tabs on the left engage the left channel of the table and the two tabs on the right engage the right channel.

Page 8

Fig. 5

Fig. 6

Page 8
Image 8
Ryobi RT100 warranty LEG Assembly, Lower Guard Assembly, Switch BOX Assembly, Attach Router to Table

RT100 specifications

The Ryobi RT100 is a versatile and powerful tool designed for homeowners and DIY enthusiasts seeking an efficient and reliable solution for various outdoor tasks. Combining innovative technology with practical features, the RT100 stands out as a go-to choice for those needing a robust lawn care machine.

One of the main features of the Ryobi RT100 is its electric start, providing simplicity and ease of operation. Gone are the days of struggling with pull cords; users can easily initiate the engine with the push of a button. This electric start capability also means less physical effort is required, allowing users to focus more on their tasks.

The RT100 is powered by a high-performance OHV engine that delivers plenty of torque for tackling tough jobs, from cutting tall grass to clearing thicker brush. With its adjustable cut height, users can easily customize the mowing experience to achieve their desired lawn look. Whether you prefer a close cut or a taller grass finish, this machine can accommodate your needs.

A distinctive aspect of the Ryobi RT100 is its lightweight design, ensuring easy maneuverability around the yard. The machine's compact build allows for effortless navigation in tight spaces, making it perfect for smaller lawns or intricate garden layouts.

Another significant characteristic is its dual blade system, which improves cutting efficiency and provides a cleaner cut. This technology not only enhances performance but also promotes a healthier lawn by ensuring an even and consistent grass height. Users can expect reduced clumping and improved grass health as a result.

Additionally, the RT100 features a durable steel deck, ensuring long-lasting performance even in challenging conditions. The sturdy construction protects the mower from wear and tear, making it a wise investment for years of reliable service.

Convenience is further enhanced with features like an integrated grass bagger that collects clippings for easy disposal, reducing the need for additional clean-up after mowing.

Overall, the Ryobi RT100 represents a perfect blend of technology, efficiency, and user-friendly design. Ideal for various lawn maintenance tasks, it empowers users to take greater control over their outdoor spaces while minimizing effort and maximizing results. Whether you’re dealing with regular lawn care or seasonal tasks, the Ryobi RT100 is built to perform, making it a valuable addition to any homeowner's toolkit.