ASSEMBLY
SQUARING THE BLADE TO THE FENCE
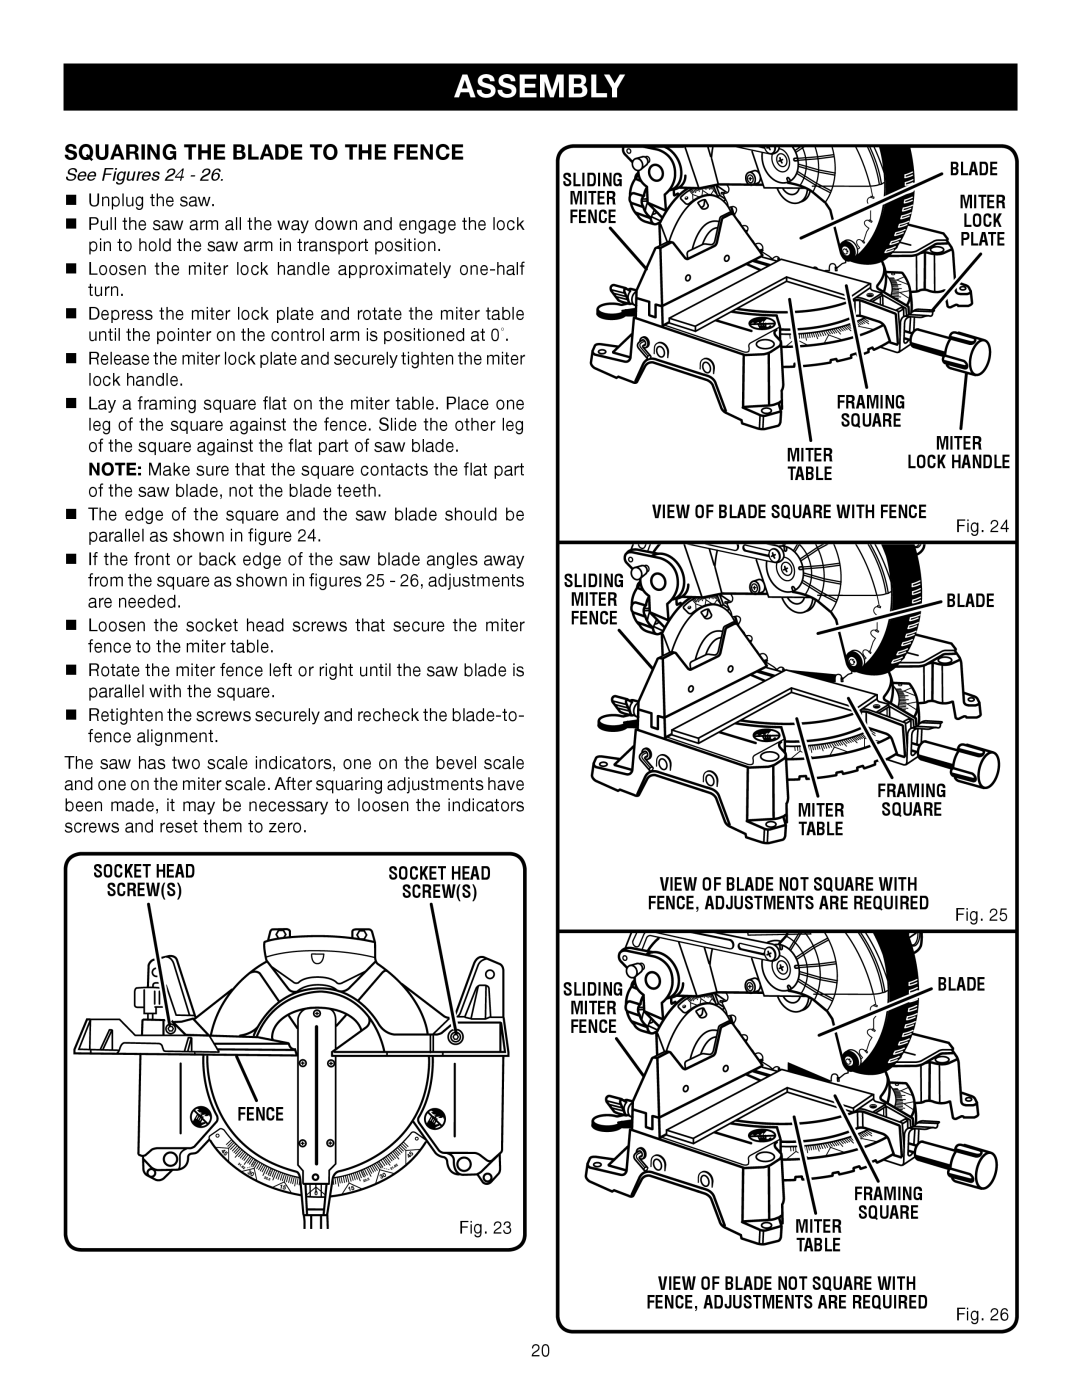
See Figures 24 - 26.
nUnplug the saw.
nPull the saw arm all the way down and engage the lock pin to hold the saw arm in transport position.
nLoosen the miter lock handle approximately
nDepress the miter lock plate and rotate the miter table until the pointer on the control arm is positioned at 0°.
nRelease the miter lock plate and securely tighten the miter lock handle.
nLay a framing square flat on the miter table. Place one leg of the square against the fence. Slide the other leg of the square against the flat part of saw blade.
NOTE: Make sure that the square contacts the flat part of the saw blade, not the blade teeth.
nThe edge of the square and the saw blade should be parallel as shown in figure 24.
nIf the front or back edge of the saw blade angles away from the square as shown in figures 25 - 26, adjustments are needed.
nLoosen the socket head screws that secure the miter fence to the miter table.
nRotate the miter fence left or right until the saw blade is parallel with the square.
nRetighten the screws securely and recheck the
The saw has two scale indicators, one on the bevel scale and one on the miter scale. After squaring adjustments have been made, it may be necessary to loosen the indicators screws and reset them to zero.
SOCKET HEAD | SOCKET HEAD |
SCREW(S) | SCREW(S) |
FENCE
Fig. 23
SLIDING | BLADE |
| |
MITER | MITER |
FENCE | LOCK |
| PLATE |
|
| FRAMING |
|
|
| SQUARE |
|
| MITER |
| MITER |
| LOCK HANDLE | ||
| TABLE | ||
|
|
| |
| VIEW OF BLADE SQUARE WITH FENCE | Fig. 24 | |
|
|
| |
SLIDING |
|
|
|
MITER |
|
| BLADE |
FENCE |
|
|
|
| FRAMING |
|
MITER | SQUARE |
|
TABLE |
|
|
VIEW OF BLADE NOT SQUARE WITH |
| |
FENCE, ADJUSTMENTS ARE REQUIRED | Fig. 25 | |
|
| |
SLIDING | BLADE | |
MITER |
|
|
FENCE |
|
|
FRAMING |
|
MITER SQUARE |
|
TABLE |
|
VIEW OF BLADE NOT SQUARE WITH |
|
FENCE, ADJUSTMENTS ARE REQUIRED | Fig. 26 |
|
20
