Keep These Instructions for Future Use
•Lay out and identify all parts.
•Do not return this product to the place of purchase. If any parts are missing, or if you are having difficulty using product visit our web site at www.safety1st.com. Or call Consumer Relations at (800)
Guarde estas instrucciones para consulta futura
•Despliegue e identifique todas las piezas.
•No devuelva este producto al lugar donde lo compró. Si faltase alguna pieza o si tiene dificultad para usar el producto visite nuestro sitio web en www.safety1st.com. O llame a Relaciones con el Consumidor al
(800)
Installing Your | Cómo instalar el Monitor |
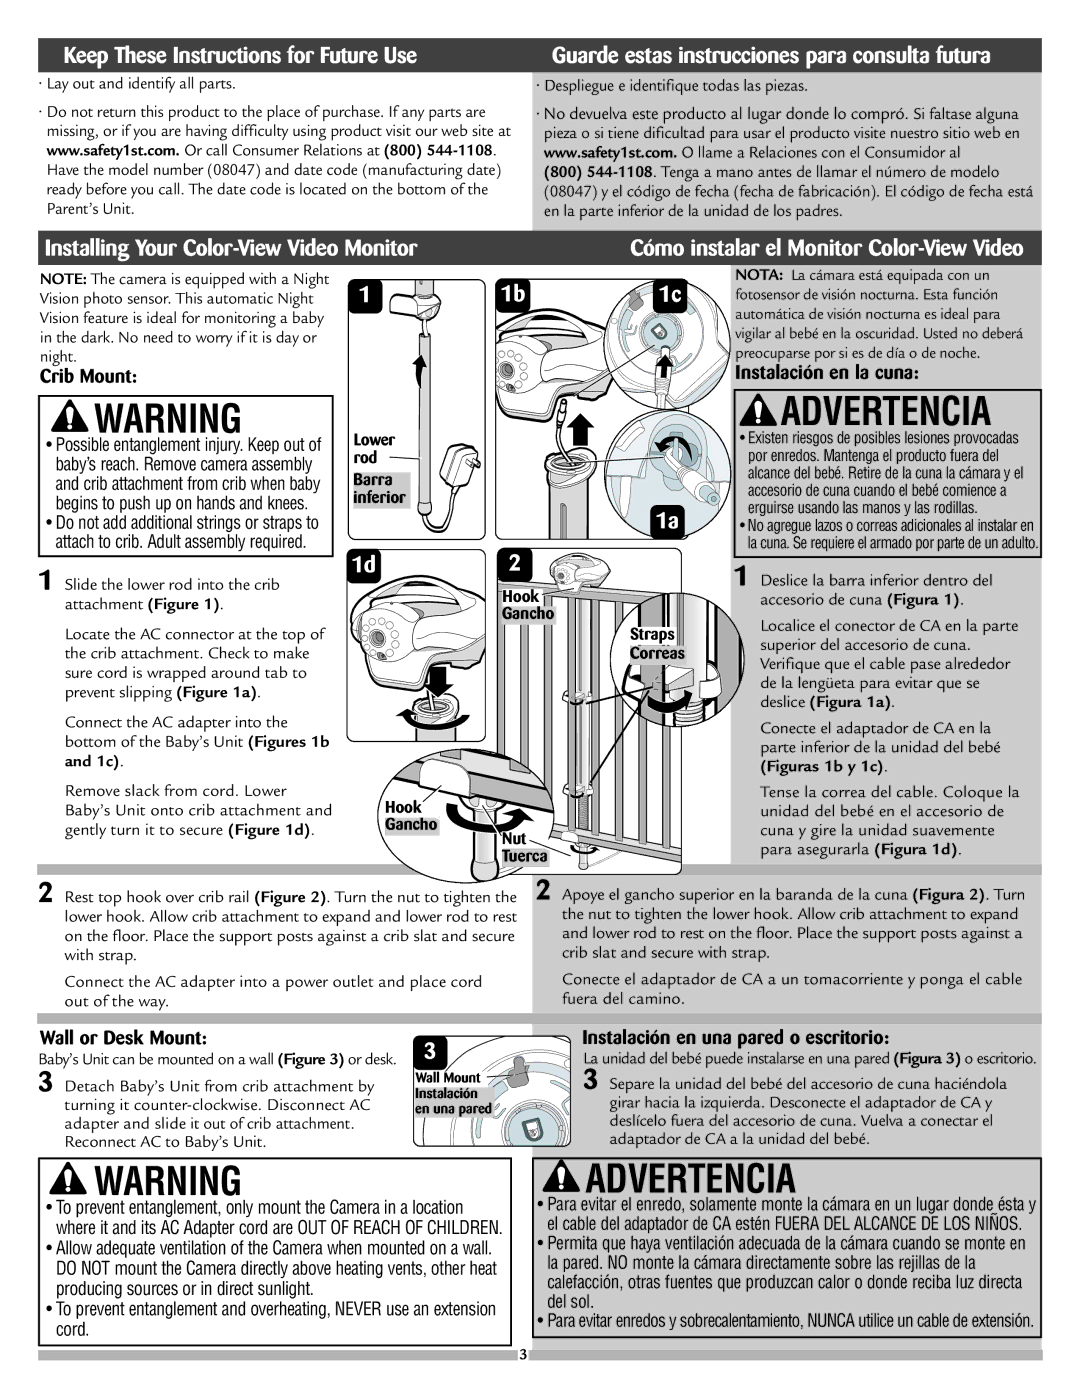
NOTE: The camera is equipped with a Night
Vision photo sensor. This automatic Night 1 Vision feature is ideal for monitoring a baby
in the dark. No need to worry if it is day or night.
Crib Mount:
1b | 1c | NOTA: La cámara está equipada con un |
fotosensor de visión nocturna. Esta función | ||
|
| automática de visión nocturna es ideal para |
|
| vigilar al bebé en la oscuridad. Usted no deberá |
1a |
| preocuparse por si es de día o de noche. |
| Instalación en la cuna: | |
|
|
![]() WARNING
WARNING
•Possible entanglement injury. Keep out of baby’s reach. Remove camera assembly and crib attachment from crib when baby begins to push up on hands and knees.
•Do not add additional strings or straps to attach to crib. Adult assembly required.
1 Slide the lower rod into the crib attachment (Figure 1).
Locate the AC connector at the top of the crib attachment. Check to make sure cord is wrapped around tab to prevent slipping (Figure 1a).
Lower rod
Barra inferior
1a
1d2
Hook![]()
Gancho
Straps![]()
Correas
 ADVERTENCIA
•Existen riesgos de posibles lesiones provocadas por enredos. Mantenga el producto fuera del alcance del bebé. Retire de la cuna la cámara y el accesorio de cuna cuando el bebé comience a erguirse usando las manos y las rodillas.
•No agregue lazos o correas adicionales al instalar en la cuna. Se requiere el armado por parte de un adulto.
1 Deslice la barra inferior dentro del accesorio de cuna (Figura 1).
Localice el conector de CA en la parte superior del accesorio de cuna. Verifique que el cable pase alrededor de la lengüeta para evitar que se deslice (Figura 1a).
Connect the AC adapter into the bottom of the Baby’s Unit (Figures 1b and 1c).
Remove slack from cord. Lower Baby’s Unit onto crib attachment and gently turn it to secure (Figure 1d).
Hook 
Gancho
Nut
 Tuerca
Conecte el adaptador de CA en la parte inferior de la unidad del bebé (Figuras 1b y 1c).
Tense la correa del cable. Coloque la unidad del bebé en el accesorio de cuna y gire la unidad suavemente para asegurarla (Figura 1d).
2 Rest top hook over crib rail (Figure 2). Turn the nut to tighten the | 2 Apoye el gancho superior en la baranda de la cuna (Figura 2). Turn |
lower hook. Allow crib attachment to expand and lower rod to rest | the nut to tighten the lower hook. Allow crib attachment to expand |
on the floor. Place the support posts against a crib slat and secure | and lower rod to rest on the floor. Place the support posts against a |
with strap. | crib slat and secure with strap. |
Connect the AC adapter into a power outlet and place cord | Conecte el adaptador de CA a un tomacorriente y ponga el cable |
out of the way. | fuera del camino. |
Wall or Desk Mount:
Baby’s Unit can be mounted on a wall (Figure 3) or desk.
3 Detach Baby’s Unit from crib attachment by turning it
Reconnect AC to Baby’s Unit.
3
Wall Mount ![]()
![]() Instalación
Instalación
en una pared
Instalación en una pared o escritorio:
La unidad del bebé puede instalarse en una pared (Figura 3) o escritorio.
3 Separe la unidad del bebé del accesorio de cuna haciéndola girar hacia la izquierda. Desconecte el adaptador de CA y deslícelo fuera del accesorio de cuna. Vuelva a conectar el adaptador de CA a la unidad del bebé.
![]() WARNING
WARNING
•To prevent entanglement, only mount the Camera in a location where it and its AC Adapter cord are OUT OF REACH OF CHILDREN.
•Allow adequate ventilation of the Camera when mounted on a wall. DO NOT mount the Camera directly above heating vents, other heat producing sources or in direct sunlight.
•To prevent entanglement and overheating, NEVER use an extension cord.
 ADVERTENCIA
•Para evitar el enredo, solamente monte la cámara en un lugar donde ésta y el cable del adaptador de CA estén FUERA DEL ALCANCE DE LOS NIÑOS.
•Permita que haya ventilación adecuada de la cámara cuando se monte en la pared. NO monte la cámara directamente sobre las rejillas de la calefacción, otras fuentes que produzcan calor o donde reciba luz directa del sol.
•Para evitar enredos y sobrecalentamiento, NUNCA utilice un cable de extensión.
3