Step 5: Remote Control
Remote Control Buttons and Functions
✎✎This is a special remote control for the visually impaired and has Braille points on the Power, Channel and Volume buttons.
Step 6: Media Play Features
The Media Play feature lets you connect to your PC through your home network and stream PC audio and video files to your HDTV using your remote. To use IPTV or Samsung PC Share Manager, you must connect your TV to your network. You can attach the TV to your network in two ways, by cable, using CAT 5 cable, or wirelessly, using a Samsung Wireless LAN Adapter. Instructions for both connection methods are below.
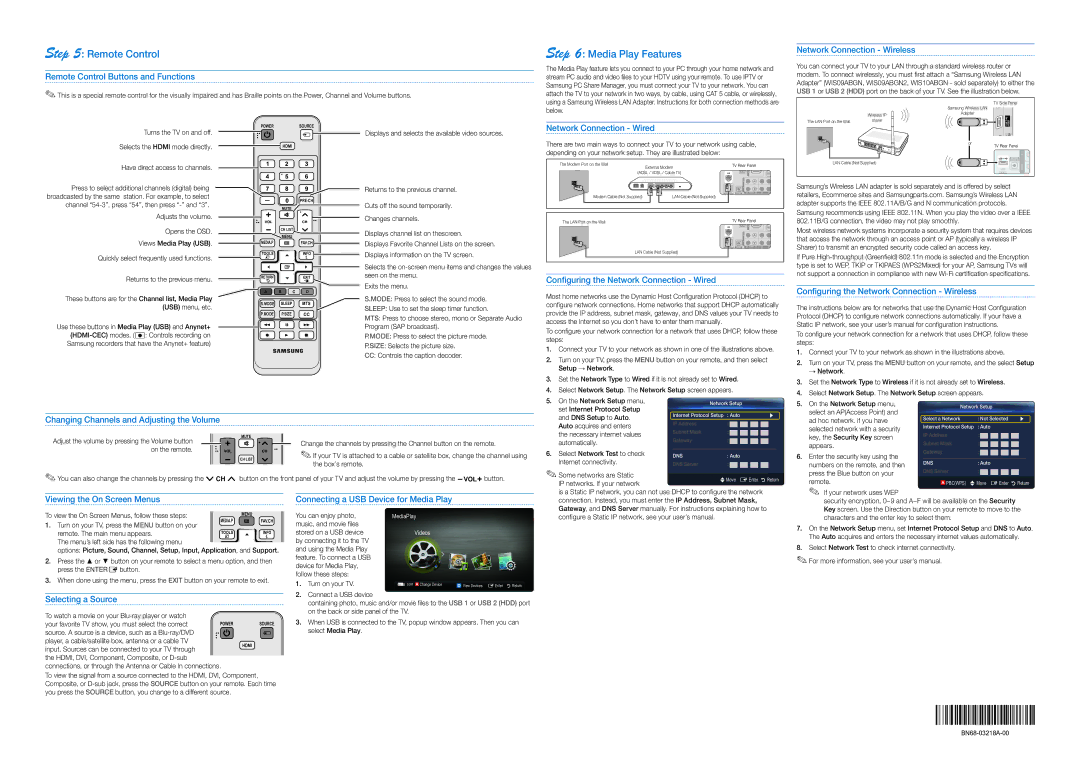
Network Connection - Wireless
You can connect your TV to your LAN through a standard wireless router or modem. To connect wirelessly, you must first attach a “Samsung Wireless LAN Adapter” (WIS09ABGN, WIS09ABGN2, WIS10ABGN - sold separately) to either the USB 1 or USB 2 (HDD) port on the back of your TV. See the illustration below.
| | TV Side Panel |
| | Samsung Wireless LAN |
| Wireless IP | Adapter |
| |
The LAN Port on the Wall | sharer | |
Turns the TV on and off.
Selects the HDMI mode directly.
Have direct access to channels.
Press to select additional channels (digital) being broadcasted by the same station. For example, to select channel “54-3”, press “54”, then press “-” and “3”.
Adjusts the volume.
Opens the OSD.
Views Media Play (USB).
Quickly select frequently used functions.
Returns to the previous menu.
These buttons are for the Channel list, Media Play (USB) menu, etc.
Use these buttons in Media Play (USB) and Anynet+ (HDMI-CEC) modes. (�: Controls recording on Samsung recorders that have the Anynet+ feature)
POWER SOURCE
HDMI
PRE-CH
MUTE
CH LIST
MENU
MEDIA.P FAV.CH
TOOLSINFO
RETURNEXIT
A B C D
S.MODE SLEEP MTS
P.MODE P.SIZE CC
Displays and selects the available video sources.
Returns to the previous channel.
Cuts off the sound temporarily.
Changes channels.
Displays channel list on thescreen.
Displays Favorite Channel Lists on the screen. Displays information on the TV screen.
Selects the on-screen menu items and changes the values seen on the menu.
Exits the menu.
S.MODE: Press to select the sound mode.
SLEEP: Use to set the sleep timer function.
MTS: Press to choose stereo, mono or Separate Audio Program (SAP broadcast).
P.MODE: Press to select the picture mode.
P.SIZE: Selects the picture size.
CC: Controls the caption decoder.
Network Connection - Wired
There are two main ways to connect your TV to your network using cable, depending on your network setup. They are illustrated below:
The Modem Port on the Wall | External Modem | TV Rear Panel |
| |
(ADSL / VDSL / Cable TV) | |
Modem Cable (Not Supplied) | LAN Cable (Not Supplied) | |
The LAN Port on the Wall | TV Rear Panel |
| LAN Cable (Not Supplied) |
Configuring the Network Connection - Wired
Most home networks use the Dynamic Host Configuration Protocol (DHCP) to configure network connections. Home networks that support DHCP automatically provide the IP address, subnet mask, gateway, and DNS values your TV needs to access the Internet so you don’t have to enter them manually.
To configure your network connection for a network that uses DHCP, follow these steps:
1.Connect your TV to your network as shown in one of the illustrations above.
2.Turn on your TV, press the MENU button on your remote, and then select Setup → Network.
3.Set the Network Type to Wired if it is not already set to Wired.
4.Select Network Setup. The Network Setup screen appears.
| | or | TV Rear Panel |
| | |
| | | | |
LAN Cable (Not Supplied) | | | | |
| | |
| | | | | |
Samsung’s Wireless LAN adapter is sold separately and is offered by select retailers, Ecommerce sites and Samsungparts.com. Samsung’s Wireless LAN adapter supports the IEEE 802.11A/B/G and N communication protocols.
Samsung recommends using IEEE 802.11N. When you play the video over a IEEE 802.11B/G connection, the video may not play smoothly.
Most wireless network systems incorporate a security system that requires devices that access the network through an access point or AP (typically a wireless IP Sharer) to transmit an encrypted security code called an access key.
If Pure High-throughput (Greenfield) 802.11n mode is selected and the Encryption type is set to WEP, TKIP or TKIPAES (WPS2Mixed) for your AP, Samsung TVs will not support a connection in compliance with new Wi-Fi certification specifications.
Configuring the Network Connection - Wireless
The instructions below are for networks that use the Dynamic Host Configuration Protocol (DHCP) to configure network connections automatically. If your have a Static IP network, see your user’s manual for configuration instructions.
To configure your network connection for a network that uses DHCP, follow these steps:
1.Connect your TV to your network as shown in the illustrations above.
2.Turn on your TV, press the MENU button on your remote, and the select Setup
→ Network.
3.Set the Network Type to Wireless if it is not already set to Wireless.
4.Select Network Setup. The Network Setup screen appears.
Viewing the On Screen Menus
To view the On Screen Menus, follow these steps: | MEDIA.P | MENU |
1. Turn on your TV, press the MENU button on your | FAV.CH |
| |
remote. The main menu appears. | TOOLS | INFO |
The menu’s left side has the following menu
options: Picture, Sound, Channel, Setup, Input, Application, and Support.
2.Press the ▲ or ▼ button on your remote to select a menu option, and then press the ENTEREbutton.
3.When done using the menu, press the EXIT button on your remote to exit.
Selecting a Source
To watch a movie on your Blu-ray player or watch | | |
your favorite TV show, you must select the correct | POWER | SOURCE |
| source. A source is a device, such as a Blu-ray/DVD | |
| |
| |
| player, a cable/satellite box, antenna or a cable TV | HDMI |
| input. Sources can be connected to your TV through |
| |
| the HDMI, DVI, Component, Composite, or D-sub | |
| connections, or through the Antenna or Cable In connections. | |
To view the signal from a source connected to the HDMI, DVI, Component, Composite, or D-sub jack, press the SOURCE button on your remote. Each time you press the SOURCE button, you change to a different source.
Connecting a USB Device for Media Play
You can enjoy photo, | MediaPlay | | |
music, and movie files | | | | | |
stored on a USB device | Videos | | |
by connecting it to the TV | | | | | |
and using the Media Play | | | | | |
feature. To connect a USB | | | | | |
device for Media Play, | | | | | |
follow these steps: | | | | | |
1. Turn on your TV. | SUM | | Change Device | | View Devices EEnter RReturn |
2.Connect a USB device
containing photo, music and/or movie files to the USB 1 or USB 2 (HDD) port on the back or side panel of the TV.
3.When USB is connected to the TV, popup window appears. Then you can select Media Play.
connection. Instead, you must enter the IP Address, Subnet Mask, Gateway, and DNS Server manually. For instructions explaining how to configure a Static IP network, see your user’s manual.
security encryption, 0~9 and A~F will be available on the Security Key screen. Use the Direction button on your remote to move to the characters and the enter key to select them.
7.On the Network Setup menu, set Internet Protocol Setup and DNS to Auto. The Auto acquires and enters the necessary internet values automatically.
8.Select Network Test to check internet connectivity.
✎✎For more information, see your user’s manual.